PuTTY is Linux terminal emulator, serial console and network file transfer application that can connect Windows operating systems and remote devices like the Raspberry Pi.
Table of contents
Introduction to PuTTY and the Raspberry Pi
“PuTTY is an SSH and telnet client, developed originally by Simon Tatham for the Windows platform. PuTTY is open-source software that is available with source code and is developed and supported by a group of volunteers.” — putty.org
This post was inspired by using PuTTY to connect to a Raspberry Pi running Raspbian, OpenELEC or RetroPie. Before using PuTTY to connect to a Raspberry Pi, it needs to be downloaded, installed and configured.
- Get the Raspberry Pi 4B 4GB Starter Kit from Amazon.com
- Get the Raspberry Pi 4B 8GB Starter Kit from Amazon.com
- Get the LG 22MK430H-B 21.5″ Full HD Monitor from Amazon.com
- Get the Corsair K95 RGB Platinum XT Mechanical Gaming Keyboard from Amazon.com
PuTTY and the Raspberry Pi
Apart from various other functions, PuTTY can be used to establish a secure command-line interface (CLI) between a Windows desktop and a remote Linux-based operating system. Connections can be secured using SSH (secure shell or secure socket shell).
By logging in using the Raspberry Pi’s username and password, the connected device can have access to various terminal commands which can be used to download and maintain packages (e.g. apt-get commands), change configuration files (e.g. raspi-config), and create and edit directories and files — all from a remote location.

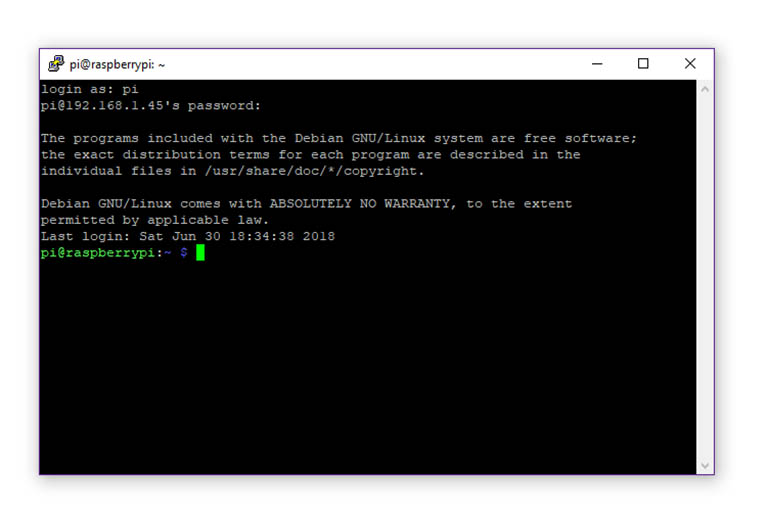
The PuTTY terminal window from Windows 10 after the remote device’s username and password have been entered. In this case, the remote device was a Raspberry Pi and the remote operating system was Raspbian. The window/connection can be closed by using the ‘exit’ terminal command.
Understanding some common network protocols such as SSH and SCP
Basics of installing an operating system on a Raspberry Pi
Installing Kodi on a Raspberry Pi
Getting started with RetroPie on the Raspberry Pi
Why use PuTTY to connect to a Raspberry Pi?
Raspberry Pis are popular to use as small, standalone devices on a network. By using PuTTY, the need for these devices to have a keyboard, mouse and screen is reduced to only their setup phases. After an IP address has been obtained, PuTTY can be used from a remote computer to have full access via a terminal.
PuTTY and WinSCP
Both PuTTY and WinSCP can be installed in Windows. PuTTY used together with WinSCP will extend remote access to a user-friendly file copy interface. WinSCP uses SCP and functions as a visual representation of the directory and file structures.
Requirements for using PuTTY
- The Raspberry Pi and the remote computer needs to be connected to the same local network.
- The Raspberry Pi has SSH enabled. Some Raspbian distributions have SSH enabled by default but can be configured using the Raspi-config tool.
- The IP address of the Raspberry Pi is known. It can be obtained by using the following terminal command:
hostname -I
- (Optional) Although a static IP address for the Raspberry Pi is not required, it is recommended. A static IP will standardise the address used to access the Raspberry Pi.
Raspberry Pi first-time setup (Raspi-config tool)
Things you’ll need for your first Raspberry Pi build
Setting a static IP on the Raspberry Pi and Raspbian
Setting a static IP on the Raspberry Pi using Wi-Fi and Raspbian
3 ways to connect a Raspberry Pi 3 to a network using Wi-Fi
Download, install & configure PuTTY
Putty is available for download and installation on Windows and UNIX-based operating systems. For Microsoft Windows users, simply run the downloaded file by double-clicking on it and following the on-screen instructions.
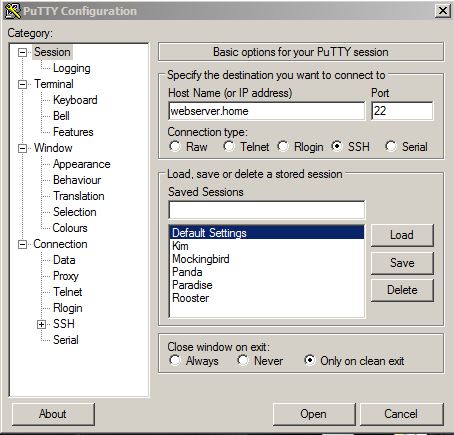
The first time PuTTY is opened there will be no Saved Sessions. A saved session is basically a name given to a group of settings (including the IP address, connection type and close window on exit method for the remote Raspberry Pi).
Under Host Name, enter the IP address of the Raspberry Pi, leave the port to 22, make sure SSH is selected and give it a name under Saved Sessions, then click the Save button. Multiple Saved Sessions to different Raspberry Pis can be created.

PuTTY Configuration screen (main screen) where the Connection type and Sessions are loaded and saved.
In this case, Kim, Mockingbird, Panda, etc. are all saved sessions to different Raspberry Pis.
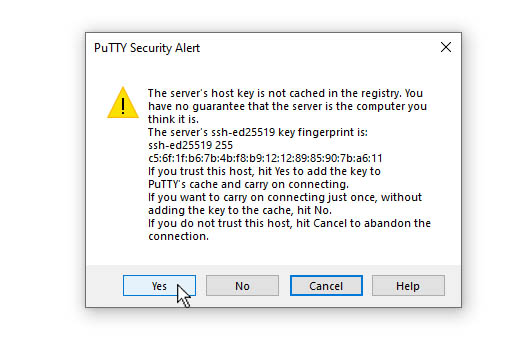
By double-clicking on the Saved Session name, the Raspberry Pi’s terminal will open. During the first connection, PuTTY will obtain the host key from the Raspberry Pi, which will probably cause a security alert to pop up.

Click Yes to continue with the connection.
For Raspbian, the default username and password is pi and raspberry.
The settings can be changed by selecting the applicable Saved Session and pressing the Load button. After changing the settings it needs to be saved again.
Although PuTTY is mainly a Telnet and SSH client, other connection types including Raw, Rlogin, and serial can also be used to connect to other devices.
PuTTY alternatives
PuTTY makes it easy to establish a non-intimidating, CLI between a personal computer and a Raspberry Pi. As mentioned earlier, its main connection method is SSH. An alternative for using PuTTY is using the Windows Command Prompt (searchable from the Windows search icon).
To use the Windows Command Prompt to connect to a Raspberry Pi, the SSH command can be used as follows:
ssh <USERNAME>@<IP ADDRESS>
where <USERNAME> is the username and <IP ADDRESS> is the IP address of the remote Raspberry Pi, e.g.:
ssh pi@192.168.1.xx
After the command was entered, the SSH command will ask for the password of the Raspberry Pi. The default password for Raspbian is raspberry.
Using PuTTY to connect to OpenELEC & XBMC (Kodi)
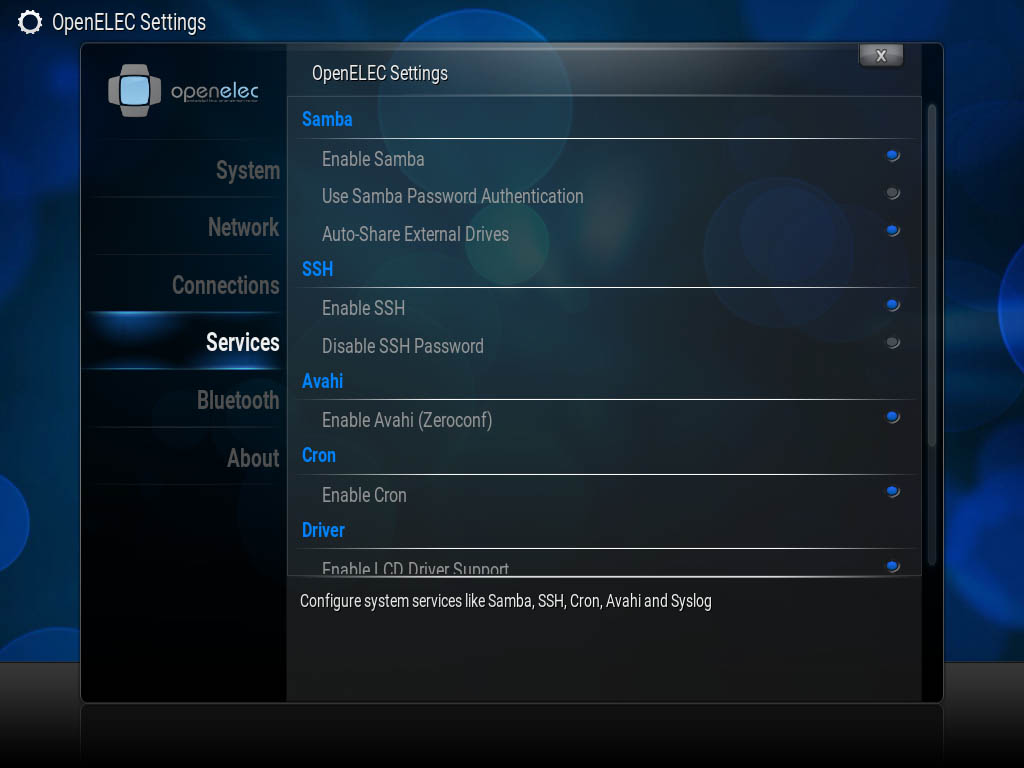
Kodi might not have SSH enabled. SSH can be enabled from the Services section by going to Settings -> OpenELEC -> Settings (do not change the username and password settings for now). A reboot might be required.
The default username and password for OpenELEC is root and openelec and root without a password for XBMC.
Using PuTTY to connect to RetroPie
To use PuTTY to connect to RetroPie, SSH needs to be enabled from the RetroPie Configuration screen. This is done by choosing RASPI-CONFIG-> 5 Interfacing Options -> P2 SSH.
The default username and password for RetroPie is pi and raspberry.
Conclusion
This post discussed using PuTTY to connect to a Raspberry Pi. PuTTY is a great tool for accessing a Raspberry Pi through a terminal-like interface from a remote Windows computer.
PuTTY is free and easy to install and configure. By using PuTTY, the Raspberry Pi can be used as a stand-alone device on a local network. PuTTY is often used in combination with WinSCP.


