

RetroPie is a feature-rich, all-in-one retro game emulation operating system for the Raspberry Pi. Here we show how to get started with RetroPie on a Raspberry Pi.
Table of contents
Introduction to RetroPie on a Raspberry Pi
RetroPie is a free, software utility that combines all the tools required to run games and applications on a Raspberry Pi. Its main focus is running retro games and uses EmulationStation as the graphical user interface (GUI).
By getting started with RetroPie on Raspberry Pi, the user will be able to collect all the required parts, create a MicroSD card with RetroPie, get an overall understanding of how RetroPie works, do the basic configuration required, add an emulator, copy ROMs and start using RetroPie.
RetroPie can be installed in one of two ways:
- as a Debian-based operating system
- as an application on Raspbian
As an operating system, RetroPie manages all OS-related settings through the Raspi-config tool and other Linux bootup files.
This post will cover installing RetroPie as a Debian-based operating system.
The latest version of RetroPie tested was 4.8 (released 14 March 2022).
EmulationStation is an emulator, game and App launcher that also manages controller and keyboard support. It is not an emulator itself. EmulationStation also provides access to the RetroPie configuration settings.
Emulators are the different (pre-installed or additional-installed) ‘programs’ or ‘cores’ on the RetroPie system. The emulators run the ROMs.
Libretro is the framework for the emulators and ‘libretro cores’ are the emulators themselves. It makes up a large portion of the emulators on RetroPie.
RetroArch is the frontend or GUI for Libretro.
ROMs (e.g. ROM images or ROM files) are computer files that contain a copy of the data from a read-only memory chip, i.e. the games.
No ROMs are included in RetroPie, but we will be using some free, example ROMS in this post.
- Get the CanaKit Raspberry Pi 4B 8GB Starter Kit from Amazon.com
- Get the GeeekPi Raspberry Pi 4B 4GB Starter Kit from Amazon.com
- Get the 8BitDo SN30 Pro USB Gamepad from Amazon.com
- Get the 8BitDo SN30 Pro Bluetooth Gamepad from Amazon.com
What you need to get started with RetroPie
Apart from a Raspberry Pi, the following components will also be required:
- keyboard and HDMI monitor or screen
- appropriately sized MicroSD card and SD card reader
- PC connected to the internet
- Game controller (optional)
Raspberry Pi (model B)
A fully functional Raspberry Pi 2B, 3B/B+ or 4B with at least a keyboard and a screen connected to it. The B models are preferred because of their Ethernet connectivity. A wireless keyboard and mouse can also be used.
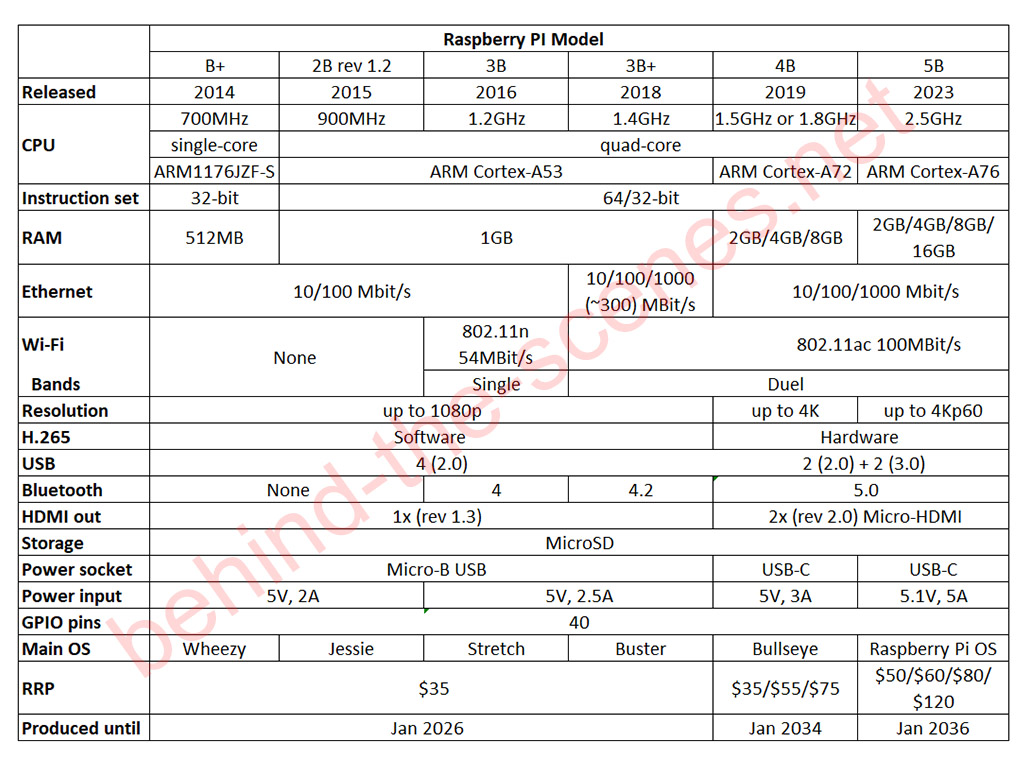
Comparing all the Raspberry Pi B models up to date. The Raspberry Pi 4B and 5B are, of course, the better choices.
We used a 2019 Raspberry Pi 4B with 4GB of RAM
MicroSD card
To install RetroPie as an operating system a MicroSD card will be required. The minimum MicroSD card size required for RetroPie is 4GB.
The RetroPie operating system is installed on a MicroSD card before it is inserted into the MicroSD card slot of the Raspberry Pi.
A 4GB MicroSD card will have enough space if only a few emulators and game ROMs are going to be stored. 16GB and 32GB MicroSD cards will have more than enough space for hundreds of ROMs, but are more expensive. For CD and DVD-ROM files (e.g. for PlayStation emulation) 64GB, or even 128GB MicroSD cards are recommended.
Irrespective of the size of the MicroSD card, the fastest available card (i.e. Class 10 or faster) is recommended.
SD card reader and PC
To install RetroPie as an operating system a PC connected to the internet and an SD card reader will be required. A PC is also required to format a USB flash drive.
- Get the HAMA 8-in-1 SD Card Reader from Amazon.com or BangGood
- Get the SAMSUNG MicroSDHC EVO Memory Card (various sizes) from Amazon.com
- Get the SanDisk Ultra MicroSDHC Memory Card (various sizes) from Amazon.com
Internet connection
An internet connection is required to download the image files onto a PC before they are written to the MicroSD card.
After RetroPie has been fully configured on the Raspberry Pi, an internet connection is optional but necessary for proper updating and ‘net play’. WiFi or Ethernet will do.
Game controller
Although not completely necessary, a game controller comes highly recommended. A keyboard can also be used. There are many game controllers to choose from. Most USB and Bluetooth game controllers will work with the Raspberry Pi.
Our go-to game controller for RetroPie is the Logitech F310 gamepad. Other compatible game controllers can be swapped out depending on the system being emulated.

The Logitech F310 USB gamepad is our go-to game controller for RetroPie.
Installing RetroPie on a Raspberry Pi
The RetroPie OS is built on top of Raspberry Pi OS Lite (without the PIXEL desktop environment). It can either be installed onto a MicroSD card using the Raspberry Pi Imager or installed using the appropriate RetroPie image file in combination with an SD card formatting tool and a disk imaging tool. While updating this post, Raspberry Pi Imager version 1.8.5 was used.

Installing RetroPie OS using the Raspberry Pi Disk Imager.
On the Raspberry Pi Imager, RetroPie is situated under the Emulation and game OS main menu item.
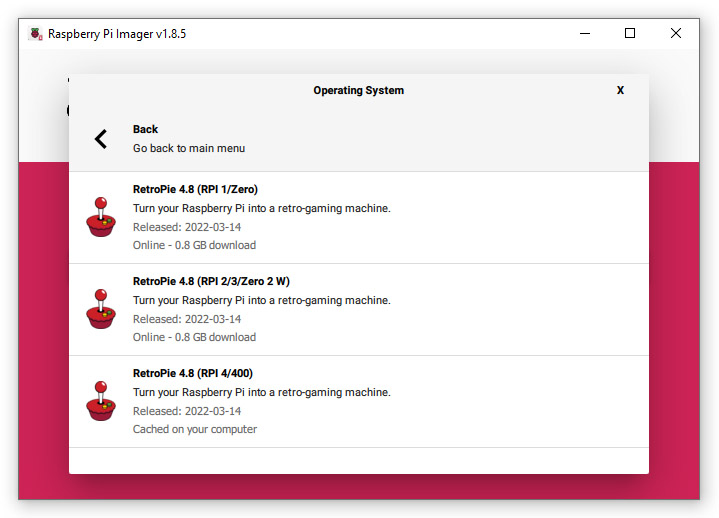
RetroPie images for different models of Raspberry Pis
The first RetroPie boot
After the MicroSD card is inserted into the Raspberry Pi and it is switched on for the first time, RetroPie will enlarge the main boot partition on SD card and reboot again. After this, RetroPie will boot into EmulationStation.
For the Raspberry Pi to display, the monitor/screen needs to be switched on already and be ready to accept signals from its HDMI port. If there is no signal during the first boot, try switching the monitor/screen on the appropriate HDMI port first and maybe the second boot will display. If there is still no display after this, wait for at least 1 minute before switching the Raspberry Pi off and on again
Mapping keys for the first time
Upon launching for the first time, EmulationStation will prompt to configure a controller/gamepad (called mapping or binding). A keyboard can also be used. The mapping done here will be the default mapping for EmulationStation and the basic mapping for RetroArch/emulators. Emulator mapping can be refined later.
To start the mapping process, EmulationStation prompts to HOLD A BUTTON to start. Hold the key for about 3 seconds and release when the mapping prompt appears.
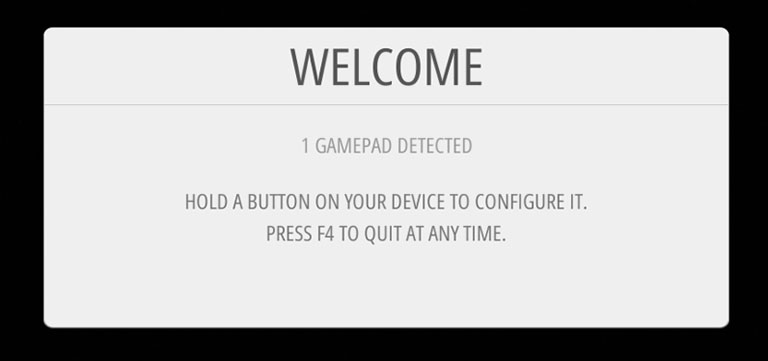
RetroPie gamepad configuration welcome screen. Press and hold the A key on the controller/gamepad to be configured to get started with the mapping process.
For this post, wired keyboard and a Logitech F310 gamepad were connected to the two USB 2.0 ports without any problems.
If a mistake was made with the key mapping before the end, the F4 key on the keyboard can be pressed to go back to the RetroPie terminal. By typing sudo reboot, the Raspberry Pi will be rebooted, which will allow the user to start over again. To skip a key-specific binding, the Esc key can be pressed and held. When finished, the Done button can be pressed using the gamepad’s A-key or the Enter key on the keyboard.
We used the default button layout for the Logitech F310 gamepad. The Select key was mapped to the Back button, and the Hotkey Enabled button was mapped to the Logitech button (the one with the Logitech logo on). The Hotkey can also be successfully mapped to the Back or Select button. The Logitech Mode button was not used/mapped. The rest of the buttons were self-explanatory.

The Logitech gamepad button layout for RetroPie.
When a new controller is connected, key mapping can also be performed at a later stage from the EmulationStation Main Menu.
The EmulationStation keys that will be used most often during the setup process are the directional key, the A-key, B-key, Start-key and Select-key.

Now that you have your EmulationStation booted up, it will start in the default frontend with RetroPie Configuration. This is where it all starts! From there will be two options — you can either go into the EmulationStation Main Menu, RetroPie Configuration or the RetroPie terminal.
The important configuration & menu screens & the terminal
There are five important screens to master: EmulationStation Main Menu, RetroPie Configuration, raspi-config, RetroArch Main Menu and the Retropie-Setup Script.
Some of these screens use the EmulationStation key mappings while others use the default Linux menu keys.
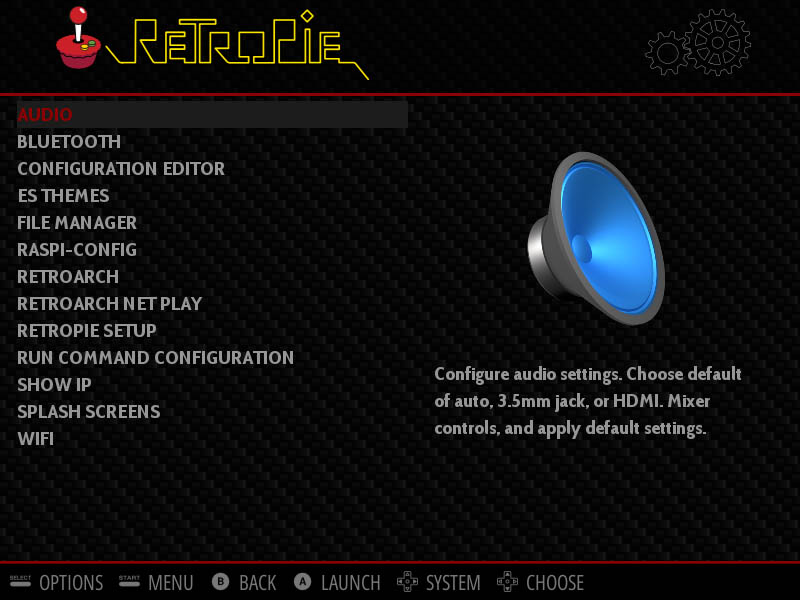
The EmulationStation Main Menu
The EmulationStation Main Menu contains options for the scraper, sound settings, UI settings, and input configuration settings. EmulationStation or the Raspberry Pi can be rebooted from its Quit option. This is also where the Raspberry Pi can be shut down.
To get to the EmulationStation Main Menu, press the Start-key.

The EmulationStation Main Menu uses the EmulationStation key mapping to navigate (i.e. A-key & B-key).
The RetroPie Configuration screen
The RetroPie Configuration screen contains the main menu items for configuring the Raspberry Pi, EmulationStation Themes, the File Manager, RetroArch and Splash Screens.
To get to the RetroPie Configuration screen, choose RetroPie Configuration (A-key) from EmulationStation.
The RetroPie Configuration screen uses the EmulationStation key mapping to navigate (i.e. A-key & B-key).
The Raspberry Pi Software Configuration Tool (raspi-config)
The Raspberry Pi Software Configuration Tool is where the Raspberry Pi itself is configured. To get to raspi-config, choose RASPI-CONFIG (A-key) from the RetroPie Configuration screen.

The raspi-config tool uses the direction, Enter & Esc keys to navigate.
The Raspi-config tool can also be accessed by pressing the F4 key on the keyboard to go to the RetroPie terminal and then by typing the following:
sudo raspi-config
RetroArch Main Menu
To get to the RetroArch Main Menu, choose RetroPie Configuration (A-key) from EmulationStation.

The RetroArch options menu item is selected from the RetroPie Configuration screen.
RetroArch is the frontend/GUI for Libretro and Libretro Emulators. Note that although not all emulators on RetroPie are from the libretro library, most are, and they are configured by RetroArch. Libretro emulators are those with an lr- in front of them.
Under RetroArch Settings there will be options for setting the screen resolution, key mapping, Shaders and Overlays.

The RetroArch Main Menu.
These settings will affect all RetroArch-supported emulators. By default, RetroArch configurations are saved in retroarch.cfg.
RetroArch can also be configured for each individual RetroArch-supported emulator. While a game is running, the RetroArch setting for that game can be accessed by pressing the Hotkey + X buttons on the controller.
The RetroPie-Setup Script
The easiest way to get to the RetroPie-Setup Script is by choosing RETROPIE SETUP from the RetroPie Configuration screen.

The RetroPie-Setup Script uses the direction, Enter & Esc keys to navigate.
The RetroPie-Setup Script can also be accessed through the RetroPie terminal (by pressing the F4 key while in EmulationStation) or from SSH:
sudo bash RetroPie-Setup/retropie_setup.sh
RetroPie terminal
Some commands can only be done through the terminal while some commands are just much easier to do through the terminal. The RetroPie terminal is similar to all Linux terminals.
The RetroPie terminal can be accessed by pressing the F4 key on the keyboard while in EmulationStation. The terminal can also be accessed using PuTTY (needs SSH to be enabled).

The RetroPie terminal needs keyboard/typed commands.
To exit the terminal and go back to EmulationStation, type:
exit
To reboot the Raspberry Pi, use:
sudo reboot
Internet settings
RetroPie needs the internet to install and update most of its functions. An Ethernet connection can be used before a Wi-Fi connection is configured.
Wi-Fi can be configured, and the IP address can be obtained, using the RetroPie Configuration screen.
Connect via Wi-Fi (optional)
From the RetroPie Configuration screen, scroll down to WIFI
- Connect to WiFi network
- Choose the network
- Enter the network key/password
Get the IP address
There are two ways to get the IP address of a Raspberry Pi running RetroPie:
1. from the RetroPie Configuration screen, scroll down to SHOW IP
or
2. in the RetroPie terminal (by pressing F4 while in EmulationStation) and using the following terminal command:
hostname -I
Raspberry Pi settings
It is important to go through the Raspi-config tool at least once after RetroPie has been installed. From here, the settings for underscan and keyboard layout can be set. This is also where the output resolution is set, the Raspi-config tool is updated and SSH is enabled.
Update Raspi-config (important)
By choosing Update, the Raspi-config tool will be updated to the latest version. This should be done from time to time to make sure all the Raspberry Pi configuration is up to date.
Overscan (optional)
Overscan (in the form of disabling underscan) might, or might not create a fuller image if there is a border around the screen. Overscan, on the other hand, can cause the display to be cut off on the edges. In this case, underscan can be used to prevent this from happening.
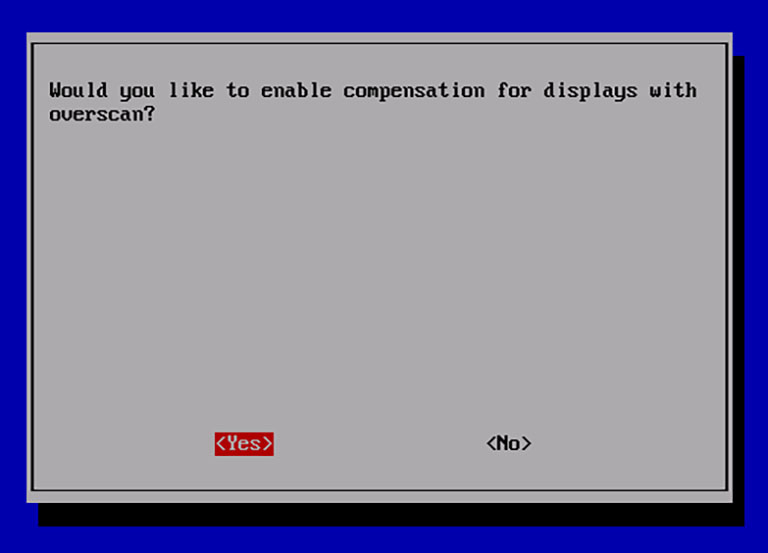
In RetroPie, compensation for displays with overscan (i.e. underscan) can be enabled or disabled in the Display Options under Underscan.
Keyboard settings (optional)
The keyboard layout is set under Localisation Options. Under Keyboard, I usually choose Generic 105-key (Intl.) — which is also the default.
The default Language is English (UK), but can also be set to English (US).
I don’t use keyboard functions so I just choose the default settings there.
The ‘Compose’ key has various functions in RetroPie and gets mapped during the controller/keyboard key binding process. It is better to set the same one here too. I use one on the right Ctrl key.
Enable SSH (optional)
By enabling SSH, PuTTY and WinSCP can be used to connect to RetroPie from a remote location. WinSCP can be used to copy ROM files to RetroPie.
SSH is enabled under Interfacing Options -> SSH. The Raspberry Pi needs to be rebooted before SSH will be active.
Use the IP address, username:pi and password:raspberry to SSH into RetroPie.
Resolution
The resolution is a measurement of the sharpness and clarity of an image. It is mainly dependent on the display device (e.g. TV, computer screen, etc.).
The resolution set here is going to be used for RetroPie (i.e. the Raspberry Pi). It is screen-dependent. The boot sequence, EmulationStation and the emulators will be affected by the resolution set here. Fortunately, the resolution for each emulator can be changed at a later stage.
In most cases, 720p @60Hz will be more than enough, but smaller or different resolutions might be more fitting for older or atypical screens.
Higher resolutions need more processing power from the Raspberry Pi, so setting the correct resolution is important for speed too.
The output resolution of a Raspberry Pi is set under the Display Options -> Resolution.
Raspberry Pi 4B
The Raspberry Pi 4B is known to have some issues with its resolution settings. It typically only accepts the highest resolution of the display device, which is mainly a problem with 1080p and 4K displays.
1080p and 4K are unsupported by most game emulators at this stage and there is no benefit for EmulationStation. In our case, these resolutions have significantly reduced the performance of RetroPie.
The problem with the Raspberry Pi 4 is that the Raspi-config Resolution setting does not work as expected and needs to be set manually using the boot configuration file (config.txt) using terminal commands.
Update RetroPie (important)
Apart from updating Raspi-config, the RetroPie packages should also be updated from time to time.
This process will update the RetroPie-Setup Script, all the RetroPie Linux packages, RetroArch (emulators), the drivers and all the optional and experimental installed packages. An active connection to the internet is required.
To update the RetroPie-Setup Script and Linux packages, choose Update from the RetroPie-Setup Script and follow the prompts.
The Core, Main, Optional and Experimental packages can be updated from the RetroPie-Setup Script under their respective Manage packages > Update all packages options.
Adding packages
Packages are the actual pieces of software that are used by EmulationStation to perform a specific function. They include all the required packages (referred to as core packages) and popular packages (main packages).
Emulators and other applications (such as Kodi and the Steam Link App) are installed as optional packages or experimental packages.
Additional packages are installed from the RetroPie Configuration screen under RetroPie Setup.

The RetroPie setup menu is situated under the RetroPie Configuration.

The RetroPie Manage packages menu item is situated under the RetroPie Setup section.
Under Manage packages, there are options to manage all the types of packages (e.g. core packages, main packages, etc.).

The RetroPie Manage Packages options are situated under the Manage packages menu item of the RetroPie Setup section.
After managing/installing the desired package(s), the user can go back to EmulationStation again.
Installing from binary vs. source
Packages can either be installed from binary or from the source files. Installing from (pre-compiled) binary installs the latest stable version of the package while installing from source installs package files that might still be in development.

Installing packages from binary vs. source.
The source code can take much longer to install and are more prone to bugs. It is preferred to install from binary.
Adding emulator packages
Emulators are software packages that are able to emulate the hardware required to run ROMs. Emulators are usually specific to one piece of hardware, but multi-platform emulators are also available.
There are single-platform emulators for the Sega Genesis/Mega Drive, Sony PlayStation, Super Nintendo, and many other consoles and devices. Multi-platform emulators are available for arcade machines, Atari machines and others.
Most of the popular emulators are pre-installed (e.g. Genesis/Mega Drive, PlayStation and NES), but some must be manually installed (e.g. for the Atari ST).
Additional emulators can be installed from the Manage Packages section under either optional packages or experimental packages.
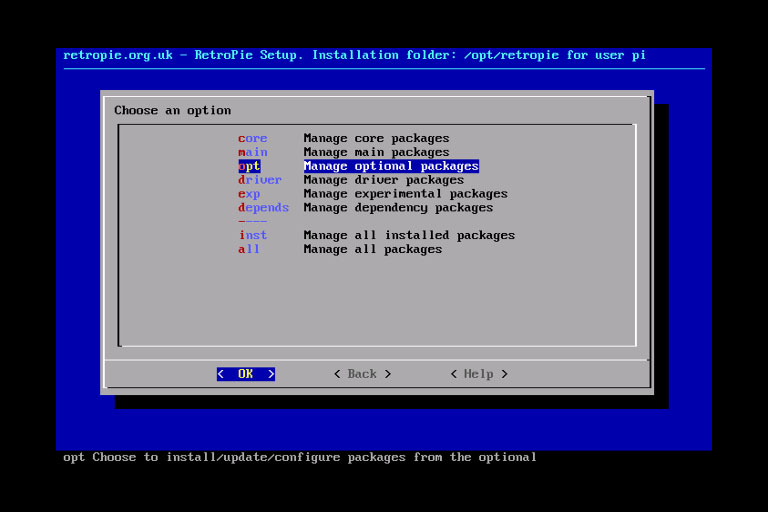
Option packages in RetroPie can be installed under the Manage optional packages section of the Manage packages section of the RetroPie Setup section.
To, for example, install the Atari ST emulator, Hatari (Atari ST/STE/TT/Falcon emulator), go to Manage optional packages -> hatari (item 22) -> Install from binary.

RetroPie hatari emulator installation menu item.
Removing packages
Packages are removed from the Manage Packages section under either optional packages or experimental packages. After selecting the package, the Remove option will uninstall it.
Adding ROMs to RetroPie
After the appropriate emulator(s) have been installed, their specific ROMs can be added.
ROMs (i.e. ROM images or ROM files) are files that contain a copy of the data from a read-only memory chip, e.g. the games. No ROMs are included in RetroPie and need to be downloaded/dumped yourself.
There is a lot to say about the dumping instructions, and legality of owning, an electronic form of a ROM, so for the purpose of this post official freeware ROMS will be used. On Wikipedia, a list of commercial video games released as freeware will be used.
Zero Tolerance (Genesis/Mega Drive) and S.D.I. (Atari ST) were chosen as freeware example ROMs.
ROMs can either be added to RetroPie using a USB flash drive or by copying them directly to the Raspberry Pi storage using WinSCP. Before ROMS are added to RetroPie, they need to be prepared first.
Preparing ROM files for RetroPie
ROM files are prepared by compressing or uncompressing them, checking their file format, removing extra files and renaming them.
Compressed ROMs
To save space, ROM files are usually downloaded as compressed .zip, .rar or .7z files. To prepare ROM files to be used by EmulationStation, they might have to be extracted to be used in their original form, and/or re-compressed to a supported file format.
By using the links provided, Zero Tolerance and S.D.I. are both downloaded as .zip files. By opening these files (using a zip utility), Zero Tolerance is a .SMD file and S.D.I. is a .st file.
File format
In most cases, the ROM files will work in their original file format, but this might take up unnecessary space on the Raspberry Pi’s storage. It also makes ROM files that consist of multiple files messy. In most cases, .zip files will also work.
A better solution would be to see what files are supported by each system. This can be done by looking at the EmulationStation systems file. It can be accessed from the RetroPie terminal by using the following command:
nano /etc/emulationstation/es_systems.cfg
This will open the es_systems.cfg file as read-only, so it can not be edited at this point.
Each <system> tag represents a system and the <name> tag represents the shortened name for the system. Each system is closed by the </system> tag.
For example, <name>megadrive</name> represents the Sega Genesis/Mega Drive:
<system>
  <name>megadrive</name>
  <fullname>Sega Mega Drive</fullname>
  <path>/home/pi/RetroPie/roms/megadrive</path>
  <extension>.7z .smd .bin .gen .md .sg .zip .7Z .SMD .BIN .GEN .MD .SG .ZIP</extension>
  <command>/opt/retropie/supplementary/runcommand/runcommand.sh 0 _SYS_ megadrive %ROM%</command>
  <platform>megadrive</platform>
  <theme>megadrive</theme>
</system>
Similarly,<name>atarist</name> represents the Atari ST:
<system>
  <name>atarist</name>
  <fullname>Atari ST</fullname>
  <path>/home/pi/RetroPie/roms/atarist</path>
  <extension>.st .stx .img .m3u .rom .raw .ipf .ctr .zip .ST .STX .IMG .M3U .ROM .RAW .IPF .CTR .ZIP</extension>
  <command>/opt/retropie/supplementary/runcommand/runcommand.sh 0 _SYS_ atarist %ROM%</command>
  <platform>atarist</platform>
  <theme>atarist</theme>
</system>
The <extension> tab will list all the ROM file formats that can be used for that system.
Extra file information
Some compressed ROM files might have extra information files packaged inside the compressed files. These files will probably not interfere with EmulationStation, but it is recommended to remove/delete them from the compressed file.
Renaming
Most versions of downloaded ROMs (compressed or uncompressed) will be named with additional information, such as the version, region or site they were downloaded from or will be abbreviated.
I like to rename these files to something more human-readable. The filename of the compressed/ROM file will actually be shown on RetroPie.
For example. I will rename zerotol.zip to Zero Tolerance.zip.
Note that the EmulationStations scraper can be used at a later stage to identify ROM files in a cleaner, more presentable manner.
Using a USB flash drive to add ROMs
In the case where RetroPie is not connected to a network that includes a PC, ROM files can be added by using a USB flash drive. This method will copy files from the USB flash drive onto the Raspberry Pi and is often faster when compared with WinSCP. A PC to prepare and copy the ROM files to the flash drive is still required.
The process includes preparing the USB flash drive where the ROM directory structure will be created, copying the ROM files to the flash drive and transferring the ROM files from the flash drive to RetroPie.
Preparing the USB flash drive
Before a USB flash drive can be used to transfer ROM files to RetroPie, it needs to be prepared first. By preparing the flash drive, directories will be created where the ROM files are to be copied.
The USB flash drive is prepared as follows:
- Format the flash drive using your PC’s operating system. Usually following the prompts/options with something like right-clicking on the drive letter and Format… The drive needs to be formatted to FAT32 (default) or exFAT.
- Create a directory named
retropiein the root of the flash drive. This directory will be used by RetroPie to create additional directories to which the ROMS are to be copied. - Safely unmount the Drive before transferring it to the Raspberry Pi.
- Directly after being plugged into the Raspberry Pi, the flash drive’s LED will start to blink repeatedly. It can be unplugged after the blinking has stopped. If it is an LEDless flash drive, leave it in for about one minute before it can be unplugged.
- After plugging the flash drive back into a PC, there will be newly created directories under the
/retropiedirectory.
The flash drive is now prepared.
Following using the example ROMs, the following directories will be created:
retropie/megadriveretropie/nes
This process needs to be done each time additional emulators have been added to RetroPie.
Copying the ROM files to the USB flash drive
In order to better understand the copying process and to prepare the ROM files (see earlier) we need to take a look at the newly created directories that were created on the USB flash drive under /retropie/.
RetroPie would have created directories for all the emulators that are installed. These would include the ‘default’ emulators (i.e. those that are main packages) and those that were installed manually (i.e. those that were installed as optional or experimental packages). Atari ST would be an example of an optional package.
Because EmulationStation automatically installed emulators for the PlayStation, Genesis/Mega Drive and the Nintendo Entertainment System, the following directories will be present:
retropie/psx/retropie/megadrive/retropie/nes/
If hatari was installed, a /atarist/ directory would also be present.
Transferring the ROMs to RetroPie
The prepared ROMs can now be copied to their respective ROM directories onto the flash drive. With the flash drive connected to a PC, browse to the retropie/roms/ directory and copy the ROM files to their respective directory:
- Zero Tolerance ->
/roms/megadrive/ - S.D.I. ->
/roms/atarist/
Safely unmount the flash drive before transferring it back to the Raspberry Pi. This time all the ROMs copied onto the flash drive are going to be transferred onto RetroPie’s MicroSD card. Allow enough time until the LED stops blinking again, or at least the amount of time it took to copy the ROM files onto the flash drive.
Once this is done, the flash drive can be removed from the Raspberry Pi and RetroPie needs to be rebooted or EmulationStation needs to be restarted.
From the EmulationStation Main Menu go to QUIT and press the A-key -> choose RESTART EMULATIONSTATION and press the A-key -> Choose YES with the A-key.
By default, the ROM files will eventually be transferred from the flash drive to its appropriate directory on RetroPie without being removed from the USB flash drive.
Using WinSCP to add ROMs
WinSCP can also be used to copy ROM files to RetroPie. Using the IP address of RetroPie and the SSH setting on WinSCP, a network connection can be established.

Copying files to RetroPie using WinSCP.
With its file explorer interface, browse to the /home/pi/RetroPie/roms/ directory on RetroPie and the directory where the ROM files have been prepared.
Because EmulationStation automatically installs emulators for the PlayStation, Genesis/Mega Drive and the Nintendo Entertainment System, their respective directories will be present. If hatari was installed, a /home/pi/RetroPie/atarist/ directory would also be present.
The ROM files can either be copied and pasted or dragged and dropped, to their respective system directory:
- Zero Tolerance ->
/home/pi/RetroPie/roms/megadrive/ - S.D.I. ->
/home/pi/RetroPie/roms/atarist/
Once the ROM files have been copied, RetroPie needs to be rebooted or EmulationStation needs to be restarted.
From the EmulationStation Main Menu go to QUIT and press the A-key -> choose RESTART EMULATIONSTATION and press the A-key -> Choose YES with the A-key.
Accessing the ROMs (games)
After ROM files have been added and EmulationStation starts up again, game systems for the added ROMs will appear under their respective system on the EmulationStation menu. To choose a ROM (now a game on a system), navigate to its system icon and press the A-key.
When more ROMs are added, a list will form under the respective system.
First-time ROM / game setup
When a game is opened, there will be an emulation settings screen flashed for a short period of time. If a key (any key) is pressed while this screen is shown, the emulator settings menu will appear.
These settings are pretty self-explanatory, so make sure to check them out in the future. Things like the default emulator and video mode (screen resolution) per ROM or emulator can be tweaked here.
For now, we are going to skip this step and use the default emulation settings.
Exiting a game
To exit a game, press the Select + Start buttons at the same time.
Removing ROM files
ROM files can be removed using the RetroPie File manager or WinSCP. Games/ROMs will no longer appear after EmulationStation has been restarted.
Taking screenshots in RetroPie
Although there are other ways to do so, one of the easier ways to take a screenshot in RetroPie is by doing it from a remote location using raspi2png.
Resetting EmulationStation’s key mapping (when or if necessary)
EmulationStation’s key mapping can be reset using the RetroPie-Setup Script. If the current key mapping is not allowing proper navigation, the terminal or SSH/terminal option can be used.
When in the RetroPie-Setup Script go to P Manage Packages -> Manage core packages -> emulationstation -> Configuration / Options -> Clear / Reset Emulation Station input configuration

Reset EmulationStation controllers
Go all the way Back to the first page of the RetroPie-Setup Script and choose Perform reboot to go back to EmulationStation.
Conclusion
RetroPie is a retro game emulation operating system for the Raspberry Pi. This post showed how to get started with RetroPie on a Raspberry Pi.