

A static IP address is often used for a wireless Raspberry Pi. A static IP address will not change over time - simplifying network connections to a Raspberry Pi.
Table of contents
Introduction to static IPs on the Raspberry Pi
Raspberry Pis are often used as stand-alone devices and connected to a network and the internet using their Wi-Fi connectivity. This makes it possible to disconnect the Raspberry Pi from a screen and keyboard and allow it to be a true IoT device.
For other devices to be able to connect to these Raspberry Pis, their IP address on the network needs to be known — making it better to set a static one.
By default, Raspbian will be configured to connect to a local network using a dynamic (dhcp) IP address. From here on, the user can either decide to keep the dhcp settings, but it might cause the IP address to change over time.
The solution would be to reserve the network IP address for that Raspberry Pi by setting a static one. Here we show how to set up a static IP address for a Raspberry Pi using Wi-Fi and Raspbian. Either the terminal or the Desktop can be used, but the process is dependent on the release of Raspbian and the Model of the Raspberry Pi used.
To see what release of Raspbian is installed, the following terminal command can be used:
cat /etc/os-release
To see the Raspberry Pi model used, the following terminal command can be used:
cat /sys/firmware/devicetree/base/model
- Get the CanaKit Raspberry Pi 4B 8GB Starter Kit from Amazon.com
- Get the GeeekPi Raspberry Pi 4B 4GB Starter Kit from Amazon.com
Assumptions and requirements
The Rasberry Pi used needs to be fully functional with an operating system installed. The Raspberry Pi OS (formerly known as Raspbian) was used as the operating system when preparing this post.
Initially, a keyboard, mouse and screen need to be connected, but after an IP address has been obtained, PuTTY can be used to access the terminal from a remote location.
The Raspberry Pi needs to be connected to a LAN either using Ethernet or Wi-Fi. Initially, an Ethernet connection and the dhcp IP address can be used.
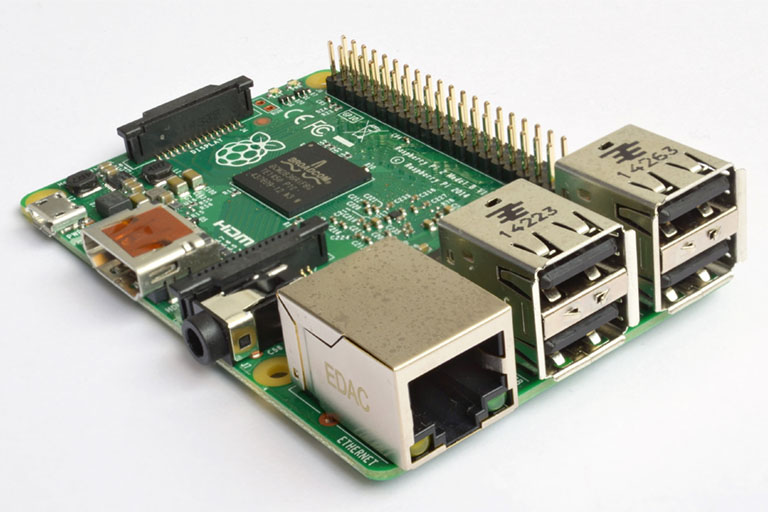
The Raspberry Pi 2 Model B with Ethernet and 4 USB ports. Image Multicherry (CC-BY 4.0 International)
Any address in the IP range of the router can be used as a static IP address, even the dhcp already assigned, but it is better to rather use a static IP address in the low or high IP range of the router.
All the Raspberry Pi B models have an Ethernet port. Raspberry Pi Models 3B and upwards have built-in Wi-Fi too.
To get Wi-Fi connectivity on older Raspberry Pis (i.e. the B+ and 2B models), a USB Wi-Fi dongle can be used:
- Get the TP-Link TL-WN725N USB Wi-Fi Adapter from Amazon.com
- Get the USB 2.0 Wireless Wi-Fi Adapter Dongle from BangGood
- Get the TP-Link Nano AC600 USB Wi-Fi Adapter from Amazon.com
The process of setting a static IP address is somewhat different when an Ethernet connection is used. The process also differs depending on the distribution of Rasbian used (discussed here).
Raspbian OS (Raspbian)
The process of setting a static IP address on a Raspberry using Wi-Fi will depend on the operating system used.
There are two ways to set a static IP address on a Raspberry Pi using Wi-Fi: using the Desktop and/or using the terminal.
Using the Desktop to set a static IP
By far the easiest way to set a static IP address on a Raspberry Pi is by using the latest Full distribution of Raspbian (currently Raspbian Bullseye) and using the Wi-Fi settings on the Desktop version. The Wi-Fi settings are accessed by clicking on the Wi-Fi icon situated on the toolbar.
The Wi-Fi settings started to appear on the Desktop version of Raspbian Jessie since March 2017.
Getting started
If you are new to Raspbian, it is recommended to use a fresh install. This post discusses all distributions of Raspbian, but installing the latest distribution will be best. The latest distribution at the time of updating this post was Raspbain Buster.
Accessing the terminal
Terminal commands will be used to accommodate all distributions of Raspbian.
Raspbian Wheezy, Raspbian Jessie Lite, Raspbian Stretch Lite and Rasbian Buster Lite will boot straight into the terminal command prompt. The default username:password for Raspbian is pi:raspberry.

The full versions of Raspbian Jessie, Raspbian Stretch and Raspbian Buster will boot into a graphic user interface (GUI). The command terminal can be accessed by clicking the terminal icon (usually in the form of a computer screen) on the top/bottom menu bar.
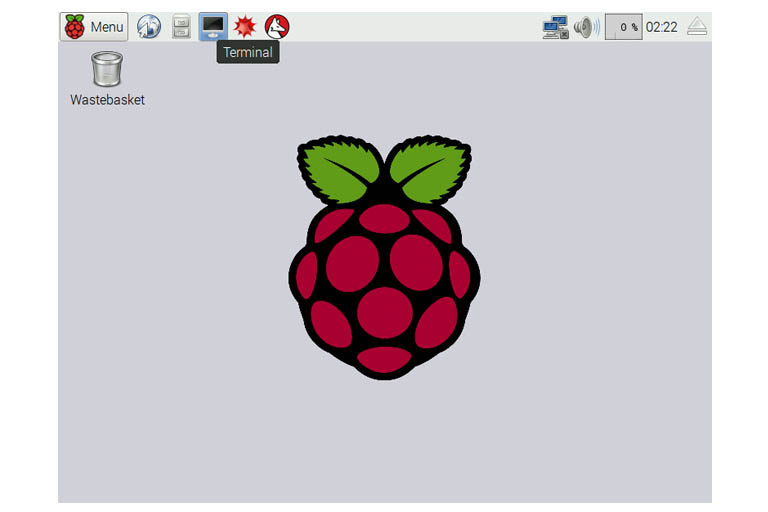
Raspbain Jessie GUI interface. To access the terminal, use the terminal icon on the top of the screen.
Connecting to the local network
Before a wireless device can connect via Wi-Fi to a local network, the network information needs to be supplied first. This is also referred to as making a network association.
After this process, a dynamic/random IP address will be assigned by the router to the Raspberry Pi and the user will have access to the local network and the internet.
Network information is in the form of the network name (SSID) and its password (also called the passphrase or pre-shared key). The SSID and password can either be entered via the GUI (if available) or as a terminal command.
When the GUI and mouse are available (e.g. when using the full version of Raspbian Jessie, Raspbian Stretch or Raspbian Buster) the Network settings can be accessed by clicking the network icon situated on the top/bottom menu bar. It is usually in the form of two computers next to each other.
Raspbain Jessie GUI interface. To access the network settings, use the network icon on the top of the screen.

Raspbain Jessie’s network configuration asking for the Pre Shared Key.
The SSID and network password can also be entered using the iwconfig terminal command:
iwconfig wlan0 essid "MYNETWORK" key "s:PASSWORD"
where MYNETWORK is the SSID and PASSWORD is the network password.
Updating Raspbian to the latest version
Now that we are connected to the local network and the internet, the current Raspbian distribution needs to be updated to its latest version. To do this, the update and upgrade commands can be used:
sudo apt-get update
sudo apt-get upgrade
Setting a static IP on the Raspberry Pi
After the Raspberry Pi has been connected to the local network, its most current IP address can be obtained using hostname terminal command:
hostname -I
The IP address of the Raspberry Pi can also be obtained, together with other network information, by using the ifconfig terminal command.
Remember that this will be a dynamic/random IP address assigned by the router and will likely change from time to time.
To be able to change a dynamic IP address to a static one, certain network information needs to be collected and entered into the network configuration file.
Step 1 Collect the information needed for a static IP
In addition to the network name and password, the following network information will be needed:
- Current IP address (dynamic/DHCP)
- Desired IP address
- Netmask address
- Broadcast address
- Network address
- Gateway address
The Desired IP address is the address to be used as a static IP. Any unused IP on the network can be used.
Go to the Netmask address (Mask) and the Broadcast address (Bcast), use ifconfig.
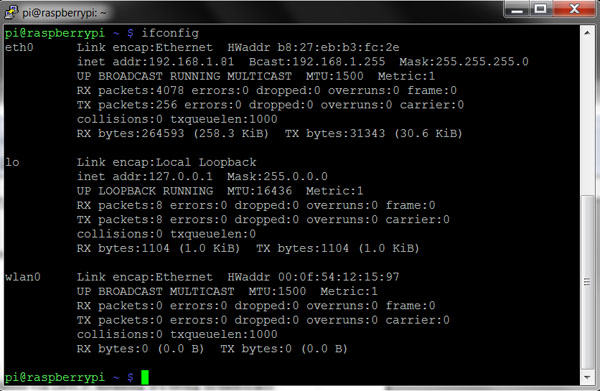
For the Network address, replace the last number of the Current IP address with 0 – e.g. 192.168.1.81‘s Network address is 192.168.1.0.
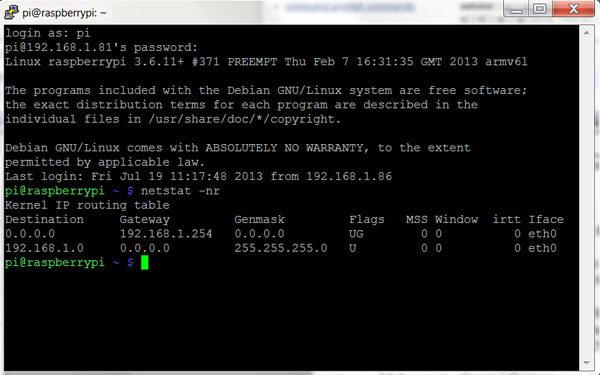
Lastly, use netstat -nr or ip route | grep default | awk '{print $3}' to get the Gateway address.
The following network information will be used during the rest of this post:
- Current IP address 192.168.1.81
- Desired IP address 192.168.1.16
- Netmask address 255.255.255.0
- Broadcast address 192.168.1.255
- Network address 192.168.1.0
- Gateway address 192.168.1.254
Step 2 Enter the information gathered
After obtaining the desired network information, it needs to be added to Raspbian’s network configuration file.
The network configuration files and the way the information is added are different for Raspbain Wheezy (2a) and Raspbian Jessie/Stretch/Buster (2b).
Step 2a Edit the interfaces file (Raspbian Wheezy)
For Raspbian Wheezy, the interfaces file is used to store the network configuration.
Start off by making a backup of the original interfaces file:
sudo cp -p /etc/network/interfaces /etc/network/interfaces.original
Open the interfaces file for editing:
sudo nano /etc/network/interfaces
The original interfaces file for Raspbian Wheezy will look something like this:
auto lo
iface lo inet loopback

auto eth0
allow-hotplug eth0
iface eth0 inet manual

auto wlan0
allow-hotplug wlan0
iface wlan0 inet manual
    wpa-conf /etc/wpa_supplicant/wpa_supplicant.conf

auto wlan1
allow-hotplug wlan1
iface wlan1 inet manual
    wpa-conf /etc/wpa_supplicant/wpa_supplicant.conf
It is always a good idea to comment out the original lines with # (comment sign) to allow a simple reversal.
Replace everything with the following lines (copy/paste):
# NOTES:
# These lines are a summary for switching between a static and dynamic IP on Raspbian Wheezy
# (The process for Raspbian Jessie/Stretch is different!)
# Last updated 06.07.2018

# For static IPs, there are 3 important sections in the /etc/network/interfaces file
# 1) General section
# 2) Wired settings section (eth0)
# 3) Wireless (WiFi) settings section (wlan0 & wlan1)
# 3a) Dynamic (dhcp) WiFi settings
# 3b) Static Wi-Fi settings

# 1) ##########################################################

auto lo
iface lo inet loopback

# 2) ##########################################################

auto eth0
allow-hotplug eth0
iface eth0 inet manual

# 3) ##########################################################
# 3a) For a dynamic WiFi connection un-comment this section

#auto wlan0
#allow-hotplug wlan0
#iface wlan0 inet manual
#    wpa-conf /etc/wpa_supplicant/wpa_supplicant.conf

#auto wlan1
#allow-hotplug wlan1
#iface wlan1 inet manual
#    wpa-conf /etc/wpa_supplicant/wpa_supplicant.conf

# 3b) For a static WiFi connection un-comment this section

#allow-hotplug wlan0
#iface wlan0 inet static
#address 192.168.1.16
#netmask 255.255.255.0
#broadcast 192.168.1.255
#network 192.168.1.0
#gateway 192.168.1.254
#     wpa-conf /etc/wpa_supplicant/wpa_supplicant.conf

#auto wlan1
#allow-hotplug wlan1
#iface wlan1 inet manual
#    wpa-conf /etc/wpa_supplicant/wpa_supplicant.conf

###############################################################
This will allow to un-comment the appropriate section for the settings needed. For the purpose of this post, un-comment section 3b and supply the network information as per Step 1.
Exit and save by pressing Ctrl + X and then Y.
For Wi-Fi, no eth0 settings are needed. Changing the file above is mainly aimed at setting up the wlan0 to static (as suppose to dynamic). This will set a dynamic Ethernet connection and a static Wi-Fi connection.
To check if Raspbian accepted the new network settings, use:
sudo /etc/init.d/networking restart
If there are no errors, release the potential lease and reboot:
sudo rm /var/lib/dhcp/*
sudo reboot
STEP 2b Edit the dhcpcd.conf file (Raspbian Jessie/Stretch/Buster)
For Raspbian Jessie Lite, Raspbian Stretch Lite and Raspbian Buster Lite, the dhcpcd.conf file is used to store the network configuration.
Start off by making a backup of the original dhcpcd.conf file:
sudo cp -p /etc/dhcpcd.conf /etc/dhcpcd.conf.original
Open the dhcpcd.conf file for editing:
sudo nano /etc/dhcpcd.conf
The original dhcpcd.conf file for Raspbian Jessie/Stretch/Buster will look something like this:
# A sample configuration for dhcpcd.
# See dhcpcd.conf(5) for details.

# Allow users of this group to interact with dhcpcd via the control socket.
#controlgroup wheel

# Inform the DHCP server of our hostname for DDNS.
hostname

# Use the hardware address of the interface for the Client ID.
clientid
# or
# Use the same DUID + IAID as set in DHCPv6 for DHCPv4 ClientID as per RFC4361.
#duid

# Persist interface configuration when dhcpcd exits.
persistent

# Rapid commit support.
# Safe to enable by default because it requires the equivalent option set
# on the server to actually work.
option rapid_commit

# A list of options to request from the DHCP server.
option domain_name_servers, domain_name, domain_search, host_name
option classless_static_routes
# Most distributions have NTP support.
option ntp_servers
# Respect the network MTU.
# Some interface drivers reset when changing the MTU so disabled by default.
#option interface_mtu

# A ServerID is required by RFC2131.
require dhcp_server_identifier

# Generate Stable Private IPv6 Addresses instead of hardware based ones
slaac private

# A hook script is provided to lookup the hostname if not set by the DHCP
# server, but it should not be run by default.
nohook lookup-hostname
Scroll all the way to the bottom of the file and add the following:
# NOTES:
# These lines are a summary for switching between a static and dynamic IP on Raspbian Jessie & Raspbian Stretch
# (The process for Raspbian Wheezy is different!)
# Last updated 06.07.2018

# For static IPs, there are 2 important sections to be added to the end of the /etc/dhcpcd.conf file
# 1) Wired settings section (eth0)
# 2) Wireless (WiFi) settings section (wlan0)

# 1) ##########################################################

#interface eth0
#static ip_address=192.168.0.16/24  # note the /24 at the end
#static routers=192.168.1.254
#static domain_name_servers=192.168.1.254

# 2) ##########################################################

#interface wlan0
#static ip_address=192.168.0.16/24
#static routers=192.168.1.254
#static domain_name_servers=192.168.1.254

###############################################################
This allows to simply un-comment the appropriate section for the settings needed.
For the purpose of this post, un-comment section 2 and supply the network information as per Step 1 (routers & domain_name_servers are both = Gateway address). Leave the /24 at the end of the static IPs address.
Exit and save by pressing Ctrl + X and then Y.
Release the potential lease and reboot:
sudo rm /var/lib/dhcp/*
sudo reboot
Step 3 Check & test the new IP
After the Raspberry Pi has booted, the newest IP address can be obtained by using the hostname terminal command:
hostname -I
There might be more than one IP shown, but the static IP just configured should also be on the list. While the other addresses might change, the static IP address will remain the same until the network configuration file has been changed again.
Step 4 Disable power management (optional)
Without disabling power management, the Wi-Fi tends to disconnect if not used for a certain period of time. The current power management settings can be seen with the iwconfig command:
iwconfig

Note Power Management
In the case above, Power Management is on, which can cause disconnection problems if the Raspberry Pi is idling. Power management can be disabled with the following command:
sudo iwconfig wlan0 power off
To make this change permanent, the command can be added to either Crontab or the rc.local file. In crontab (crontab -e) add:
@reboot sleep 10 && sudo iwconfig wlan0 power off
or in rc.local (sudo nano /etc/rc.local) add:
# Disable power management
sleep 10
sudo iwconfig wlan0 power off
at the bottom. In either case, exit and save with Ctrl + X and then Y before rebooting (sudo reboot).
Step 5 Keep the network alive (optional, if required)
When still experiencing disconnection problems after Step 4, the following Bash script added to Cron can help. It basically checks if the router is still available and, if not, then resets wlan0.
To create a bash file in the /home/pi directory, use:
sudo nano /home/pi/ping.sh
Add the following to it:
#!/bin/bash

ping -c4 192.168.1.xx > /dev/null # the router's IP
if [ $? != 0 ] # if the IP can't be pinged
then
  echo "No network connection, restarting wlan0..."
  /sbin/ifdown 'wlan0'
  sleep 5
  /sbin/ifup --force 'wlan0'
fi
Exit and save with Ctrl+X and then Y.
Add the following line to the bottom of Crontab (crontab -e):
*/5 * * * * sudo /home/pi/ping.sh > /dev/null
Exit and save by pressing Ctrl + X and then Y.
This will run ping.sh every 5 minutes to keep the network alive.
Conclusion
A static IP address can be assigned to a Raspberry Pi using Wi-Fi. The process of setting a static IP address on the Raspberry Pi depends on the distribution of Raspbian, but can always be done using terminal commands.
That is correct. Raspbian Jessie/Stretch and I think Buster uses the /etc/dhcpcd.conf file.
Raspberry Pi OS no longer uses the /etc/network/interfaces & interfaces.d files. It uses /etc/dhcpcd.conf instead.