Amazon Web Services offers a downloadable version of DynamoDB. Here show how to use a Raspberry Pi as a stand-alone DynamoDB, NoSQL database server.
Table of contents
Introduction
Running and testing apps/code on commercial servers can be risky, especially when you are exploring new horizons. CRUD and other database commands can be tested and practised with more freedom on a local database server.
For testing and development purposes, Amazon Web Services (AWS) made it possible to install a DynamoDB database locally too. In this case, we will use a Raspberry Pi with Raspbian as the operating system to run the local DynamoDB. Similar to using a URL endpoint to one of AWS’ computer centres, we will point it to a local address on your LAN.
The process of installing an Amazon Web Services (or AWS) DynamoDB is explained in the AWS resource documentation, but the process can be intimidating and will not work in some cases (or on some Raspberry Pis). Apart from a complete set of installation instructions, this post will also address the following errors:
Caused by: java.lang.UnsatisfiedLinkError: no sqlite4java-linux-arm in java.library.path
WARNING: [sqlite] cannot open DB[1]: com.almworks.sqlite4java.SQLiteException: [-91] cannot load library: java.lang.
WARNING: [sqlite] SQLiteQueue[shared-local-instance.db]: stopped abnormally, reincarnating in 3000ms
- Get the Raspberry Pi 4B 4GB Starter Kit from Amazon.com
- Get the Raspberry Pi 4B 8GB Starter Kit from Amazon.com
Overview
As mentioned earlier, this post will explain how to set up a Raspberry Pi, using Raspbian, to deploy and use a stand-alone NoSQL (MongoDB, AWS DynamoDB) database server. The server will be accessible over the local network. The processes that will be explained will include the following:
- Requirements and basic setup of the Raspberry Pi
- Overview of installing DynamoDB locally on a Raspberry Pi
- Installing the required packages
- Copying and extracting the AWS DynamoDB files
- Running and stopping DynamoDB locally
- Accessing DynamoDB locally
- Potential local DynamoDB errors
- Creating a provisioned mode table using a control panel (DynamoDB tables are schemaless — other than the primary key, you do not need to define any extra attributes or data types when you create a table.)
- Making backups of all the database-related files (pending)
- Transferring backup versions over to a new server (pending)
Requirements and basic setup of the Raspberry Pi
The first thing that is needed is a fully configured Raspberry Pi running, preferably the latest release of, Rasbian. The AWS DynamoDB setup will be done using terminal commands, so either the Lite or the Full Version can be used. Sudo privileges will be required.
A connection to the internet will be required to install additional required packages. To be able to connect over the local area network, the Raspberry Pi should also have a static and/or known IP address.
After the Raspberry Pi has been configured, using SSH or PuTTY from a separate computer on the same network will make the installation process much easier. Although this can be done directly from the Raspbain GUI, the separate computer will also be used to copy the DynamoDB download URL and to access the DynamoDB shell.
Hardware and software used
The setup used while writing this post was a Raspberry Pi 3 Model B with the Full version of Raspbain Stretch as OS. An 8Gb class 10 microSD card was used. The Raspberry Pi was configured locally using a keyboard and mouse. A static IP address and SSH were enabled and a connection to my LAN and the internet was via Wi-Fi.
After the initial configuration was done, a Windows 10 computer with PuTTY was used to connect to the CLI of the Raspberry Pi. Google Chrome was used as the web browser on the Windows 10 computer.
Installing the required packages on the Raspberry Pi
To start, from the Raspberry Pi terminal, do an update and upgrade:
sudo apt-get update
sudo apt-get upgrade
To be able to run a local instance of AWS DynamoDB on a Raspberry Pi, Java Development Kit (JDK) 6 or higher is required. Raspbian is distributed with OpenJDK, but Oracle JDK can also be used. To see if JDK is installed, or what version of JDK is installed, the java version terminal command can be used:
java -version
If JDK is not available, it can be installed using the following terminal command:
sudo apt install default-jdk
or to install OpenJDK 8 use:
sudo apt install openjdk-8-jdk
Now that the Raspberry Pi has been updated, and upgraded and that we know JDK is available, we can move on to copying the required files for running a local instance of AWS DynamoDB.
Copying and extracting the AWS DynamoDB files
In this section, we will create a directory for the DynamoDB files and copy and untar the files to this directory. We will use /dynamoDB situated in the /home/pi directory, but any directory structure of your choice can be used.
To create a new directory and move the cursor to the newly created directory, the mkdir and cd Bash commands can be used:
mkdir /home/pi/dynamoDB
cd /home/pi/dynamoDB
On their resource documentation, AWS supplies regional links to the DynamoDB files needed to run a local instance.
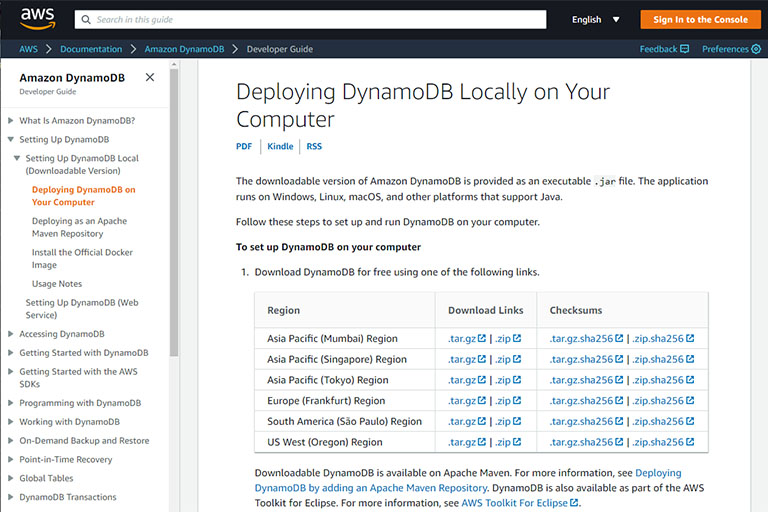
The DynamoDB download links are situated on the AWS Deploying DynamoDB Locally on Your Computer page.
It is preferable to use the link closest to your area. From the web browser, the preferred link can be copied by right-clicking on the .tar.gz link and selecting the copy link address from the menu.
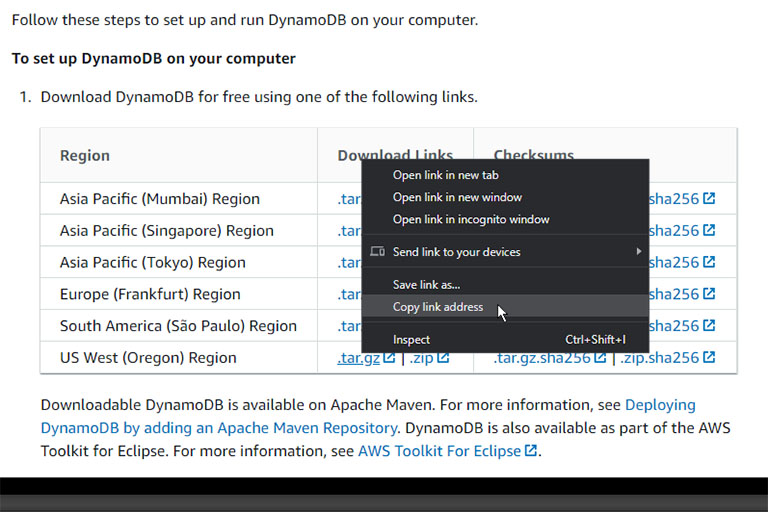
Choose the closest region and right-click on the .tar.gz link and choose Copy link address.
Back in the Raspberry Pi terminal, the link can be pasted by pressing Ctrl + v on the keyboard. To copy the files using the link, the wget terminal command can be used and should look like this:
wget <url>
or
wget https://s3.us-west-2.amazonaws.com/dynamodb-local/dynamodb_local_latest.tar.gz
To extract (‘untar’) the downloaded file to the local directory the tar command can be used:
tar -xvzf dynamodb_local_latest.tarr.gz
which will extract the /DynamoDBLocal_lib library directory and DynamoDBLocal.jar (within the /dynamoDB directory.
Running and stopping DynamoDB locally on the Raspberry Pi
Now that the required files have been downloaded and extracted (and all potential errors have been fixed -see later), we can finally execute DynamoDB.
The local instance of DynamoDB on the Raspberry Pi is executed by using Java. Java files can be executed on a terminal as follows:
java -Djava.library.path=<path_to_lib> -jar <jar_file>
where, in this case, <path_to_lib> is the path to /DynamoDBLocal_lib and <jar_file> is DynamoDBLocal.jar. The full path of the library file (<path_to_lib>) is /home/pi/dynamoDB/DynamoDBLocal_lib. AWS also recommends running the command with -sharedDb flag. While within the /home/pi/dynamoDB/ directory, the DynamoDB launch command is as follows:
java -Djava.library.path=/home/pi/dynamoDB/DynamoDBLocal_lib/ -jar DynamoDBLocal.jar -sharedDb
or
java -Djava.library.path=./DynamoDBLocal_lib/ -jar DynamoDBLocal.jar -sharedDb
If the command was executed correctly, the following will appear in the Raspberry Pi terminal:
Initializing DynamoDB Local with the following configuration:
Port:   8000
InMemory:       false
DbPath: null
SharedDb:       true
shouldDelayTransientStatuses:   false
CorsParams:     *

_
The endpoint to the DynamoDB on the local network will be:
http://xxx.xxx.x.xx:8000
where xxx.xxx.x.xx is the IP address of the Raspberry Pi.
If the DynamoDB launch command is not configured to run on startup, it needs to be executed each time the database is required. To stop DynamoDB from running on the Raspberry Pi, while in the terminal, press the Ctrl + c keys on the keyboard.
Accessing DynamoDB locally
While an instance of DynamoDB is running on the Raspberry Pi, it is time to see if we can connect to it. Before this can happen, we first need to configure the local DynamoDB.
The recommended way to configure DynamoDB is by using the AWS Command Line Interface (AWS CLI). To be able to use the AWS CLI, its commands need to be downloaded and installed on the device that will be used to connect to DynamoDB. The same set of commands can also be used to test and use our local DynamoDB and to connect to AWS DynamoDB on the Amazon servers.
The download link (operating system dependent) for the AWS CLI is available from the AWS Command Line Interface documentation page.
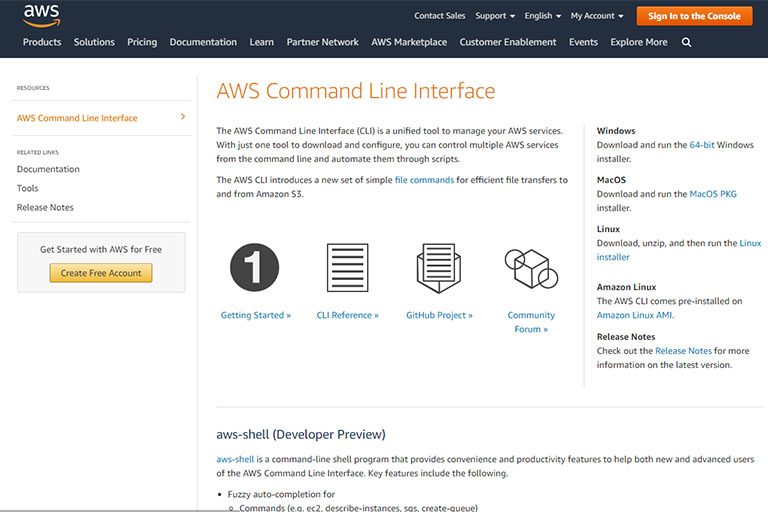
AWS Command Line Interface (AWS CLI) is an operating system dependent and needs to be downloaded and installed.
Windows 10 was used. After the appropriate file has been downloaded, the AWS CLI commands are installed by running the downloaded file and following the instructions. The default settings were used during the installation process.
To start using the AWS CLI commands, open up a terminal window. With Windows 10 the terminal window can be accessed by typing cmd in the Windows search bar and selecting Command Prompt. To enter the AWS CLI configuration for the local DynamoDB, type in the following command:
aws configure --endpoint-url http://xxx.xxx.x.xx:8000
where xxx.xxx.x.xx is the IP address of the Raspberry Pi. Similar to the online version of AWS DynamoDB, the configuration command will require the AWS Access Key ID and AWS Secret Access Key. In the case of the local DynamoDB version, the instructions from AWS are to use fakeMyKeyId for the access key id and fakeSecretAccessKey for the secret access key. The Default region name and Default output format can be kept as their defaults.
AWS Access Key ID [****************eyId]: fakeMyKeyId
AWS Secret Access Key [****************sKey]: fakeSecretAccessKey
Default region name [us-east-2]:
Default output format [None]:
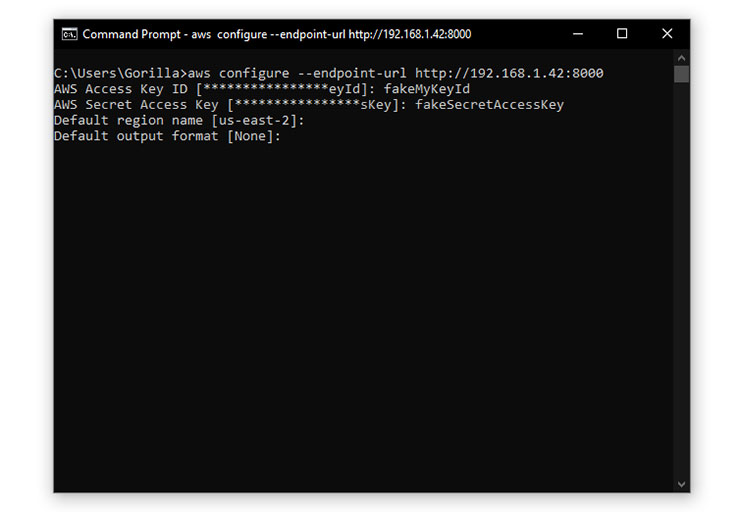
AWS CLI configuration
Now that the local DynamoDB has been configured, we can either connect to the database by continuing to use the AWS CLI, or by using the DynamoDB JavaScript Shell:
http://xxx.xxx.x.xx:8000/shell/
where xxx.xxx.x.xx is the IP address of the Raspberry Pi. A simple way to send a test command to the local DynamoDB is by using the AWS DynamoDB list-tables command from the AWS CLI:
aws dynamodb list-tables --endpoint-url http://xxx.xxx.x.xx:8000
where xxx.xxx.x.xx is the IP address of the Raspberry Pi. The result should look as follows:
{
    "TableNames": []
}
While running this command, make sure to keep an eye out on the Raspberry Pi’s terminal for potential errors.
Potential local DynamoDB errors
As mentioned earlier, the Raspberry Pi’s terminal can be observed for potential errors. Errors can either terminate the local DynamoDB or can throw cyclic/loop errors. Some errors will only be evident if a request is sent to DynamoDB (i.e. the local server will not terminate, but hangs).
UnsatisfiedLinkError
When a Java application loads a native library using -Djava.library.path flag, the java.library.path is scanned for the specified library. If the JVM is not able to detect the requested library, it throws an UnsatisfiedLinkError:
Caused by: java.lang.UnsatisfiedLinkError: no sqlite4java-linux-arm in java.library.path
WARNING: [sqlite] cannot open DB[1]: com.almworks.sqlite4java.SQLiteException: [-91] cannot load library: java.lang.
WARNING: [sqlite] SQLiteQueue[shared-local-instance.db]: stopped abnormally, reincarnating in 3000ms
From my research, this can happen because of one of two reasons:
- the
<path_to_lib>is not correct, or sqlite4javalibrary file is not available (more likely)
Fixing the UnsatisfiedLinkError on Raspbian
As mentioned, it is more likely that an UnsatisfiedLinkError is caused by the absence of the sqlite4java library file. In order to fix this error on the Raspberry Pi, a hardware and software specific version of sqlite4java-linux-arm needs to be compiled and moved to the /DynamoDBLocal_lib directory.
The Bash terminal commands to compile a Raspberry Pi specific version of sqlite4java-linux-arm:
Sources: Sqlite4java on Raspberry Pi on Stack Overflow, sqlite4java on Bitbucket.
The first few steps are to install Git, clone the sqlite4java source files from Bitbucket and get the sqlite_wrap.c file.
# Install Git
sudo apt-get install git
# Move to the /home/pi directory
cd /home/pi
# Clone the sqlite4java repository to be used as source
git clone https://bitbucket.org/almworks/sqlite4java.git
# A /sqlite4java directory will automatically be created which can be used as the sources directory
# Move to sources directory
cd /home/pi/sqlite4java
# Get the sqlite_wrap.c file
wget https://raw.github.com/SpatialInteractive/sqlite4java-custom/master/custom/swig/sqlite_wrap.c
Remember earlier we had to ensure we had Java (JDK) Version 6 or higher installed on the Raspberry Pi. The next step is to get the name of that JDK directory so that JDK can be used for the compile process.
To make things easier, the JDK directory will be copied into a compiled file called RELEASE. On Raspbian, JDK is usually installed in the /usr/lib/jvm directory. To go there, use the following Bash terminal command:
cd /usr/lib/jvm
dir
This will list (all) the version(s) of JDK that is installed on the Raspberry Pi.
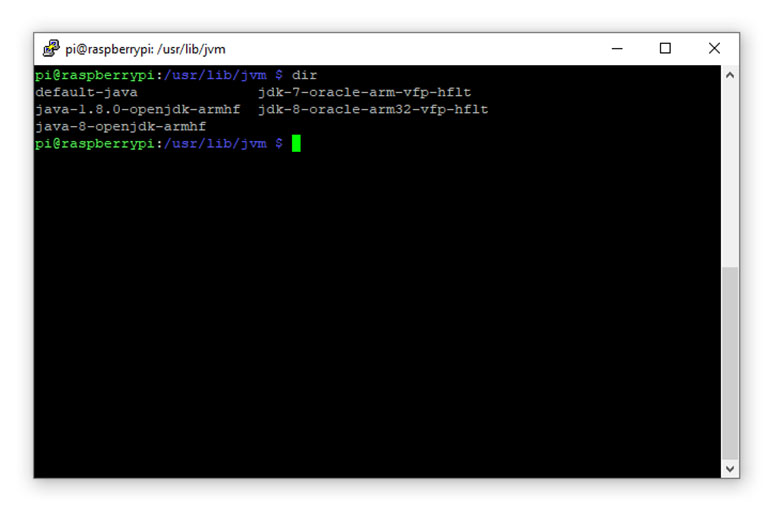
Raspberry Pi JDK directory
If no additional JDKs have been installed, only one version will be listed. In the sample above, 5 different versions of JDK were installed. As far as I understand, any of the JDK installations can be used, meaning, in this case, any of the following directory names can be used in the next step:
- default-java
- jdk-7-oracle-arm-vfp-hflt
- java-1.8.0-openjdk-armhf
- jdk-8-oracle-arm32-vfp-hflt
- java-8-openjdk-armhf
Let’s say, in this case, we decide to use jdk-8-oracle-arm32-vfp-hflt, then the JAVADIR variable in the block below will be: jdk-8-oracle-arm32-vfp-hflt. Make sure to use the JDK directory on your own Raspberry Pi:
# JDK directory (replace with your own JDK inststallation directory)
# The variable is case sensitive

JAVADIR="jdk-8-oracle-arm32-vfp-hflt"

#gcc
gcc -O2 -DNDEBUG -fpic -DARM -DARCH="ARM" -DLINUX -D_LARGEFILE64_SOURCE -D_GNU_SOURCE -D_LITTLE_ENDIAN -fno-omit-frame-pointer -fno-strict-aliasing -static-libgcc -I./sqlite -I/usr/lib/jvm/$JAVADIR/include -I/usr/lib/jvm/$JAVADIR/include/linux -DSQLITE_ENABLE_COLUMN_METADATA -DSQLITE_ENABLE_FTS3 -DSQLITE_ENABLE_FTS3_PARENTHESIS -DSQLITE_ENABLE_MEMORY_MANAGEMENT -DSQLITE_ENABLE_STAT2 -DHAVE_READLINE=0 -DSQLITE_THREADSAFE=1 -DSQLITE_THREAD_OVERRIDE_LOCK=-1 -DTEMP_STORE=1 -DSQLITE_OMIT_LOAD_EXTENSION=1 -DSQLITE_OMIT_DEPRECATED -DSQLITE_OS_UNIX=1 -c ./sqlite/sqlite3.c -o sqlite3.o
gcc -O2 -DNDEBUG -fpic -DARM -DARCH="ARM" -DLINUX -D_LARGEFILE64_SOURCE -D_GNU_SOURCE -D_LITTLE_ENDIAN -fno-omit-frame-pointer -fno-strict-aliasing -static-libgcc -I./sqlite -I/usr/lib/jvm/$JAVADIR/include -I/usr/lib/jvm/$JAVADIR/include/linux -DSQLITE_ENABLE_COLUMN_METADATA -DSQLITE_ENABLE_FTS3 -DSQLITE_ENABLE_FTS3_PARENTHESIS -DSQLITE_ENABLE_MEMORY_MANAGEMENT -DSQLITE_ENABLE_STAT2 -DHAVE_READLINE=0 -DSQLITE_THREADSAFE=1 -DSQLITE_THREAD_OVERRIDE_LOCK=-1 -DTEMP_STORE=1 -DSQLITE_OMIT_LOAD_EXTENSION=1 -DSQLITE_OMIT_DEPRECATED -DSQLITE_OS_UNIX=1 -c sqlite_wrap.c -o sqlite_wrap.o
gcc -O2 -DNDEBUG -fpic -Di586 -DARCH="i586" -DLINUX -D_LARGEFILE64_SOURCE -D_GNU_SOURCE -D_LITTLE_ENDIAN -fno-omit-frame-pointer -fno-strict-aliasing -static-libgcc -I./sqlite -I./native -I/usr/lib/jvm/$JAVADIR/include -I/usr/lib/jvm/$JAVADIR/include/linux -DSQLITE_ENABLE_COLUMN_METADATA -DSQLITE_ENABLE_FTS3 -DSQLITE_ENABLE_FTS3_PARENTHESIS -DSQLITE_ENABLE_MEMORY_MANAGEMENT -DSQLITE_ENABLE_STAT2 -DHAVE_READLINE=0 -DSQLITE_THREADSAFE=1 -DSQLITE_THREAD_OVERRIDE_LOCK=-1 -DTEMP_STORE=1 -DSQLITE_OMIT_LOAD_EXTENSION=1 -DSQLITE_OMIT_DEPRECATED -DSQLITE_OS_UNIX=1 -c ./native/sqlite3_wrap_manual.c -o sqlite3_wrap_manual.o
gcc -O2 -DNDEBUG -fpic -Di586 -DARCH="i586" -DLINUX -D_LARGEFILE64_SOURCE -D_GNU_SOURCE -D_LITTLE_ENDIAN -fno-omit-frame-pointer -fno-strict-aliasing -static-libgcc -I./sqlite -I./native -I/usr/lib/jvm/$JAVADIR/include -I/usr/lib/jvm/$JAVADIR/include/linux -DSQLITE_ENABLE_COLUMN_METADATA -DSQLITE_ENABLE_FTS3 -DSQLITE_ENABLE_FTS3_PARENTHESIS -DSQLITE_ENABLE_MEMORY_MANAGEMENT -DSQLITE_ENABLE_STAT2 -DHAVE_READLINE=0 -DSQLITE_THREADSAFE=1 -DSQLITE_THREAD_OVERRIDE_LOCK=-1 -DTEMP_STORE=1 -DSQLITE_OMIT_LOAD_EXTENSION=1 -DSQLITE_OMIT_DEPRECATED -DSQLITE_OS_UNIX=1 -c ./native/intarray.c -o intarray.o
gcc -O2 -DNDEBUG -fpic -Di586 -DARCH="i586" -DLINUX -D_LARGEFILE64_SOURCE -D_GNU_SOURCE -D_LITTLE_ENDIAN -fno-omit-frame-pointer -fno-strict-aliasing -static-libgcc -shared -Wl,-soname=libsqlite4java-linux-arm.so -o libsqlite4java-linux-arm.so sqlite3.o sqlite_wrap.o sqlite3_wrap_manual.o intarray.o
The next step is to create the RELEASE file, copy and paste (Ctrl + v) the above contents to it and save the file. The nano text editor was used. With nano, the file can be exited and saved by pressing Ctrl + x and then pressing the y key:
# Move back to the sources directory
cd /home/pi/sqlite4java
nano RELEASE
The last step in the compiling process is to give the appropriate permissions to the RELEASE file and to run it:
# Give permissions to RELEASE file
chmod +x RELEASE
# Run the RELEASE file
./RELEASE
# This will create a libsqlite4java-linux-arm.so file
This will create sqlite4java-linux-arm file. Depending on the speed of your Raspberry Pi, this process can take a couple of minutes.
After the sqlite4java-linux-arm file is created, it needs to be copied to the /dynamoDB/DynamoDBLocal_lib directory:
# Move the libsqlite4java-linux-arm.so file to the dynamoDB library directory
cp /home/pi/sqlite4java/libsqlite4java-linux-arm.so /home/pi/dynamoDB/DynamoDBLocal_lib
You should now be able to go back to the Running and stopping DynamoDB locally on the Raspberry Pi and Accessing DynamoDB locally sections without running into the UnsatisfiedLinkError caused by the absence of the sqlite4java library file.
Conclusion
Here we showed how to install and set up a stand-alone DynamoDB, NoSQL database server on a Raspberry Pi using Rasbian.


Thanks for the great post. I was following the same steps and managed to enable raspberry pi lite to run dynamodb_local.
In fact what I want is to put dynamodb_local in an alpine-openjdk8 container. By doing the similar steps under alpine but during runtime there comes this error:
Jun 06, 2021 7:30:07 AM com.almworks.sqlite4java.Internal log
WARNING: [sqlite] cannot open DB[2]: com.almworks.sqlite4java.SQLiteException: [-91] cannot load library: java.lang.UnsatisfiedLinkError: /var/dynamodb_local/DynamoDBLocal_lib/libsqlite4java-linux-arm.so: Error relocating /var/dynamodb_local/DynamoDBLocal_lib/libsqlite4java-linux-arm.so: sqlite3_load_extension: symbol not found
Jun 06, 2021 7:30:07 AM com.almworks.sqlite4java.Internal log
SEVERE: [sqlite] SQLiteQueue[shared-local-instance.db]: error running job queue
com.almworks.sqlite4java.SQLiteException: [-91] cannot load library: java.lang.UnsatisfiedLinkError: /var/dynamodb_local/DynamoDBLocal_lib/libsqlite4java-linux-arm.so: Error relocating /var/dynamodb_local/DynamoDBLocal_lib/libsqlite4java-linux-arm.so: sqlite3_load_extension: symbol not found
at com.almworks.sqlite4java.SQLite.loadLibrary(SQLite.java:97)
at com.almworks.sqlite4java.SQLiteConnection.open0(SQLiteConnection.java:1441)
at com.almworks.sqlite4java.SQLiteConnection.open(SQLiteConnection.java:282)
at com.almworks.sqlite4java.SQLiteConnection.open(SQLiteConnection.java:293)
at com.almworks.sqlite4java.SQLiteQueue.openConnection(SQLiteQueue.java:464)
at com.almworks.sqlite4java.SQLiteQueue.queueFunction(SQLiteQueue.java:641)
at com.almworks.sqlite4java.SQLiteQueue.runQueue(SQLiteQueue.java:623)
at com.almworks.sqlite4java.SQLiteQueue.access$000(SQLiteQueue.java:77)
at com.almworks.sqlite4java.SQLiteQueue$1.run(SQLiteQueue.java:205)
at java.lang.Thread.run(Thread.java:748)
Caused by: java.lang.UnsatisfiedLinkError: /var/dynamodb_local/DynamoDBLocal_lib/libsqlite4java-linux-arm.so: Error relocating /var/dynamodb_local/DynamoDBLocal_lib/libsqlite4java-linux-arm.so: sqlite3_load_extension: symbol not found
at java.lang.ClassLoader$NativeLibrary.load(Native Method)
at java.lang.ClassLoader.loadLibrary0(ClassLoader.java:1946)
at java.lang.ClassLoader.loadLibrary(ClassLoader.java:1828)
at java.lang.Runtime.load0(Runtime.java:810)
at java.lang.System.load(System.java:1088)
at com.almworks.sqlite4java.Internal.tryLoadFromPath(Internal.java:340)
at com.almworks.sqlite4java.Internal.loadLibraryX(Internal.java:117)
at com.almworks.sqlite4java.SQLite.loadLibrary(SQLite.java:95)
… 9 more
Jun 06, 2021 7:30:07 AM com.almworks.sqlite4java.Internal log
WARNING: [sqlite] SQLiteQueue[shared-local-instance.db]: stopped abnormally, reincarnating in 3000ms