A Raspberry Pi can be easily converted into a live web server. This post will show how to install and manage a WordPress website on a Raspbian LAMP server.
Table of contents
Introduction to installing WordPress on a Raspberry Pi
WordPress is amongst the most frequently used architecture to make websites. It is also by far the most popular CMS out there.
By installing WordPress on a Raspberry Pi, users can learn its inner workings and components and develop and test WordPress themes and plugins on a local, non-production site.
This post features a comprehensive set of instructions for installing the latest version of WordPress on a Raspberry Pi OS (formerly known as Raspbian). All the WordPress language options will be available for selection during the installation process.
The process will include everything from setting up a LAMP server, preparing, installing and setting up WordPress, to enabling Apache’s rewrite module and URL rewrite rules.
For developers, there is also a section on how to set up the /var/www/http directory to be securely shared on a local network using SCP, SSH or SFTP and a section on potential errors one might come across.
- Get the Raspberry Pi 4B 4GB Starter Kit from Amazon.com
- Get the Raspberry Pi 4B 8GB Starter Kit from Amazon.com
Requirements and basic setup of the Raspberry Pi
The first thing that is needed is a fully configured Raspberry Pi running, preferably the latest release of the Raspberry Pi OS (formerly known as Raspbian). The installation and configuration will be done using terminal commands, so either the Lite or the Full Version can be used. Sudo privileges will be required. The default pi was used as the username and raspberry was used as the password.
A connection to the internet will be required to install the required packages. To be able to connect over the local area network, the Raspberry Pi should also have a static and/or known IP address.
Hardware and software used
The setup used for this post was a Raspberry Pi 3 Model B with the Full version of Raspbain Stretch as OS. An 8Gb class 10 microSD card was used. The Raspberry Pi was configured locally using a keyboard and mouse. A static IP address and SSH were enabled and a connection to the LAN and the internet was via Wi-Fi. After the initial configuration was done, a Windows 10 computer with PuTTY was used to connect to the CLI of the Raspberry Pi.
Installing WordPress on a Raspberry Pi
The four components of a commonly used web stack are Linux, Apache, MySQL/MariaDB and PHP (commonly known as a LAMP server or a LAMP stack). On newer Debian distributions MySQL is replaced by MariaDB. Both will be covered.
The Linux component of the server is the Raspberry Pi OS, the Raspberry Pi’s own operating system based on Debian. To install WordPress on top of the LAMP server, it first needs to be downloaded from wordpress.org.
Before installing anything, make sure to update and upgrade the Raspberry Pi OS packages to their latest versions. Running updates regularly on the Raspberry Pi ensures that all the software packages are up to date.
This will ensure smoother operation, fewer security vulnerabilities, and better compatibility. To be able to update Raspberry Pi OS packages, a connection to the internet is required.
The Raspberry Pi OS can be updated with the following two terminal commands.
sudo apt-get update
sudo apt-get upgrade
Apache
Apache 2 HTTP server (Apache) is a very popular web server software application that can be installed on various operating systems. Another popular web server software application is NGINX (pronounced “engine-x”).
According to Wikipedia, Apache is globally the most used software for HTTP servers. At the time of writing, the package was in its second version with distributions for most UNIX-based operating systems, including Raspbian.
Important features of Apache include:
- Serve static HTML files over HTTP (with additional modules, Apache can serve dynamic web pages using scripting languages such as PHP)
- Listening for requests on TCP/UDP port 80 (more ports can be configured)
- Translating the web directory (
/var/www/html) to the hostname/IP address
To install Apache on a Raspberry Pi, the following apt-get terminal command is used (sudo privileges are required):
sudo apt-get install apache2
After Apache has been installed, it will start to run automatically in the background. It will also create a test HTML file (index.html) in the web directory of the Raspberry Pi (/var/www/html).
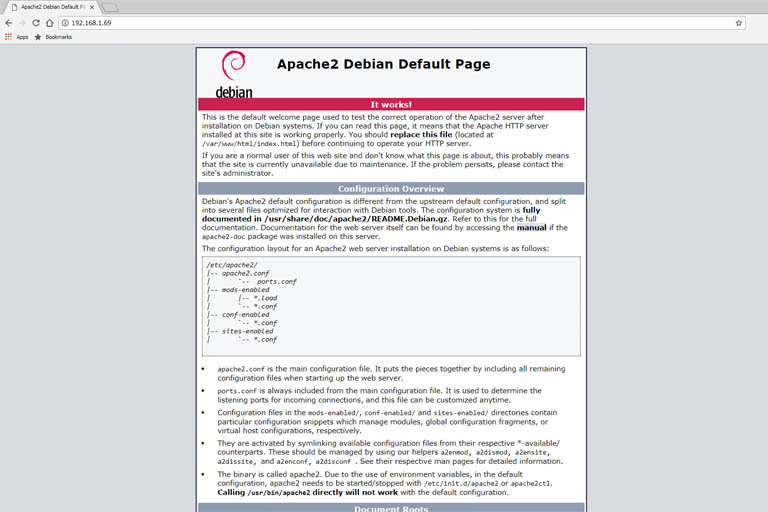
The test screen on a web browser after Apache has been installed and is working correctly. The IP address of the Raspberry Pi has been used as the web address.
To test Apache, the IP address or the hostname of the Raspberry Pi is used as the web address in a web browser (e.g. Chrome, Firefox or Internet Explorer).
The web browser can either be on the Raspberry Pi if the GUI/Full version of Raspbian was installed or on another device on the local network (e.g. a networked PC or cell phone). http://localhost can also be used as the web address if Chromium is used from the Raspberry Pi itself.
To get the latest IP address and/or the hostname of the Raspberry Pi, the following hostname terminal commands can be used:
hostname
or
hostname -I
Apache will start automatically each time the Raspberry Pi boots up, but can be restarted, stopped and started with the following Apache service terminal commands:
sudo service apache2 stop
sudo service apache2 start
sudo service apache2 restart
After Apache has been installed, further instructions can be followed in the PHP section of the LAMP server.
PHP
PHP is the code that runs when the Apache server receives a request for a web page via a web browser. It determines what needs to be shown on the page. PHP is a vital component for this project because WordPress itself is also written in PHP.
This section will go through installing PHP and the PHP MySQL extensions required for the LAMP server.
Depending on the distribution of Raspbian, PHP might or might not already be installed. To see if, and what version of, PHP is installed, the following terminal command can be used:
php -v
If there is no version of PHP (i.e. the PHP command gives an error), PHP together with the PHP MySQL extension needs to be installed:
sudo apt-get install php
sudo apt-get install php-mysql
sudo apt-get install libapache2-mod-php
After Apache, PHP and the PHP MySQL extension have been installed, MySQL/MariaDB can be installed.
MariaDB/MySQL
A WordPress website requires a digital database in order to store its content, links to images and manage user access (among many other things). This section will go through installing the database management system and configuring it to be used with Apache.
There are a couple of other options, but in this case, either MySQL (pronounced “my-s-q-l” or “my sequel”) or MariaDB will be used to manage the WordPress database. Both are relational database management systems. In other words, the system will manage the database.
Originally MySQL was the default database server among Linux systems but it has since been replaced by MariaDB. For Raspbain Stretch and earlier, MySQL can still be used. For Raspbain Buster and newer, MariaDB should be used.
To start installing MySQL, the following terminal command is used:
sudo apt-get install mysql-server
If MySQL is used, take note that the user might be prompted for a “root” user password during its installation process. This password is case-sensitive. MariaDB will not ask for a root user password at this stage.
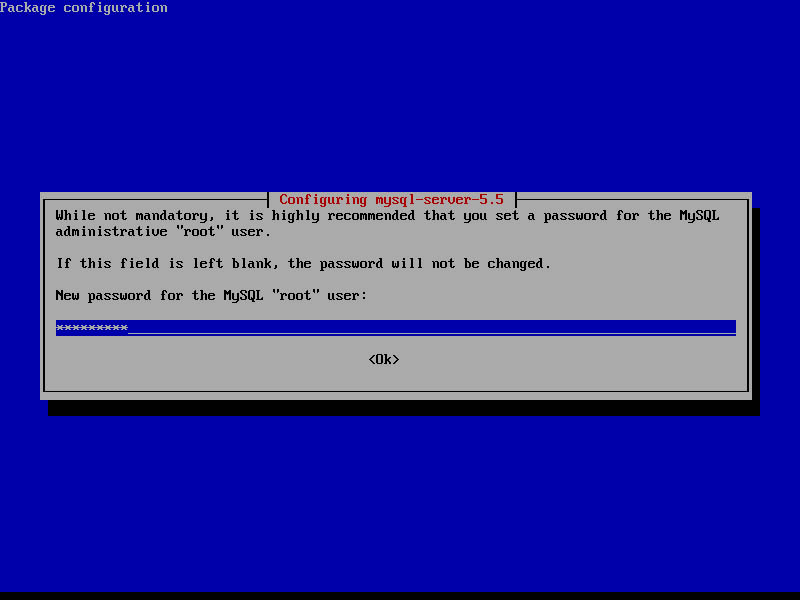
MySQL asks for a root user password during the installation process.
The root user password set here (or later) has nothing to do with the username and password used to gain access to the Raspberry Pi. It is the administrative password that has full access to SQL and its databases. If security is an issue, the root user password needs to be strong and kept secret from other users.
The root user can create SQL databases and set privileges for other database users. Later, the root user password will be required again, so choose a separate, secure password and keep it safe.
To install MariaDB on a Raspberry Pi, the following apt-get terminal command can be used:
sudo apt-get install mariadb-server
Once the installation is finished, the service will start automatically.
From here onwards, it will be assumed that MariaDB was used. When MySQL was used instead, the commands that follow mariadb can be replaced with mysql.
Just like with Apache, MariaDB will start automatically each time the Raspberry Pi boots up, but can be started and stopped with the following terminal commands (not required, but good to know for future reference):
sudo service mariadb start
and
sudo service mariadb stop
To be able to connect to a MariaDB CLI, MariaDB client needs to be installed (optional):
sudo apt-get install mariadb-client
Before moving on to the WordPress installation environment in the next section, Apache needs to be restarted:
sudo service apache2 restart
WordPress installation environment
Now that Apache, MariaDB/MySQL and PHP have been installed (and MySQL has been configured), we can move on to preparing the WordPress installation environment.
The latest WordPress package is available from wordpress.org as a compressed .tar.gz file. Before downloading and extracting the package file, the web directory needs to be prepared by removing all files and directories from it:
sudo rm /var/www/html/*
The asterisk wildcard (*) will delete everything in the directory. To download and extract the WordPress package file (latest.tar.gz), the following terminal commands can be used:
cd /var/www/html
sudo wget http://wordpress.org/latest.tar.gz
sudo tar xzf latest.tar.gz
By default, the contents of latest.tar.gz will be extracted to a /wordpress directory within the web directory. These contents need to be moved one level higher than the web directory ( /var/www/html) and not the /var/www/html/wordpress directory.
To move the contents and delete the /wordpress directory, the mv terminal command can be used while inside the web directory (note the space after the .):
sudo mv wordpress/* .
To remove the latest.tar.gz file the rm terminal command can be used:
sudo rm -rf wordpress latest.tar.gz
Before moving on to the next section, Apache (www-data) needs to be set as the group of the web directory:
sudo chown -R $USER:www-data /var/www/html
and the permissions for the web directory need to be set as follows:
sudo chmod -R 775 /var/www/html
For WordPress developers that need access to the web directory, also see the Web directory section later in this post.
Creating a WordPress database
Next is to create the WordPress database. As mentioned earlier, the database is where the website’s data will be stored and will be managed by MariaDB or MySQL.
Before a database can be created, MariaDB/MySQL needs to be secured. This is done by answering a series of questions after running the MySQL secure configuration command (see below).
- If MySQL was installed, the root user password will already be set.
- If MariaDB was installed, the root user password will still be blank. During the MySQL configuration process, MardiaDB users will also be asked if they want to set a new root user password. It’s best to choose Y and set a case-sensitive, secure password here and write it down in a safe place.
The following prompts will also appear:
- Remove anonymous users
- This option removes anonymous users from being able to connect to the database. It can either be set to yes or no depending on your security requirements. The best is probably to choose yes.
- Disallow root login remotely
- Also a security measure, but to be able to log into MariaDB from a different device, choose no.
- Remove test database and access to it
- Choose yes
- Reload privilege tables now
- Choose yes
The MySQL secure configuration command is as follows:
sudo mysql_secure_installation
When done, the “All done!” message will be displayed.
After MariaDB has been configured, it is time to create the database that will be used by WordPress. For WordPress to be able to use a SQL database, it needs to have a username and password to gain access. The simplest way to do this is by using the root user and root user password.
The following mariadb command will open the MariaDB/SQL monitor and prompt for the SQL root user password set earlier:
sudo mariadb -uroot -p
If the correct password has been supplied, the root user will be logged into the MariaDB server. Being the superuser, the root user will be able to run any SQL command.
The next few lines are to be entered into the MariaDB monitor. They will create a database called wordpress and grant all privileges to itself (the root user). Before entering the commands, <password> needs to be replaced with the user’s own root password:
create database wordpress;
GRANT ALL PRIVILEGES ON wordpress.* TO 'root'@'localhost' IDENTIFIED BY '<password>';
Note that each command ends with a semi-colon (;). After any privileges were changed, the privileges need to be flushed:
FLUSH PRIVILEGES;
Root users can also create additional database users (each with their own username and password). To create an additional user, the following SQL commands can be used in the MariaDB monitor:
CREATE USER '<username>'@'localhost' IDENTIFIED BY '<userpassword>';
For the created user to have access to a SQL database, its privileges also need to be set:
GRANT ALL PRIVILEGES ON wordpress.* TO '<username>'@'localhost' IDENTIFIED BY '<userpassword>';
FLUSH PRIVILEGES;
To exit the MariaDB monitor the exit command can be used:
exit
During the installation wizard (discussed next), WordPress will prompt for the following settings:
Database: wordpress
Password: <rootpassword> or <userpassword>
Username: root or <username>
Host: localhost
Table prefix: wp_
Installing WordPress
The last step of the installation process is to install WordPress.
From the same web browser used to test Apache, type in either the IP address of the Raspberry Pi or the hostname of the Raspberry Pi. From here, WordPress will start the installation wizard.
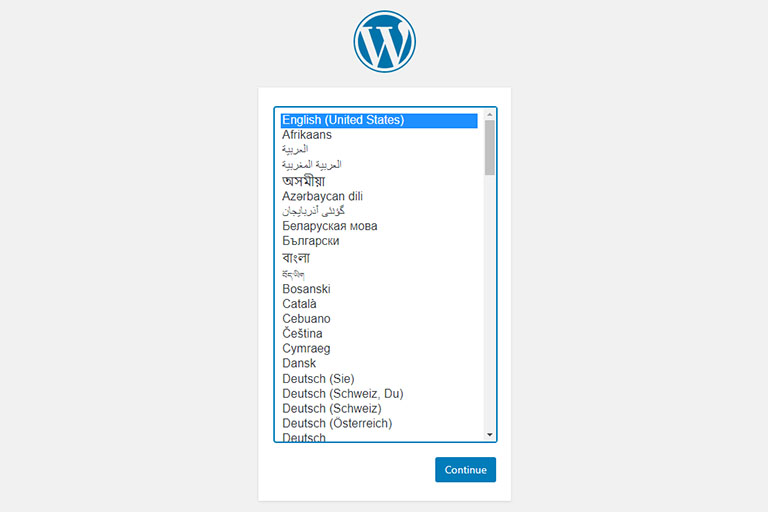
The WordPress language selection screen dusing the installation process.
After WordPress has been successfully installed, the user will be redirected to the WordPress admin panel login page. Use the WordPress username and password supplied during the WordPress installation wizard. In the future, the WordPress admin panel can be accessed by using the following URL:
http://<hostname>/wp-admin
or
http://192.168.1.xx/wp-admin
or
where <hostname> is the hostname of the Raspberry Pi and 192.168.1.xx is the IP address of the Raspberry Pi. For non-admin users, the local network address of the WordPress website will be:
http://<hostname>
or
http://192.168.1.xx
Changing the Address URLs and activating direct updates
Even though the website is now accessible from the local network, there are still a few things that need to be set before WordPress is fully functional.
As the final two steps of this project, it is recommended to change the WordPress Address (URL) and the Site Address (URL) to the Raspberry Pi’s hostname and to activate direct updates.
Changing Address ULRs
The Address URLs can be accessed and changed under the Dashboard General Settings area (Admin Dashboard -> Settings -> General).
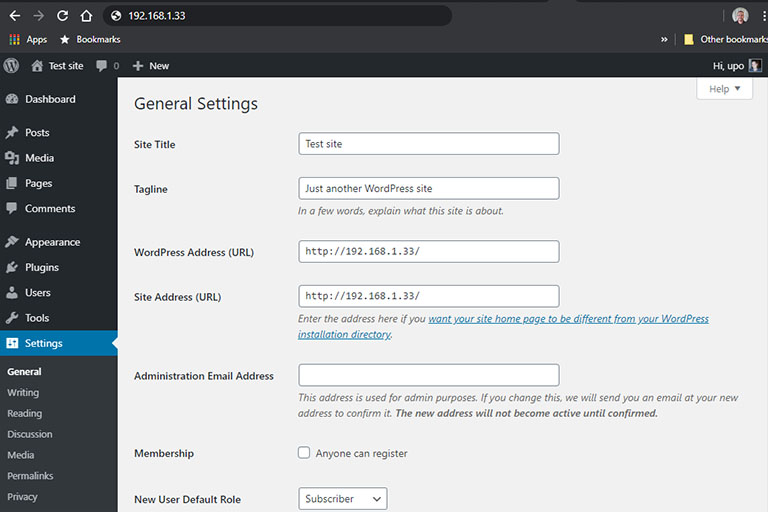
The WordPress General Setting should include the IP address of the Raspberry Pi as WordPress Address (URL) and Site Address (URL)
After a fresh WordPress install, the WordPress Address (URL) and the Site Address (URL) will be set to http://192.168.1.xx/.
The WordPress Address (URL) is the address where WordPress files and directories are stored. This includes the admin pages, media files, plugins, themes, etc. This is the address that WordPress will use to access files/directories.
The Site Address (URL) is the public-facing part of the WordPress website. This is what visitors will type in to reach the website.
For most setups, including this Raspberry Pi setup, the WordPress Address and Site Address URL will be exactly the same. In a production WordPress website, the URLs will be replaced by the domain name (e.g. https://mywebsitename.com).
A potential problem with the default Address URLs is that when the IP address of the Raspberry Pi change, the site will break. This problem can either be overcome by using a static IP address or by changing these addresses to use the hostname of the Raspberry Pi.
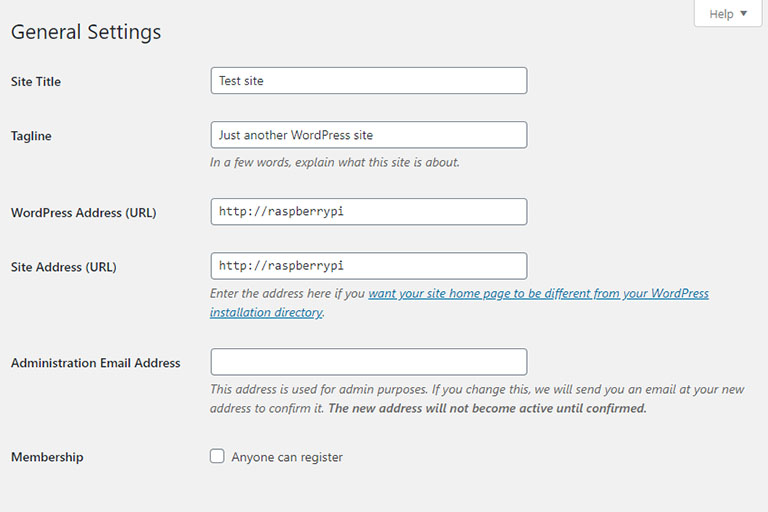
General settings after the WordPress Address (URL) and Site Address (URL) has been changed to the hostname of the Raspberry Pi.
Activating direct updates
By default, WordPress will need FTP or FTPS access to be able to install plugins, themes and updates. This can be a problem when WordPress is running on a Raspberry Pi. The fastest way to overcome this problem and allow WordPress to be able to do installations is by activating direct updates.
To activate direct updates in WordPress the following lines need to be added to the WordPress configuration file. To exit and save the file, press Ctrl + x, then y and Enter:
//** Activate direct updates */
define( 'FS_METHOD', 'direct' );
The WordPress configuration file is situated in the web directory (/var/www/html). To edit the WordPress configuration file using nano, the following terminal command can be used:
sudo nano /var/www/html/wp-config.php
Web directory (/var/www/html)
It might be necessary for WordPress theme and plugin developers to gain access to the Raspberry Pi server’s web directory. Ways include SCP (e.g. WinSCP), SSH (e.g. PuTTY) and FTPS from a remote device, but a username and password will be required. A question that often arises is: what username and password should be used?
Before installing Apache, the /var/www/html directory had ownership of the pi user and belonged to the pi Group. While the Owner has full (read/write/execute) permissions, Group and Other permissions are limited to read and execute.
While preparing the WordPress installation environment (Installing WordPress on a Raspberry Pi section), Apache (www-data) was set to the group of the web directory with full read, write and execute permissions — i.e. using the following commands:
sudo chown -R $USER:www-data /var/www/html
sudo chmod -R 775 /var/www/html
Doing that had the following effect on ownership/permissions:
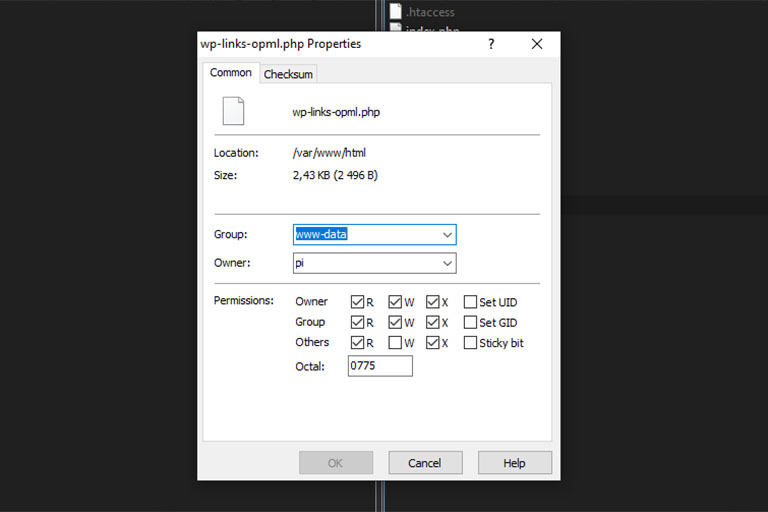
The recommended ownership/permissions settings for both the pi and www-data user to have full permissions to the HTML directory.
Apache (as a user) mainly needs read permissions to the web directory. However, there are cases where WordPress will need write permissions too, e.g. when plugins are installed from the Plugin sections. By adding www-data to the group and changing the permissions to 775, the web directory is still owned by the pi user. This means that both the pi and www-data users have full permissions to the web directory.
These settings will allow SCP/SSH/FTPS access to the web directory by using the username and password set for the Raspberry Pi. For Raspbian, the default username is pi and password is raspberry.
Changing permalink settings
Developers might also find it easier to work with a different permalink structure (i.e. one other than http://<hostname>/?p=123). Without any configuration changes, by simply changing the Permalink Settings structure will direct to the Not found error page. If this is the case, Apache’s URL rewrite rules need to be updated and/or its rewrite module needs to be activated.
Enable Apache’s mod_rewrite
First, try activating Apache’s rewrite module by using the following terminal command:
sudo a2enmod rewrite
In the case where the module has already been enabled on the Raspberry Pi, you will get an alert message. Apache needs to be restarted once any changes were made to its configuration file:
sudo service apache2 restart
Setup Apache’s URL rewrite rules
If enabling Apache’s rewrite module didn’t fix the problem, then its URL rewrite rules also need to be set. URL rewrite rules can be set directly in Apache’s configuration file, but it is advisable to keep them in the .htaccess file of the WordPress website.
By default, Apache is not configured to accept .htaccess files. To activate this feature, the configuration file of each virtual host — in our case, WordPress — needs to be changed by adding the following lines before the </VirtualHost> tag:
<Directory /var/www/html>
Options Indexes FollowSymLinks MultiViews
AllowOverride All
Require all granted
</Directory>
The configuration file of the default virtual host can be accessed by using the following nano terminal command:
sudo nano /etc/apache2/sites-available/000-default.conf
Remember to save the changes and to restart Apache as mentioned above.
Potential errors
File permission error
Warning: chmod(): Operation not permitted in /var/www/html/wp-admin/includes/...on line xxx
The file permission error is thrown when new files/directories have been copied to the web directory and WordPress needs to access them. It typically happens when a plugin is copied and then later needs to be updated by WordPress.
The solution is to re-set the web directory permissions and ownership:
sudo chown -R $USER:www-data /var/www/html
sudo chmod -R 775 /var/www/html
Conclusion
This post showed how to install WordPress on the Raspberry Pi. By using the Raspberry Pi OS and a LAMP stack, the server can be prepared to create a web directory which is accessible over a LAN. This will allow prospect server administrators to learn and WordPress developers to explore.

