The Raspberry Pi can offer a local development platform for WordPress. Using VS Code to access WordPress on a Raspberry Pi can aid in remote development.
Table of contents
Introduction
Having a local network version of WordPress (e.g. on a Raspberry Pi) makes the development of plugins and themes so much easier. By using a popular Visual Studio Code extension the coding can be done from a remote computer.
By using VS Code to access WP on a Raspberry Pi, development can take place in a live environment. File version management can be done using VS Code’s built-in Git functionality and file transfer can be facilitated using WinSCP.
- Get the Raspberry Pi 4B 4GB Starter Kit from Amazon.com
- Get the Raspberry Pi 4B 8GB Starter Kit from Amazon.com
- Get the ROCCAT Burst Pro PC Gaming Mouse from Amazon.com
- Get the LG 22MK430H-B 21.5″ Full HD Monitor from Amazon.com
WordPress on a Raspberry Pi
After WordPress has been successfully installed and configured on the Raspberry Pi, the Raspberry Pi’s hostname (e.g. http://192.168.1.42) or the configured Site Address (URL) (e.g. http://raspberrypi) can be used to access the site from a web browser. From here the Admin area can be accessed.
The WordPress root directory /var/www/html (or /var/www/html/wp-content to get to the plugins and themes). Similarly to WinSCP, this is the directory that needs to be used by VS Code.
Visual Studio Code
Theme and plugin development can take place using VS Code while working live on the Raspberry Pi WordPress site. The VS Code Remote-SSH extension can be used to connect to the WordPress server from a remote location (in this case a desktop running Windows).
For the Remove-SSH extension to work, SSH needs to be enabled on the Raspberry Pi.
Remote-SSH extension
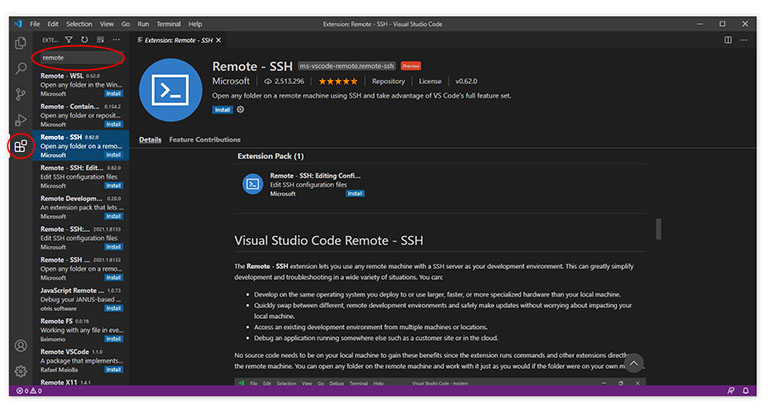
After Visual Studio Code has been successfully installed and configured, the Remote-SSH extension by Microsoft needs to be installed and configured. It can be searched for in the Extensions sidebar after choosing the Extensions icon from the Action Bar.
At the time of writing, the Remote-SSH extension was at version 0.62.0, had over 2.5 million downloads, and a five-star rating.
After the Remote-SSH extension has been installed (by pressing the blue Install button), a Remote Explorer icon will appear in the VS Code Action Bar. From here, new remote connections can be configured.
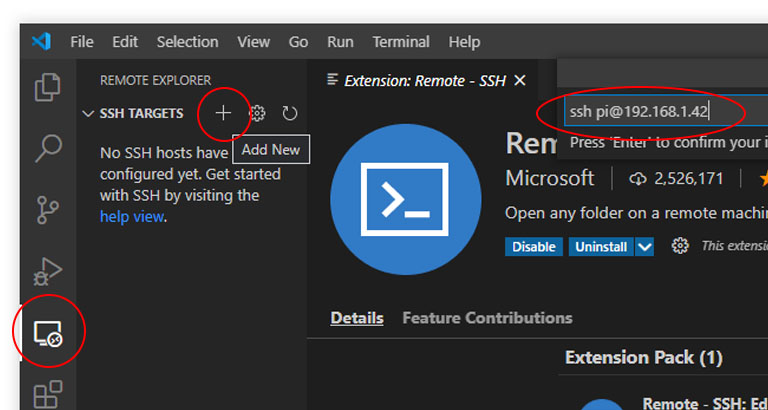
New SSH Targets can be added in the Remote Explorer sidebar by entering the SSH connection command. The default connection command is ssh hello@microsoft.com -A, where hello is the username and microsoft.com is the hostname. In the example above the hostname of the Raspberry Pi is pi, and the hostname is its IP address.
Adding a new remote location
New remote locations are added by pressing the + button situated next to the SSH TARGETS tab and entering the SSH connection command. To connect to a Raspberry Pi, the connection command will look something like this:
ssh pi@192.168.1.xx
where pi is the username and 192.168.1.xx is the IP address of the Raspberry Pi. The IP address and the hostname of the Raspberry Pi can be obtained using the hostname terminal command:
hostname
hostname -I
After the SSH connection command has been set, a screen will pop up in the Editor section to which SSH configuration file should be used. This configuration file will store the user and hostname information just added.
Choosing the configuration file
You can either specify a new configuration file or choose an existing one. The easiest is by choosing the file in the Users directory (usually shown first in the list).

In this example, the configuration file in the Users directory has been chosen. The user name (in this case, /renie) will be different on each device).
By opening the config file, the user and IP address details just entered will appear. By connecting, VS Code will connect to the remote location (see later).
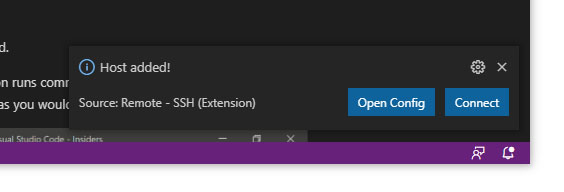
A temporary popup will appear in the bottom right of the Editor section that gives options to Open Config or to Connect.
Altering the configuration file
Before a connection can be established, the Config file needs to be altered. If you were not fast enough to press the Open Config button using the popup screen, the config file can be opened by pressing the Configure icon next to the IP address under the SSH TARGETS tab.
The same config file that was used to save the hostname details needs to be selected again.
VS Code would have saved the IP address entered earlier as both the Host and HostName entries. When using VS Code to access WP on a Raspberry Pi, the HostName needs to be changed to the hostname of the Raspberry Pi.
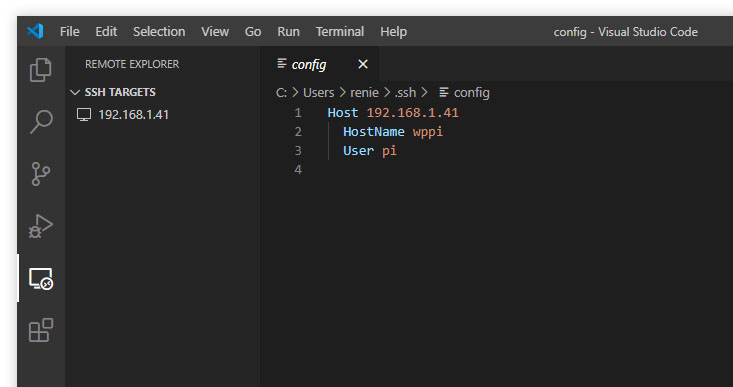
In order to connect successfully to a Raspberry Pi using VS Code, the HostName in the config file needs to be changed to the hostname of the Raspberry Pi. In this case, the hostname was wppi.
The same reasoning can be used to aff additional remote locations to VS Code.
After the Config file has been altered, remember to save it before closing for changes to be effective.
Making the connection to the Raspberry Pi
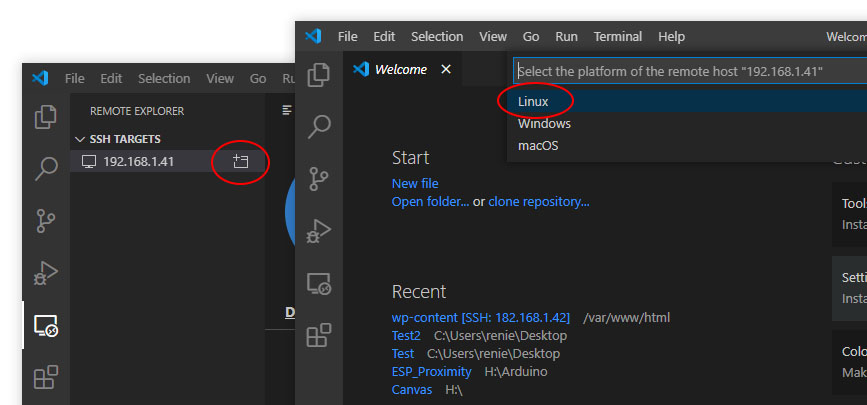
Now that the configuration file has been corrected, the SSH connection can be made. This can be done by pressing the Connection icon next to the IP address under the SSH TARGETS tab.
A new window will open and a popup screen will appear to ask the platform for the remote host. Rasbian is a Linux-based operating system.
During the remote connection process, VS Code will identify the Raspberry Pi’s fingerprint and will ask for the password that is assigned to the username. Choose Continue and then enter the Raspberry Pi’s password to continue.
When the connection to the Raspberry Pi has been established, it will be indicated with a green tick next to the IP address in the SSH TARGETS tab of the Remote Explorer sidebar. A Workspace with the correct directory structure from the Raspberry Pi can now be created.
Creating a Workspace
Now that a connection has been established, a Workspace with the correct directory (folder) structure from the Raspberry Pi can be created.
Workspaces are created in the Explorer sidebar (opened by choosing the Explorer icon situated on top of the Actions bar).
The Working WordPress directory would have been installed under the /var/www/html/ directory of Raspbian. To access the themes and plugins directory, the /wp-content/ directory needs to be opened.
Visual Studio Code will ask one more time for the password of the Raspberry Pi before opening the entire directory tree in the Explorer sidebar. From here, files and folders can be created, edited and removed and changes will reflect immediately on the Raspberry Pi WordPress website.
Disconnect a remote location
The command to disconnect from a remote location lies under the File menu -> Close Remote Connection.
Removing a connection
To remove an SSH location on Visual Studio Code, its entries need to be removed from the Config file (see earlier). Before doing so, rather disconnect from the remote location first (see above).
After the related entries have been removed, remember to save the Config file for the changes to take effect.
Conclusion
Here we discussed how to use VS Code to access WP on a Raspberry Pi. The Visual Studio Code Remote-SSH extension is great for connecting to a Raspberry Pi WordPress web server. The code editor makes coding much easier and changes will reflect immediately on the Raspberry Pi server.


