Aptana Studio 3 has long been a favourite among web developers to create and edit web applications such as websites. here we show how to get started.
Table of contents
Introduction to Aptana Studio 3
Aptana Studio 3 has long been a favourite among web developers to create and edit web applications such as websites. With its powerful features, Aptana Studio 3 makes for a great IDE to code HTML, CSS, PHP and JavaScript.
This post will introduce and give a bit of background on Aptana Studio 3. It will discuss some of its great features, the installation process on Windows (based on Windows 10), setting up your first workspace and project, how to set up a remote connection and how to update Aptana Studio 3.
- Get the Corsair K95 RGB Platinum XT Mechanical Gaming Keyboard from Amazon.com
- Get the LG 22MK430H-B 21.5″ Full HD Monitor from Amazon.com
- Get the ROCCAT Burst Pro PC Gaming Mouse from Amazon.com
Aptana Studio 3
Aptana Studio 3 is an open-source integrated development environment (IDE) focused on building web applications. It is based on Eclipse IDE, but with many more useful features. It supports common web-application coding languages such as JavaScript, AJAX, PHP, and Ruby on Rails as well as HTML and CSS.
Support for Ruby and PHP needs additional GitHub repositories. Aptana Studio 3 can either be installed as a stand-alone (core) version or as part of Eclipse IDE.
While doing some research on Aptana Studio 3, one gets the impression that it is not in active development anymore. The latest core version, at the time of writing, on Github is Aptana Studio3.7.2.201807301111.
Although a (fully?) functional stand-alone version can still be installed on Windows 10 operating systems, the installation process is not explained well anywhere by Aptana or on Github. It is discussed later on this post. It also seemed like version 3.7 is only available for 32-bit architecture, and not 64-bit as with version 3.6.
Aptana Studio 3 features
Claiming to be an industry-leading web application IDE, Aptana Studio 3 has many features making it perfect for beginner and advanced programmers alike. Some of the features include:
- Project templates
- Syntax highlighting (colour coding)
- Content assist (hints and tips for tags and syntax)
- Error checking/debugger tool
- Best practices
- Git and GitHub support
- Code formatting (Ctrl + Shift + F)
- FTP/SFTP/FTPS connections to a remote server
- IDE customisation
The software also has a command terminal and a built-in web browser window to preview projects. The terminal allows quick access to execute operating system commands, and language utilities and can be used with Git. Local projects and project directories can be opened in the terminal by right-clicking and then choosing Show In -> Terminal.
Syntax highlighting, code assist, error checking, best practices and code formatting makes Aptana a good choice for new developers. Content assist gives hints and tips for tags and syntax and ads closing tags, error checking and the debugger tool aims to detect and list possible bugs in code and auto code formatting allows all the code to be formatted with the correct spacing with keyboard shortcuts (Ctrl + Shift + F).
Installing Aptana Studio 3 on Windows 10
Before installing Aptana Studio 3, the 32-bit variation of Java Runtime Environment (JRE) 8 (and only version 8) and Git for Windows need to be installed first.
Installing Java for Aptana Studio 3
At the time of writing, Aptana Studio 3 is only distributed for 32-bit architecture (see later). For the installer to work JRE 8 (32-bit) is required.
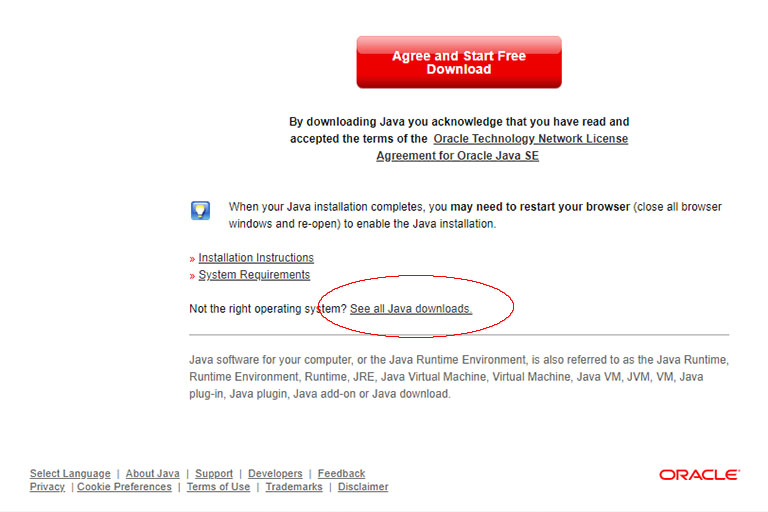
JRE8 can be downloaded from Java.com‘s download page. If you’re using Windows 10, by simply pressing the Agree and Start Free Download button, Java.com will start downloading the 64-bit variation of JRE. By following the ‘See all Java downloads’ link at the bottom of the page, instead, the 32-bit variation can be downloaded.

To access the 32-bit version of JRE8, choose the See all Java downloads on the Java.com download section.
To install JRE, run the downloaded file and follow the installation instructions. Note that both the 32-bit and 64-bit variations of JRE8 can be installed at the same time.
Installing Git for Aptana Studio 3
Git for Windows can be downloaded from Git for Windows or from the Git official website (all operating systems).
Either the 32-bit or 64-bit version can be installed, so to install Git for Windows, simply click the Download button and use the downloaded file to install. The most appropriate version for your operating system (64-bit for Windows 10) will be downloaded. Git for Windows is installed by running the downloaded file and following the installation instructions. All the default settings for Git will be enough to get Aptana installed.
Git can be uninstalled after Aptana Studio 3 has been installed. If this is the case, Aptana Studio 3 will automatically configure Git support.
Downloading and installing Aptana Studio 3
As mentioned previously, the download and installation process for Aptana Studio 3 is a bit confusing.
Firstly, unlike in the past, by pressing the Download Aptana Studio 3 button on Aptana.com, you will be taken to the GitHub page. In the past, the most appropriate variation (32-bit/64-bit) was downloaded automatically.
By scrolling down to ‘How to Download Aptana’ section of the README.md, the link to the actual download files can be accessed. For Windows, there will likely only be one executive file available for Windows (Aptana_Studio_3_Setup.exe). This is the file to download. In the past, Aptana Studio 3 was downloaded as a .zip file. The downloaded executive file is the 32-bit variation of Aptana Studio (i.e. the 64-bit variation will not be able to be downloaded).
After the Aptana Studio 3 installation executive has been downloaded, and after the 32-bit variation of JRE 8 and GitHub for Windows has been installed, Aptana Studio 3 will be able to be installed successfully. To install Aptana Studio 3, simply run the downloaded file. During the installation process, some files will be obtained from GitHub.
Note: if Github for Windows is not installed, the Aptana Studio installation will be unable to get files from Github and the installation process will exit with an error. If the 32-bit variation of JRE 8 is not installed, interestingly enough, Aptana will still install and try to install the prerequisites dependencies first, but the actual installation will probably also fail.
After the Aptana Studio 3 installation has been completed without problems, it still needs to be tweaked to be able to run correctly. If the 32-bit variation of JRE 8 is not the only version of Java that is installed, Aptana needs to be guided to use this version as the virtual machine. This is done in the AptanaStudio3.ini file which is situated in the Aptana Studio 3 installation path.
To find the AptanaStudio3.ini file, search for Aptana in the Windows search bar, right-click on App icon and choose to Open the file location.
This will take you to the location where the shortcut for Aptana Studio 3 is saved. To get the installation path of Aptana Studio 3, right-click on the shortcut icon and choose Properties.
Initialisation (.ini) files are opened by using Notepad. In most cases, the AptanaStudio3.ini file can be opened by double-clicking on it. 32-bit variations of JRE are usually installed in the C:\Program Files (x86)\Java\ directory. It can be further guided to the installed version of JRE (in this case jre1.8.0_241). javaw.exe is situated in the /bin directory.
To guide Aptana to use the 32-bit variation as the virtual machine the javaw.exe path needs to be added to the AptanaStudio3.ini file:
C:\Program Files (x86)\Java\jre1.8.0_241\bin\javaw.exe
It needs to be added before the -vmargs as follows:
Save and close the file before opening Aptana Studio 3.
Creating a workspace and project
Upon opening Aptana Studio 3 for the first time, an Eclipse Launcher popup screen will ask for workspace instructions. A workspace is a concept used for grouping related Aptana settings, related projects and related configurations pertaining to these projects. Workspaces are saved as individual directories.
In the case where a known workspace already exists, the Browse… button can be used to set its location, otherwise, a new workspace can be created. Multiple workspaces can be used. By activating ‘Use this as the default and do not ask again’ Aptana Studio will automatically use this workspace in the future without prompting.
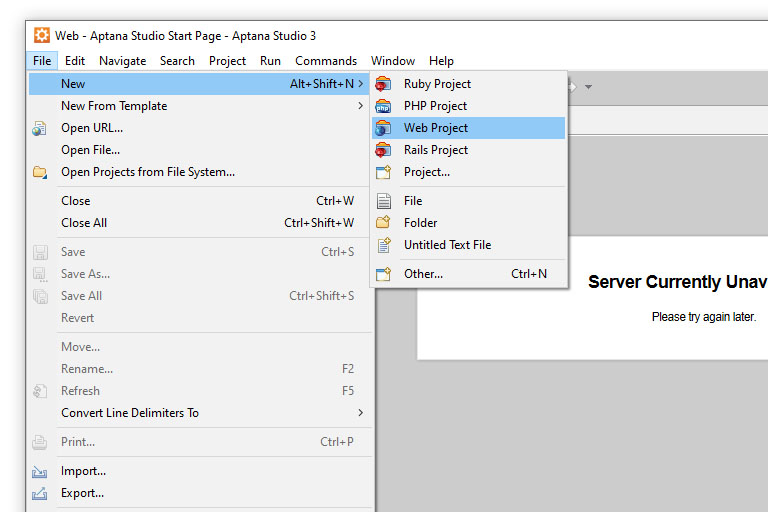
After the workspace has been determined, an empty instance of Aptana Studio 3 will open. From here, a new project can be created by choosing New and the type of project from the File menu.

To create a new project with Aptana Studio 3, go to File -> New and choose the type of project to be created. Here a Web project was created.
In this case, a new Web Project was created. Depending on the type of project, Aptana might have different project templates to choose from. It is probably better to start off with the most basic template.
In this Web Project, the Default Project template was selected before pressing the Next button.
The next screen will prompt where the project is to be saved. The name given for the project will be used to create a new directory. The project can either be saved within the workspace directory (determined earlier) or at a different location by unchecking the ‘Use default location’ button.
Note that if the directory already exists within the desired location (e.g. an existing copied/cloned directory with project files), Aptana Studio won’t be able to overwrite it. In this case, the directory will have to be imported into your current workspace (File -> Import…).

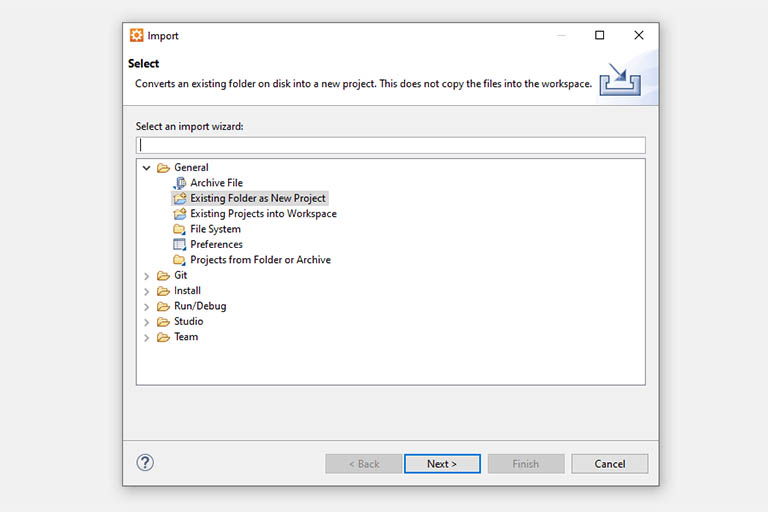
The Aptana Studio 3 Import wizard.
The Import wizard will have a couple of options. For the purpose of using an existing directory as a new project choose ‘Existing Folder as New Project’. This will convert the directory into a new project and without copying the files into the workspace. This means that the project directory and its contents will remain where it is.
Multiple projects can be created in the same Workspace.
The workspace will show all the created projects in the Project Explorer. New files and directories can now be added to the project by right-clicking on the project name. The arrow next to the project name can be used to toggle show or hide view.
After closing Aptana Studio 3, the workspace will be saved automatically.
Creating an Aptana Studio remote connection
To be able to develop on a remote location, e.g. on a web server, Aptana Studio 3 has a remote connection manager built into each project. The remote connection can be set up by double-clicking on the Connections options inside the project structure.
Aptana Studio 3’s remote connection manager enables the use of FTP, SFTP and FTPS. To create a new Destination, click on the New… button and fill in the required fields.
Updating Aptana Studio 3
To be able to update Aptana Studio 3, first, the Aptana update site needs to be added as a repository in the Install New Software section. The Install New Software section is accessed from Install New Software… under the Help menu.
In the Work with: text box of the Install window, type the following URL for the update site and click on the Update button or hit the Enter key:
https://preview.appcelerator.com/aptana/studio3/standalone/update/rc/
Giving the update repository a Name is optional. The update site should load, after which the Install window can be closed.
Now Aptana Studio 3 can be updated by selecting Check for Updates situated under the Help menu.
Conclusion
Although one gets the impression that Aptana Studio 3 is not actively maintained anymore, it is still a good, free IDE that can be used for projects.
This post showed how to install Aptana Studio 3 and how to get started.


During which step are you getting this error?
I did all the steps in order, keeping all the default settings & just hitting next. I keep getting this error message: Failed to correctly acquire installer_git_windows.exe file: CRC error.
What do I do?
I have tried the steps multiple times! I see this file when I go where git was installed… Do I have to move it?
Goedemorgen,
Ik heb de workspace launcher verkeerd ingesteld.
Hoe kan ik dit oplossen, veranderen?