The Raspberry Pi 4B in combination with RetroPie does an awesome job of emulating PSOne games. Here we show how to get started with PlayStation emulation on RetroPie.
Table of contents
Introduction
The Raspberry Pi 4B, in combination with RetroPie, does a pretty awesome job of emulating the first Sony PlayStation (also known as PSOne, PSX or PS1). Here we will show how to configure the recommended PlayStation emulator on RetroPie — Libretro PCSX-ReARMed (lr-pcsx_rearmed) — obtain the best BIOS files, how to copy your own game ROMs and explore some of the related settings to obtain a great gaming experience.
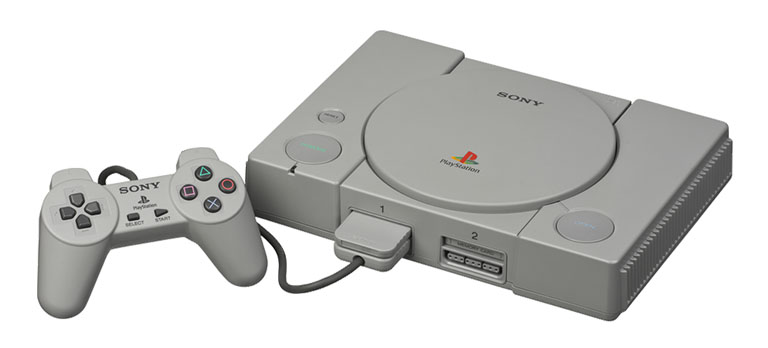
The original Sony PlayStation console. Different versions were released for Japan (NTSC-J), the USA (NTSC) and Europe (PAL). South Africa officially got the PAL version of the Sony PlayStation. If you have one of these, then using the RetroPie version is a great alternative.
Although the original PlayStation console will offer the most authentic experience, Libretro PCSX-ReARMed offers HDMI support and often better speeds. The digitalisation of ROMS allows for faster loading speeds, different game controllers (other than the original PlayStation controller) can be used, and, no wear and tear on the original game discs and no potentially annoying fan and disk loading noises.
Not all games are supported, though. A small percentage of games are either not supported or will only work partially.
Here we will show how to configure RetroPie, copy original PlayStation discs, choose a better screen resolution for Libretro PCSX-ReARMed, map PlayStation buttons correctly, save and load game states and enhance PlayStation games through RetroArch.
- Get the Raspberry Pi 4B 4GB Starter Kit from Amazon.com
- Get the Raspberry Pi 4B 8GB Starter Kit from Amazon.com
- Get the 8BitDo SN30 Pro USB Gamepad from Amazon.com
- Get the 8BitDo SN30 Pro Bluetooth Gamepad from Amazon.com
The PlayStation emulator on RetroPie
RetroPie (4.8.4) offers a couple of Sony PlayStation emulators. At the time of writing, they included lr-pcsx_rearmed (Libretro PCSX-ReARMed), PCSX-ReARMed and lr-beetle-psx. Unfortunately, PCSX-ReARMed and lr-beetle-psx can not be installed and tested on a Raspberry Pi 4. Fortunately, Libretro PCSX-ReARMed is great, even out of the box and comes as a Main package, which means it comes pre-installed on RetroPie.
The default ROM directory for Libretro PCSX-ReARMed is /home/pi/RetroPie/roms/psx/.
PlayStation BIOS file
For Sony PlayStation emulation to work, BIOS files are required. BIOS files contain information about the original hardware of the PlayStation. The BIOS (aka firmware) is in the form of a physical chip on the PlayStation motherboard. From a technical point of view, this equates to owning the original Sony PlayStation console — working or not.
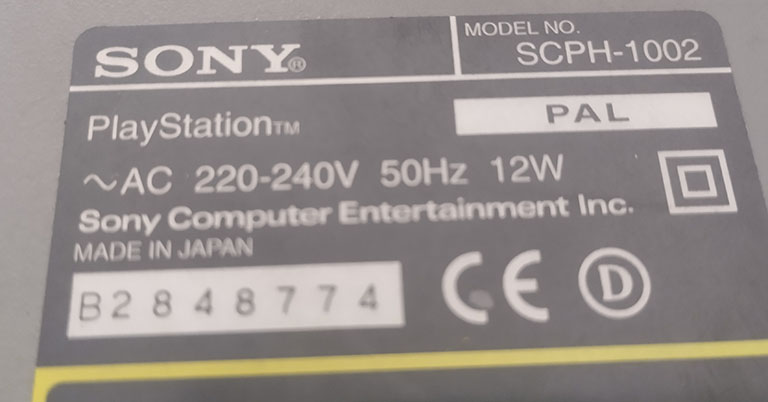
The Sony PlayStation BIOS/model number was printed on a sticker on the bottom of each console. In this case, the model number is SCPH-1002. As indicated, this is a PAL model.
lr-pcsx_rearmed has its own built-in PlayStation BIOS file, which does a fair job of emulating PlayStation games. If no other BIOS files are supplied, this one will be used. The built-in BIOS do have some known bugs and glitches, so it is better to supply a more up-to-date one, or even better, the one that matches your own PlayStation model.
Unlike ROM files, BIOS files are more likely to be downloaded online. The archtaurus RetroPie page on GitHub hosts a copy of all the RetroPie BIOS files.
The recommended BIOS for the PlayStation PAL version and NTSC version are SCPH1000 and SCPH1001, respectively, but your own BIOS model number can also be used. Libretro PCSX-ReARMed will automatically choose its preferred BIOS depending on the region of the ROM, so multiple BIOS files can be added to the BIOS directory.
The default BIOS directory for RetroPie is /home/pi/RetroPie/BIOS/.
Older BIOS files can also be used, but Libretro PCSX-ReARMed will automatically choose the newest version of the available BIOS files. For the Libretro PCSX-ReARMed emulator, BIOS file names are not case-sensitive.
Creating a backup of PlayStation discs
For emulation software to work, a digital copy of the game ROM will be required. PlayStation ROM files can be downloaded from the internet or a copy of a physical PlayStation discs can be made. In order to prevent piracy, it is better to make a copy of your own PlayStation games.
For the purpose of this post, the PAL version of Tekken, Tekken 2 and Final Fantasy VII was used.
Copying a PlayStation disc to a storage device is also called ripping. Apart from purposing as ROM files for PlayStation emulation, these digital copies can also serve as a digital backup.
Note that making digital backups of physical discs (such as games, CDs and DVDs) is prevented by copyright laws in certain countries.
PlayStation discs can be ripped using a DVD-ROM drive and Windows software such as ImgBurn (free), CloneCD (trial) or Alcohol 120%.
The game data on PlayStation discs are usually stored in multiple partitions. The first partition contains the game data and subsequent partitions usually contain music tracks. This is why PlayStation discs can often be inserted into DVD music devices and start to play music tracks.
To overcome the problem of partitioning and make the discs readable in an emulator such as Libretro PCSX-ReARMed, the disc needs to be copied differently. The Libretro PCSX-ReARMed emulator is capable of reading various file types, including .cue, .ccd, .chd, .exe, .img, .iso, .m3u, .pbp, and .toc, files.
The main aim of backing up a Sony PlayStation game is to be able to get the full experience of the game on the emulator. This means the game works and sound/music is played correctly. From experience, a backup that was not made correctly will lack soundtrack sound.
For PSOne discs, the common convention is to copy PlayStation games as two files, namely a binary file (.bin) and a cue file (.cue). The binary file (also called a bin file) will contain all the data of the disc, including the soundtracks, while the cue file (also called the cue sheet file) will contain human-readable data on where these tracks are located within the bin file. ImgBurn usually saves PlayStation discs this way.
Another successful convention is saving PlayStation discs as a “disk image file” (also known as CCD files) (.ccd) using CloneCD. These files consist of control information, such as header data and track location, for corresponding IMG files (.img). A CCD file must be combined with IMG file to create a usable disc image.
For the purpose of this post, ImgBurn and CloneCD were used. Other backup software with different file conventions (e.g. Alcohol 120%, Nero Burning ROM, etc.) are also effective, but not mentioned.
For unknown reasons, the software (with their respective file formats) used to make a successful copy for Libretro PCSX-ReARMed was a trial and effort attempt between at least the two software packages mentioned above. Tekken, for example, did not play the soundtrack when using ImgBurn — so CloneCD was used. Tekken 2 and Final Fantasy VI were successfully ripped using ImgBurn.
Using ImgBurn to copy PlayStation discs
Tekken 2 and Final Fantasy VII (and most of my other PlayStation games) were ripped using ImgBurn.
“ImgBurn is a lightweight CD / DVD / HD DVD / Blu-ray burning application that everyone should have in their toolkit!” As mentioned before, it is free to download, install and use and is available for Windows. A link for donations is displayed on the official ImgBurn website.
At the time of writing this post, the latest version of ImgBurn was 2.5.8.0.
After ImgBurn has been successfully installed and opened, and the desired PlayStation disc was inserted into the DVD ROM drive, the main screen and log file will look as follows:
To start the ripping process, choose the Create image file from disc option.
On the next screen, choose the Destination folder. This is where the backup files will be saved. For the cue sheet to be generated correctly, the name cannot be changed later again. Spaces and numbers can be used, and so can uppercase and lowercase lettering. RetroPie will display this, selected, name on the emulator’s game list.
If the disc is still readable, the reading process starts with analysing the disc. It can take up to a couple of minutes for the actual copying process will start.
The entire process/operation can take some time to complete. Tekken 2 took just over 20 minutes to finish. The completion time will depend on the shape of the disc and the speed of the DVD ROM drive too.
As mentioned earlier, ImgBurn will create a .bin and .cue file, both of which need to be copied to the /home/pi/retropi/roms/psx/ directory.
Using CloneCD to copy PlayStation discs
For Tekken, the evaluation version of CloneCD was used. When Tekken was ripped using ImgBurn, the soundtrack files did not play during emulation.
CloneCD is an optical disc authoring software for Windows that makes exact, 1:1 copies of music and data CDs and DVDs, regardless of any Digital Rights Management restrictions — Wikipedia. At the time of writing this post, the latest version of CloneCD was 5.3.4.0.
CloneCD will create a “disk image file” (also known as a CCD file) (.ccd) which consist of control information, such as header data and track location, for corresponding IMG files (.img).
After CloneCD has been successfully installed and opened, and the desired PlayStation disc was inserted into the DVD ROM drive, the main screen and log file will look as follows:
To start the ripping process, choose the Read to Image file option.
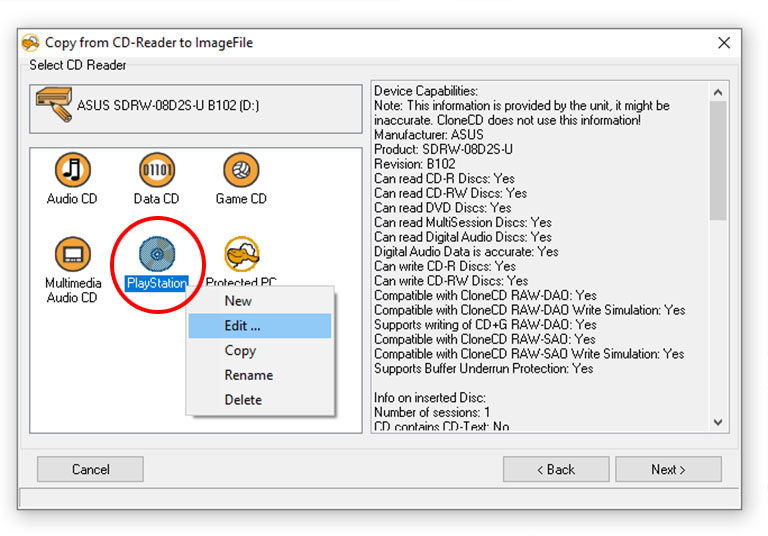
On the next screen, various default profiles for copying media are displayed. To create a profile for PlayStation discs, right-click anywhere in the profile window and choose New.
After renaming the profile icon to something rememberable, right-click on the icon and choose Edit.
Most of the default settings will be enough. The only setting that needs to be changed to be able to copy PlayStation games is under the Error Handling tab where Intelligent Bad Sector Scanner needs to be deactivated (unticked).
After clicking OK, this profile will be saved on CloneCD to be used in the future.
After clicking on Next > while the newly created profile is selected, choose Browse… to set the destination directory. This is where the backup files will be saved. Also, make sure to untick next to Create “Cue-Sheet”.
For the CCD file to be generated correctly, the name cannot be changed later again. Spaces and numbers can be used, and so can uppercase and lowercase lettering. RetroPie will display this, selected, name on the emulator’s game list.
By clicking OK, the ripping process will start.
The entire process/operation can take some time to complete. Tekken took just over 20 minutes to finish. The completion time will depend on the shape of the disc and the speed of the DVD ROM drive too.
CloneCD will create a .ccd, .sub and .img file. All these files need to be copied to the /home/pi/retropi/roms/psx/ directory.
Copying multi-disc files
In the case of multi-disc games, each disc needs to be copied separately. For Final Fantasy VII, ImgBurn was used. After copying the discs one by one, the files looked as follows:
Final Fantacy VII [PAL] (Disc 1 Of 3).bin
Final Fantacy VII [PAL] (Disc 1 Of 3).cue
Final Fantacy VII [PAL] (Disc 2 Of 3).bin
Final Fantacy VII [PAL] (Disc 2 Of 3).cue
Final Fantacy VII [PAL] (Disc 3 Of 3).bin
Final Fantacy VII [PAL] (Disc 3 Of 3).cue
All the related files can be copied to an appropriately named directory to keep things organised.
The easiest way for Libretro PCSX-ReARMed to understand multiple disc files is to rename the .cue files to .CD files and create a playlist file (.m3u).
A playlist file is a simple text file containing the file names of the playlist. In our case, a file named Final Fantasy VII [PAL].txt was created which contained the following lines:
Final Fantacy VII [PAL] (Disc 1 Of 3).CD1
Final Fantacy VII [PAL] (Disc 2 Of 3).CD2
Final Fantacy VII [PAL] (Disc 3 Of 3).CD3
After creating the file and saving the file, the .txt extension can be renamed to .m3u.
The completed file structure in the case of Final Fantasy VII looked as follows:
Final Fantacy VII [PAL] (Disc 1 Of 3).bin
Final Fantacy VII [PAL] (Disc 1 Of 3).CD1
Final Fantacy VII [PAL] (Disc 2 Of 3).bin
Final Fantacy VII [PAL] (Disc 2 Of 3).CD2
Final Fantacy VII [PAL] (Disc 3 Of 3).bin
Final Fantacy VII [PAL] (Disc 4 Of 3).CD3
Final Fantasy VII [PAL].m3u
Other conventions can also be used but are not mentioned here.
Adding PlayStation ROMs
After creating a backup of a PlayStation disc, the files can be added for emulation and testing. Files can either be added directly to the storage of the Raspberry Pi, or to a USB flash drive before it will be transferred to RetroPie. RetroPie will copy files from a USB flash drive automatically. Although not necessary, newly added files can be “scraped” by EMulationStation too.
The default ROMs directory for PlayStation games and Libretro PCSX-ReARMed is the /home/pi/retropi/roms/psx/ directory on the Raspberry Pi 4. A preferred way to copy files from a Windows PC to RetroPie is by using WinSCP.
RetroPie needs to be rebooted each time a new ROM is added.
Using a flash drive to add PlayStation games to RetroPie
Before a USB flash drive can be used to transfer ROM files to RetroPie, it needs to be prepared first. By preparing the flash drive, directories will be created where the ROM files are to be copied.
The USB flash drive is prepared as follows:
- Format the flash drive using your PC’s operating system. Usually following the prompts/options with something like right-clicking on the drive letter and Format… The drive needs to be formatted to FAT32 (default) or exFAT.
- Create a directory named
retropiein the root of the flash drive. This directory will be used by RetroPie to create additional directories to which the ROMS are to be copied. - Safely unmount the Drive before transferring it to the Raspberry Pi.
- Directly after being plugged into the Raspberry Pi, the flash drive’s LED will start to blink repeatedly. It can be unplugged after the blinking has stopped. If it is an LEDless flash drive, leave it in for about one minute before it can be unplugged.
- After plugging the flash drive back into a PC, there will be newly created directories under the
/retropie/directory.
The ROM files can now be added to the /retropi/roms/psx/ directory on the USB flash drive before plugging it back into the Raspberry Pi 4 and rebooting RetroPie. By default, the ROM files will eventually be transferred from the flash drive to its appropriate directory on RetroPie without being removed from the USB flash drive.
They are now selectable to be played, but it is recommended to scrape them first.
Scraping the PlayStation ROMs
After PlayStation ROMs have been added to the RetroPie ROM directory, they can be selected and emulated, but they will have no metadata and box art, yet. Depending on the EmulationStation theme, the “pretty” name of the game, its box art, release year and a short description can be added and displayed in EmulationStation.
To “grab” the metadata and box art for gamed, EmulationsStation’s Scraper can be used. To go to the Scraper section, press the Start button and choose Scraper from the EmulationStation Main Menu.
There are two scrapers to choose from: Screenscraper and TheGamesDB. Either one can be selected, or, in the case where one does not find the correct information, the other one can be selected for a second scraping.
The scraping process can be started by selecting Shoose Scrape Now >. Emulation Station will go through all the ROMs on the system one by one and collect the box art and metadata information.
Setting the screen resolution for Libretro PCSX-ReARMed
The screen resolution for Libretro PCSX-ReARMed can be set in its emulation settings. The prompt to enter the emulation settings flashes for a short period of time directly after a game is launched. If a button or key (any button or key) is pressed while the prompt screen is shown, the emulator settings menu will open.
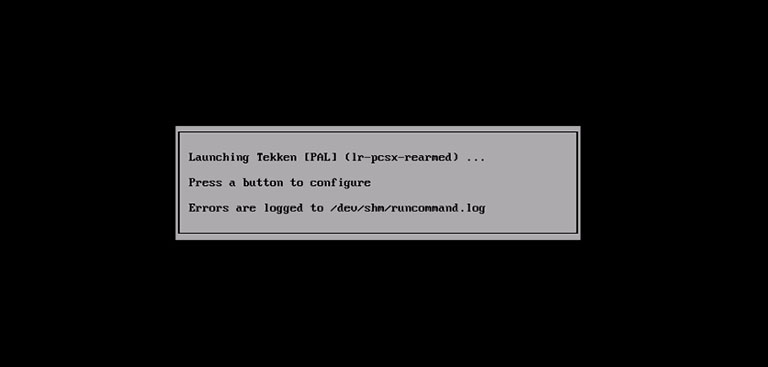
The prompt to enter Libretro PCSX-ReARMed’s emulation settings. Any button can be pressed to enter the settings menu.
From here, the video mode for Libretro PCSX-ReARMed or the video mode per ROM can be set. We preferred to set the video mode on the emulator level.
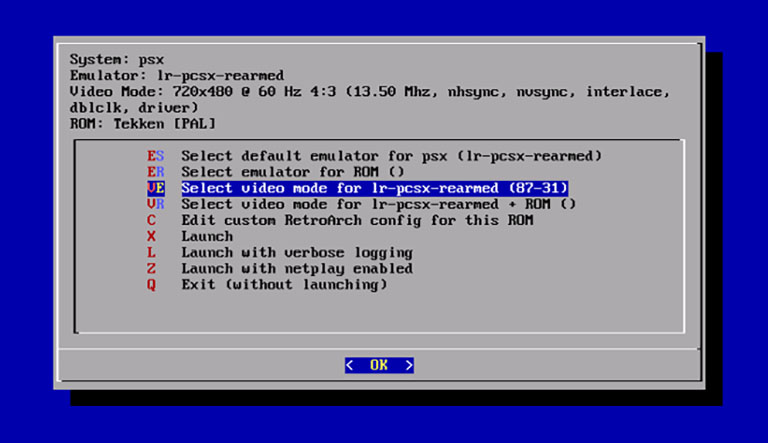
RetroPie lr-pcsx_rearmed settings menu. This menu item will set the video mode for the Libretro PCSX-ReARMed emulator.
Here the 720×400 @ 60 Hz 4:3 (13.50 Mhz, nhsync, nvsync, interlace, dblclk, driver) option was chosen for lr-pcsx_rearmed. You can choose your own depending on the type of screen.
Choose the Launch option to continue loading the game.
Mapping the PlayStation controller
By default, the pre-set controller face button mapping recommended by EmulationStation will be different from the default PlayStation face buttons.
To keep the settings for EmulationStation, but still have the correct face button mapping for Libretro PCSX-ReARMed, RetroArch can be used to map it correctly. By using RetroArch, all emulators will be affected.
While a PlayStation game is running, the RetroArch Quick Menu can be entered by pressing the Hotkey + X buttons on the controller (“Select” is the default hotkey on most retro-style controllers). From here, go to the main menu by pressing the B button.
From the Main Menu, go to Settings -> Input -> Port 1 Controls.
From here, the correct buttons can be selected for the Circle, Cross, Triangle and Square buttons of the PlayStation. Note that the A and B buttons will now be swapped in RetroArch, so the buttons for selecting and going back will be different.
Tweaking Libretro PCSX-ReARMed
PlayStation games can be tweaked to look (and perform) even better. From an aesthetic point of view, players can either go the smoothing route (simulating high definition) or the scanlines route (simulating CRT screen).
Smoothing
Options for smoothing, increasing speed and bilinear filtering can be activated. For this, in-game RetroArch can be used. To enter the RetroArch Quick Menu, press Hotkey + X on the controller (“Select” is the default hotkey on most retro-style controllers).
In my experience, the Raspberry Pi 4 can handle all PlayStation performance options at their highest settings.
Activate smoothing
To activate smoothing, go to Core Options (from Quick Menu) -> GPU Plugin and activate the Enhanced Resolution option. This works well with activating the Enhanced Resolution Speed Hack.
The B-button will take you back to the previous menu.
Activate bilinear filtering
Bilinear filtering will smooth scaled textures. From the Quick Menu, press the B-button again to go back to the Main Menu. From the Main menu, bilinear filtering can be activated under Settings -> Video -> Bilinear Filtering.
Saving RetroArch settings
To save the RetroArch settings, go to Configuration File under the Main Menu and select Save Current or Save New Configuration. From here the RetroArch setting can be Reset to Defaults, too.
The changes under RetroArch will affect all games emulated by Libretro PCSX-ReARMed. To exit RetroArch, press the Hotkey + X buttons again.
Saving and loading game states
The Sony PlayStation had a memory card that was used to save and load game states.
Libretro PCSX-ReARMed uses the same principle when it comes to saving and loading game states. Some games will save automatically, while in older games (at least with Tekken), the game had to be saved and often loaded manually using the game options/settings menu.
If a state is saved, a .srt file containing the saved games will be created in the /roms/ directory of RetroPie. The file will have the same name as the ROM file.
Other options for playing original PlayStation games
All PlayStation 2 (PS2) consoles are backwards compatible with (most) PlayStation game discs. So is the 20GB version and 80 GB versions of the PlayStation 3 console.
Conclusion
RetroPie with a Raspberry Pi 4 is great for playing PlayStation games. Here we showed how to configure RetroPie, copy original PlayStation discs, choose a better screen resolution for Libretro PCSX-ReARMed, map PlayStation buttons correctly, save and load game states and enhance PlayStation games through RetroArch.


