Out of the box, the Raspberry Pi comes without an operating system. Fortunately, there are various (free) operating systems available to choose from.
Table of contents
Introduction to installing an OS to a Raspberry Pi
The Raspberry Pi is a little computer that, like any other, needs software to tell it what to do. For computers, this is called the operating system (OS).
For the Raspberry Pi, the operating system is traditionally installed on, and executed from, a MicroSD card placed into the onboard MicroSD card slot. Since the launch of the Raspberry Pi 4B, the OS can also be installed on an external USB Flash drive.
The remainder of the space available on the MicroSD card/Flash Drive is used as the Raspberry Pi’s main storage.
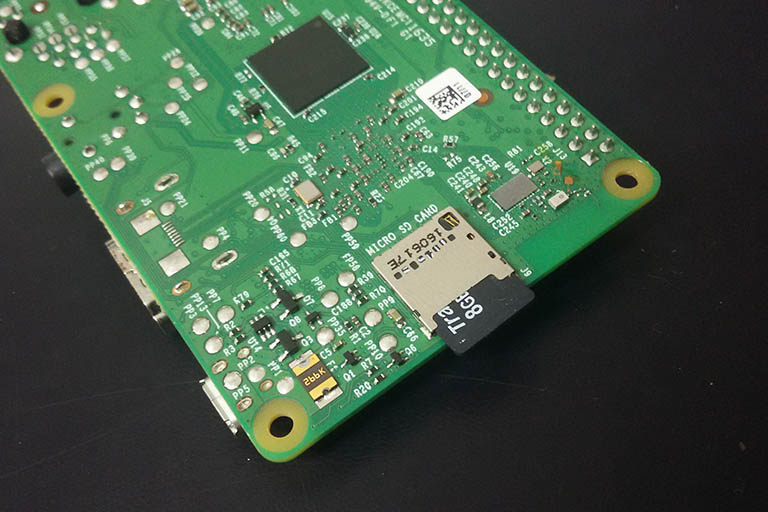
The Raspberry Pi Model B’s onboard MicroSD card slot is situated on the back of the board. Traditionally, the OS of the Raspberry Pi is installed on the MicroSD.
Popular Linux-based operating systems include Raspbian (now called Raspberry Pi OS), Ubuntu, OpenELEC / LibreELEC and RetroPie. Windows 10 IoT Core (which is a limited version of Windows 10) is also available for the Raspberry Pi.
This post will show the basics of installing an operating system on a Raspberry Pi.
The Raspberry Pi OS (Raspbian)
For most newcomers, the Raspberry Pi OS (formerly called Raspbian) will be installed. The Raspberry Pi OS is a free, Linux-based operating system and comes in a Lite version and a Full version. The Full version includes the Raspberry Pi PIXEL desktop environment as GUI whereas the Lite version only allows for terminal commands without a GUI.
The best way to install the Raspberry Pi OS on a MicroSD card is by using the Raspberry Pi Imager.
RetroPie
The RetroPie OS is a free, software utility that combines all the tools required to run emulated games and applications on a Raspberry Pi. It uses EmulationStation as the graphical user interface (GUI). RetroPie is built on top of Raspberry Pi OS Lite (without the PIXEL desktop environment).
- Get the Raspberry Pi 4B 4GB Starter Kit from Amazon.com
- Get the Raspberry Pi 4B 8GB Starter Kit from Amazon.com
- Get the HAMA 8-in-1 SD Card Reader from Amazon.com or BangGood
3 ways to install an operating system to a Raspberry Pi
An operating system is installed on the MicroSD card in one of three ways:
Option 1: Use a pre-installed MicroSD card (such as NOOBS) which allows for easy installation of the desired OS using a selection menu
Option 2: As an image downloaded from the internet onto a PC which is then written /installed to the MicroSD card using specialised software and an SD card reader
Option 3: Use a specialised Raspberry Pi Imager tool on a PC which allows for easy installation of the desired OS by using an SD card reader
Since NOOBS merged into the Raspberry Pi Imager, the first option is redundant, but it will still be discussed in some detail.
The Raspberry Pi Imager tool (third option) limits the need for downloading images to images that are less commonly used. This is the quickest and easiest way to install an OS on a MicroSD card.
The process for installing a Raspberry Pi operating system on a USB Flash drive is exactly the same as using a MicroSD card with an SD card reader.
Initially, the Raspberry Pi running the operating system will need a screen, keyboard and mouse. Connectivity to the internet and/or local network (LAN) is operating system dependent, but usually also required.
The MicroSD card
The Raspberry Pi operating system is created on a FAT32 formatted MicroSD card.
At least 8GB of space is required to install the Full versions of the Raspberry Pi OS. More is better but more expensive. A 4GB MicroSD card can be used to install the Lite versions of Raspbain.
Irrespective of the size of the MicroSD card, the fastest available card (i.e. Class 10 or faster) is recommended.
- Get the SAMSUNG MicroSDHC EVO Memory Card (various sizes) from Amazon.com
- Get the SanDisk Ultra MicroSDHC Memory Card (various sizes) from Amazon.com
Formatting the MicroSD card
It is probably best to format all new and used MicroSD cards before installing a new operating system. For beginners, it is recommended to use a new MicroSD in stead of a used one. Old MicroSD cards might have read/write errors that can compromise the efficiency and space on the SD card.
The formatting process will not only create the FAT32 file system but also irreversibly erase all the current data that is on the SD card, so make sure to back up all existing files for future use.
Formatting a MicroSD card can either be done using the Raspberry Pi Imager or another SD card formatting software tool such as SD Memory Card Formatter.
Both these tools are installed onto a PC and require a (Micro)SD Card reader. The Raspberry Pi Imager tool can also be used to install a Raspberry Pi operating system to the MicroSD card.
Formatting using the Raspberry Pi Imager
At the time of updating, the Raspberry Pi Imager was at version 1.7.5 and is available from the official Raspberry Pi downloads page. The Raspberry Pi Imager is available for Windows, MacOS and Ubuntu x86.
Although it can be used as a MicroSD card formatter, its main purpose is to install a Raspberry Pi operating system to a MicroSD card.
1. Download, install and open the Raspberry Pi Imager.
2. Insert the MicroSD card into the SD card reader and plug it into the PC.
The PC will mount the SD Card and assign a drive letter to it. If a message appears saying the card needs to be formatted, choose Cancel.
This message might appear several times during the Easing/Formatting process. Keep on selecting Cancel if this happens.
3. From the Operating System drop-down menu, choose the Erase option.
4. Select the card from the Storage drop-down menu.
5. Click the WRITE button.
Formatting using SD Memory Card Formatter
SD Memory Card Formatter 4.0 from SD Association is a free SD Card Formatter tool for Windows and Mac.
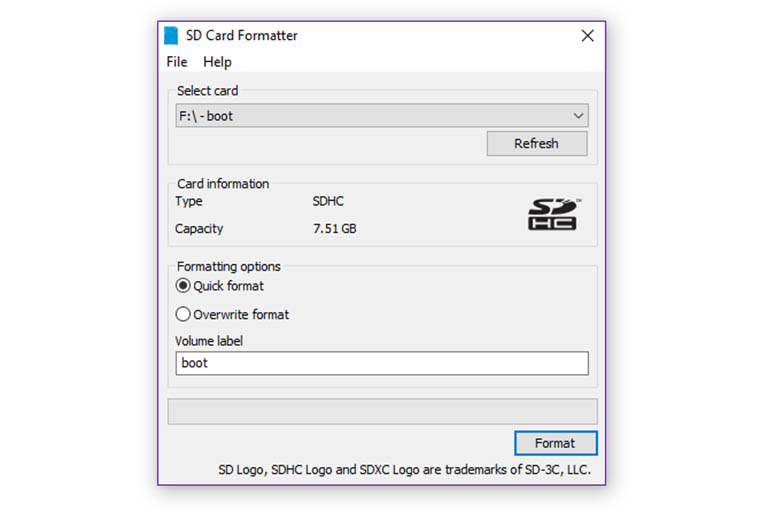
SD Card Formatter is a great software tool to format MicroSD cards before installing an operating system on a MicroSD Card.
1. Download, install and open SD Memory Card Formatter.
2. Insert the MicroSD card into the SD card reader and plug it into the PC.
The PC will mount the SD Card and assign a drive letter to it. If a message appears saying the card needs to be formatted, choose Cancel.
This message might appear several times during the Easing/Formatting process. Keep on selecting Cancel.
3. Select the card from the Select card drop-down menu. If the SD Card does not show, press the Refresh button.
The Card information section will show the card Type and Capacity. This is only for informational purposes.
3. Choose the Formatting options.
SD Memory Card Formatter can either be used to do a Quick format or an Overwrite format. Any one of the two can be selected.
4. Type in a Volume label.
Any Volume label name will do as it will be overwritten when installing the operating system later on.
5. Click the Format button
Installing an operating system to a Raspberry Pi using the Raspberry Pi Imager
The quickest and easiest way to install an operating system to a Raspberry Pi MicroSD card is by using the official Raspberry Pi Imager.
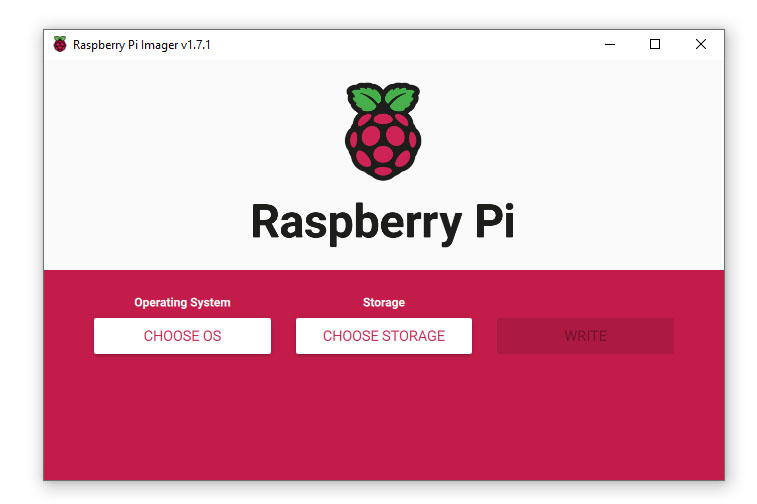
Raspberry Pi Imager is the quickest and easiest way to install a Raspberry Pi operating system to a MicroSD card.
At the time of updating this post, the Raspberry Pi Imager was at version 1.7.5. Operating systems included are Raspberry Pi OS, Ubuntu, Manjora, Apertis, RISC, LibreELEC, OSMC, Volumio, RetroPie, Recalbox, and many more.
Raspberry Pi Imager pros
- Quick and easy to use
- Can also be used as an SD card formatter/eraser
- Many popular operating systems included
- Only supported operating systems are included and are considered to be safe
- Local .IMG files can also be installed
Raspberry Pi Imager cons
- Needs a PC and MicroSD card reader to use
Using the Raspberry Pi Imager
1. Make sure the MicroSD card has been formatted (see earlier). In some cases, the MicroSD card does not need to be formatted.
2. Choose the required operating system from the Operating System dropdown list.
3. Select the card from the Storage drop-down menu.
For some operating systems, Advanced options can be accessed by pressing the gear button.
4. Click the WRITE button
Advanced options (optional)
For some operating systems, Advanced options can be accessed by pressing the gear button.
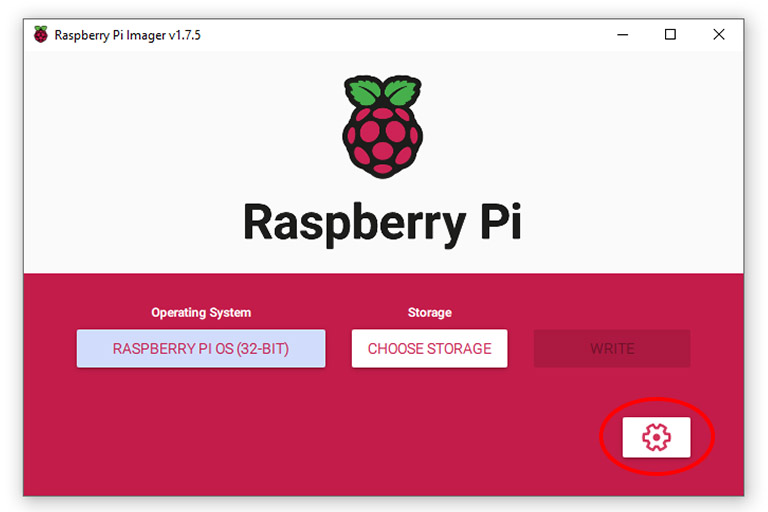
The Advanced options for an operating system can be accessed by clicking on the gear button of the Raspberry Pi Images after choosing an Operating System.
In the first section of the Raspberry Pi Imager’s advanced options, the hostname can be set and SSH can be enabled. The hostname will serve as the network name of the Raspberry Pi. By enabling SSH, PuTTY and WinSCP can be used to connect from a remote location to the Raspberry Pi on a network.
By scrolling down, the username and password for the Raspberry Pi can be set, and LAN configuration can take place.
Before the Raspberry Pi Imager starts writing, a warning message will appear to erase all data from the SD card — choose YES.
The Raspberry Pi Imager will start to prepare the writing process by opening the drive.
The Raspberry Pi Imager will start to write the data onto the MicroSD card while downloading the selected OS from the internet. This process is dependent on your internet speed.
Writing can be cancelled by pressing the CANCEL WRITE button.
After the data has been written, a verification process will start which might take another couple of minutes.
Then finally, the SD card reader with the written MicroSD card can be removed from the PC and inserted into a Raspberry Pi.
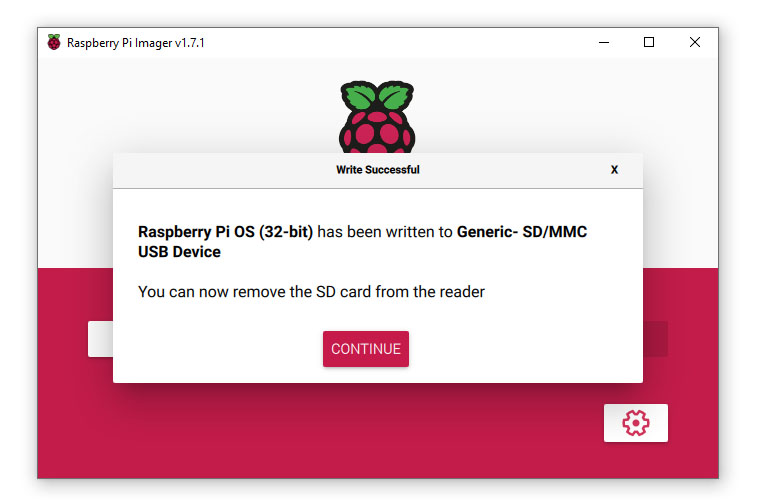
Raspberry Pi Imager after writing to a MicroSD card. “You can now remove the SD card from the reader”.
Installing an operating system to a Raspberry Pi using an image file
In the case where the required operating system is not listed in the Raspberry Pi Disc Imager (or NOOBS), a standalone operating system can be downloaded onto a PC and installed onto the Raspberry Pi MicroSD card.
This is a popular option for installing older versions of, then, Raspbian and for example OpenElect.
Using an image file pros
- Used to install non-listed, unofficial Raspberry Pi operating systems, which expands options
Using an image file cons
- More complex than using an imager tool
- Separate SD card formatter/erasor tool required
- Non-supported operating systems can be considered to be unsafe to use
- Needs a PC and MicroSD card reader to use
- Needs to be uncompressed using a ZIP-utility
Raspberry Pi operating systems are downloaded as image (.img) files and installed onto the SD card using a disk imaging software tool.
Supported Raspberry Pi operating system image files can be downloaded from various sources on the internet and are all installed in more or less the same way. They are usually downloaded as compressed files (often zip files) and needs to be uncompressed first.
When choosing an operating system, give preference to reputable builds from reputable websites. Also, note the compatibility of these operating systems with the Raspberry Pi model to be used.
Specialised disk imaging software to install an operating system to a Raspberry Pi include the Raspberry Pi Imager, Win32DiskImager and Etcher.
Using Windows32DiskImager
Windows32DiskImager is the more traditional imaging software and slightly more complex when compared with Etcher and the Raspberry Pi Imager.
The location of the uncompressed image (.img) file is selected by using the browse (folder icon) button and the drive letter of the SD card is choosable under Device. None of the other settings needs to be changed. The image is written to the SD card by using the Write (as supposed to the Read) button.
Using Etcher
The process for Etcher is much the same, choose the image, choose the drive and Flash.
After writing to the SD card was completed and its safe removal, the SD card can be inserted into the Raspberry Pi where it will boot into the installed operating system.
Installing an operating system to a Raspberry Pi using NOOBS
NOOBS is one of the old ways of installing an operating system to a Raspberry Pi. Since its last version (3.8.0) its functionality and ease of use have been merged with the Raspberry Pi Imager tool.
When available, NOOBS can either be downloaded from the internet as a .img file and written onto a MicroSD card or can be obtained as a pre-installed MicroSD card purchased separately or as part of a Raspberry Pi package deal.
As with the Raspberry Pi Imager, NOOBS offers a list of reputable and popular operating systems to be installed.
NOOBS pros
- Quick and easy to use
- Do not need a PC and MicroSD card reader to use
- Many popular operating systems included
- Only supported operating systems are included and are considered to be safe
NOOBS cons
- Included operating systems are now old and/or discontinued
- Operating systems limited to those featured on the tool
- The card has to be purchased
- Not readily available anymore
After inserting a NOOBS MicroSD card into the Raspberry Pi, it boots up with a menu where the desired operating system can be selected for the final installation.
To install NOOBS, its downloaded distribution file is simply uncompressed and copied onto a FAT32 formatted SD card. All the files required to boot and launch the NOOBS menu and start the installation of the final operating system will be in the download file.
Depending on the build, NOOBS contains options to install Raspbian (Raspbian Stretch at the time of updating), LibraELEC, Lakka, Data Partition, OSMC, recalboxOS, Screenly OSE, Windows 10 IoT Core and TLXOS.
From its official downloads location (the Raspberrypi.org NOOBS downloads page), the NOOBS distribution file can be downloaded as either the offline and network install or the network install only. The distribution file itself is compressed as a zip file and can either be downloaded directly or by using a Torrent manager.
 By using the offline and network install file, NOOBS can be installed without the necessity of the internet. It is much larger in size (about 1.7 GB) than the network install-only file but will contain all the required files to install any of its listed operating systems. The network install-only file is much smaller to download (about 35 MB) but will need an internet connection to continue to download and install the desired operating system.
If you’re planning to back up the file and/or install NOOBS on more than one Raspberry Pi at a time, the offline and network install file is worth downloading, but for single installs, the network install-only file will be faster.
After the MicroSD card has been formatted (see earlier) and the desired NOOBS distribution file is downloaded, the contents of the file are simply copied (drag-and-drop) onto the SD card. After safe removal, the SD card can be inserted into the Raspberry Pi.
If the network install-only distribution file was used, the first thing NOOBS will ask is for a network connection. Either an Ethernet cable or Wi-Fi can be used.
NOOBS will then give a menu with the options available which is selected to install the desired operating system.
After confirming that the operating system installation has been completed, the Raspberry Pi will boot into the new operating system.
Installing multiple operating systems to the Raspberry Pi
BerryBoot bootloader allows the installation of multiple operating systems onto one SD card. BerryBoot is similar to NOOBS, but instead of wiping the selection menu after an operating system was installed, it will boot back into BerryBoot.
BerryBoot was somewhat glitchy at the time of testing. The operating systems were somewhat outdated and, as with NOOBS, only had a limited amount of operating systems to choose from.
On the other hand, it is easy to use and comes in quite handy if you want to compare and/or test different operating systems. BerryBoot is also simply installed by copying the contents of the downloaded zip file to a FAT32 formatted SD card.
Conclusion
An operating system for the Raspberry Pi needs to be installed onto a FAT32 formatted MicroSD card.
An operating system can either be installed using a pre-installed MicroSD card (such as NOOBS), as an image downloaded from the internet or the Raspberry Pi imager tool.
The Raspberry Pi Imager tool is the easiest and quickest to use for the most popular operating system.
In most cases, an SD card reader and a PC are required.


