A static IP address is often used for Raspberry Pis. Here we show how to set a static IP on the Raspberry Pi using Ethernet and Raspbian.
Table of contents
Introduction
A static (vs. dynamic) IP address is often required for stand-alone Raspberry Pis. Whereas a dynamic IP address (dhcp) on a network changes from time to time, a static IP address will not. Using a static IP address will simplify and standardise network connections to a Raspberry Pi.
After a fresh install, the Raspberry Pi will be configured to connect to a network using a dynamic IP address. To make it accessible on all distributions of Raspbian, the process will mainly focus on using terminal commands.
Initially, a keyboard and screen will be required, but after a dynamic IP address is obtained, the terminal commands can also be done by using PuTTY.
All the Raspberry Pi B models have an Ethernet port. Raspberry Pi Models 3B and upwards have built-in Wi-Fi too.
Using an Ethernet connection is somewhat different from setting a static IP using a Wi-Fi connection.
To see what release of Raspbian is installed, the following terminal command can be used:
cat /etc/os-release
To see the Raspberry Pi model used, the following terminal command can be used:
cat /sys/firmware/devicetree/base/model
Accessing the terminal
Raspbian Wheezy, Raspbian Jessie Lite and Raspbian Stretch Lite will boot straight into the terminal immediately asking for a username and password. The default username:password for Raspbian is pi:raspberry.
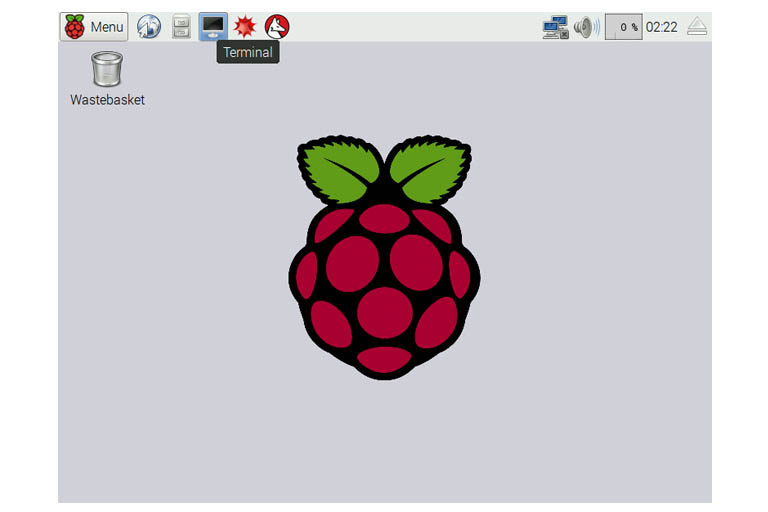
Raspbian Jessie and Raspbian Stretch will boot into the GUI. To access the terminal from Raspbian Jessie and Raspbian Stretch, click on the terminal button.

Raspbain Jessie GUI interface. To access the terminal, use the terminal icon on the top of the screen.
Setting a static IP on the Raspberry Pi and Raspbian
The Raspberry Pi should be booted while connected to the network. In an open terminal, the current IP address of the Raspberry Pi can be obtained using:
hostname -I
It can also be obtained, together with other network information, by using ifconfig. If the network settings haven’t been changed, this will be a dynamic/random IP address assigned by the router. This IP address will likely change from time to time.
To be able to change a dynamic IP address to a static one, certain network information needs to be collected and entered into the network configuration file.
Step 1 Collect the information needed for a static IP
The following network information will be needed:
- Current IP address (dynamic/dhcp)
- Desired IP address
- Netmask address
- Broadcast address
- Network address
- Gateway address
The Desired IP address is the address to be used as a static IP. Any unused IP on the network can be used.
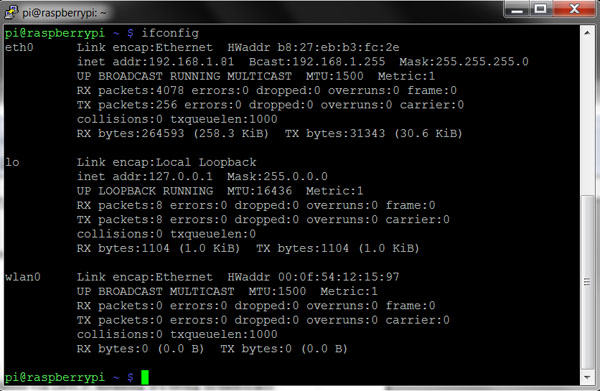
Go to the Netmask address (Mask) and the Broadcast address (Bcast), the ifconfig terminal command can be used:
For the Network address, replace the last number of the Current IP address with 0 – e.g. 192.168.1.81‘s Network address is 192.168.1.0.
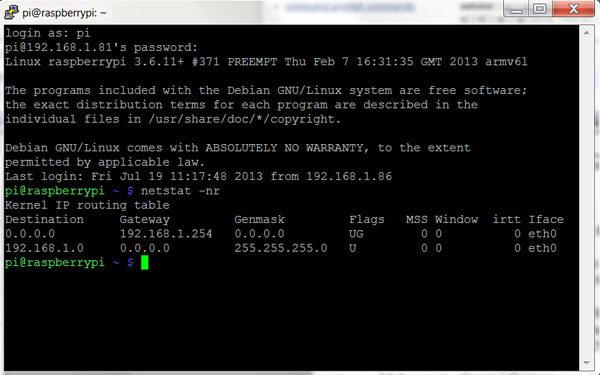
Lastly, use netstat -nr or ip route | grep default | awk '{print $3}' to get the Gateway address.

Getting a Raspberry Pi’s gateway address using the netstat -nr or ip route | grep default | awk ‘{print $3}’ command.
The following network information will be used during this post:
- Current IP address 192.168.1.81
- Desired IP address 192.168.1.16
- Netmask address 255.255.255.0
- Broadcast address 192.168.1.255
- Network address 192.168.1.0
- Gateway address 192.168.1.254
Step 2 Enter the information gathered
After obtaining the desired network information, it needs to be added to Raspbian’s network configuration file. The network configuration files and the way the information is added are different for Raspbain Wheezy (2a) and Raspbian Jessie/Stretch (2b).
STEP 2A EDIT THE INTERFACES FILE (RASPBIAN WHEEZY)
For Raspbian Wheezy, the interface file is used to store the network configuration. Start off by making a backup of the original interfaces file:
sudo cp -p /etc/network/interfaces /etc/network/interfaces.original
Open the interfaces file for editing:
sudo nano /etc/network/interfaces
The original interfaces file for Raspbian Wheezy will look something like this:
auto lo
iface lo inet loopback

auto eth0
allow-hotplug eth0
iface eth0 inet manual

auto wlan0
allow-hotplug wlan0
iface wlan0 inet manual
    wpa-conf /etc/wpa_supplicant/wpa_supplicant.conf

auto wlan1
allow-hotplug wlan1
iface wlan1 inet manual
    wpa-conf /etc/wpa_supplicant/wpa_supplicant.conf
Replace everything with the following lines (copy/paste):
# NOTES:
# These lines are a summary for switching between a static and dynamic IP on Raspbian Wheezy
# (The process for Raspbian Jessie/Stretch is different!)
# Last updated 06.07.2018

# For static IPs, there are 3 important sections in the /etc/network/interfaces file
# 1) General section
# 2) Wired settings section (eth0)
# 2a) Dynamic (dhcp) wired settings
# 2b) Static wired settings
# 3) Wireless (WiFi) settings section (wlan0 & wlan1)

# 1) ##########################################################

auto lo
iface lo inet loopback

# 2) ##########################################################
# 2a) For a dynamic Ethernet connection un-comment this section

#auto eth0
#allow-hotplug eth0
#iface eth0 inet manual

# 2b) For a static Ethernet connection un-comment this section & replace with your own values

#allow-hotplug eth0
#iface eth0 inet static
#address 192.168.1.16
#netmask 255.255.255.0
#broadcast 192.168.1.255
#network 192.168.1.0
#gateway 192.168.1.254

# 3) ##########################################################

auto wlan0
allow-hotplug wlan0
iface wlan0 inet manual
    wpa-conf /etc/wpa_supplicant/wpa_supplicant.conf

auto wlan1
allow-hotplug wlan1
iface wlan1 inet manual
    wpa-conf /etc/wpa_supplicant/wpa_supplicant.conf

###############################################################
This allows to simply un-comment the appropriate section for the settings needed (i.e. removing the appropriate #’s). For Raspbian Wheezy, un-comment section 2b and supply the network information as per Step 1. This will not change the original Wi-Fi (wlan) settings. Press Ctrl+X to exit and save the changes.
These changes are mainly aimed at setting up the eth0 to static (as suppose to dynamic). As from 05 05 2015 Raspbian Wheezy will assign an extra dynamic IP when connected. This will set a static Ethernet connection and dynamic Wi-Fi connection.
To check if Raspbian accepted the new network settings after the file has been closed, use:
sudo /etc/init.d/networking restart
If there are no errors, release the potential lease and reboot:
sudo rm /var/lib/dhcp/*
sudo reboot
STEP 2B EDIT THE DHCPCD.CONF FILE (RASPBIAN JESSIE/Stretch)
For Raspbian Jessie and Raspbian Stretch, the dhcpcd.conf file is used to store the network configuration. Start off by making a backup of the original dhcpcd.conf file:
sudo cp -p /etc/dhcpcd.conf /etc/dhcpcd.conf.original
Open the dhcpcd.conf file for editing:
sudo nano /etc/dhcpcd.conf
The original dhcpcd.conf file for Raspbian Jessie/Stretch will look something like this:
# A sample configuration for dhcpcd.
# See dhcpcd.conf(5) for details.

# Allow users of this group to interact with dhcpcd via the control socket.
#controlgroup wheel

# Inform the DHCP server of our hostname for DDNS.
hostname

# Use the hardware address of the interface for the Client ID.
clientid
# or
# Use the same DUID + IAID as set in DHCPv6 for DHCPv4 ClientID as per RFC4361.
#duid

# Persist interface configuration when dhcpcd exits.
persistent

# Rapid commit support.
# Safe to enable by default because it requires the equivalent option set
# on the server to actually work.
option rapid_commit

# A list of options to request from the DHCP server.
option domain_name_servers, domain_name, domain_search, host_name
option classless_static_routes
# Most distributions have NTP support.
option ntp_servers
# Respect the network MTU.
# Some interface drivers reset when changing the MTU so disabled by default.
#option interface_mtu

# A ServerID is required by RFC2131.
require dhcp_server_identifier

# Generate Stable Private IPv6 Addresses instead of hardware based ones
slaac private

# A hook script is provided to lookup the hostname if not set by the DHCP
# server, but it should not be run by default.
nohook lookup-hostname
Scroll all the way to the bottom of the file and add the following:
# NOTES:
# These lines are a summary for switching between a static and dynamic IP on Raspbian Jessie & Raspbian Stretch
# (The process for Raspbian Wheezy is different!)
# Last updated 06.07.2018

# For static IPs, there are 2 important sections to be added to the end of the /etc/dhcpcd.conf file
# 1) Wired settings section (eth0)
# 2) Wireless (WiFi) settings section (wlan0)

# 1) ##########################################################

#interface eth0
#static ip_address=192.168.1.16/24 # note the /24 at the end
#static routers=192.168.1.254
#static domain_name_servers=192.168.1.254

# 2) ##########################################################

#interface wlan0
#static ip_address=192.168.1.16/24
#static routers=192.168.1.254
#static domain_name_servers=192.168.1.254

###############################################################
As previously, this allows the user to simply un-comment the appropriate section for the settings needed. For Raspbian Jessie or Raspbian Stretch, un-comment section 1 and supply the network information as per Step 1 (routers & domain_name_servers are both = Gateway address). Leave the /24 at the end of the static IP address. Press Ctrl+X to exit and save the changes.
To check if Raspbian accepted the new network settings after the file has been closed, use:
sudo /etc/init.d/networking restart
If there are no errors, release the potential lease and reboot:
sudo rm /var/lib/dhcp/*
sudo reboot
Step 3 Check & test the new IP
After the Raspberry Pi has booted, get the newest IP address again by using:
hostname -I
There might be more than one IP shown, but the static IP just configured should also be on the list. The other IP addresses can be ignored for now (see the Optional Step below). While the other addresses might change, the static IP address will remain the same until the network configuration file has been changed again.
Optional step
After setting a static IP address, there might still be two or more IPs assigned to the Raspberry Pi. As of 05 05 2015, Raspbian started to force a 2nd, dynamically assigned IP address, even if a static IP has been assigned.
I found that if you deactivate this dynamic IP you are more likely to have internet connection problems, so I generally leave this as is and let it be generated.
The apparent reason for this is that some wireless routers may not accept clients with self-assigned static IPs. When a new client logs into a router, a dynamic IP is assigned, which is supposed to be requested via DHCP. If this doesn’t happen, i.e. if a ‘non-assigned random IP’ connects, the router will simply drop its packets.
This can be changed by telling your router that the assigned IP should be made static (linked to the MAC address). This is router dependent, but on my D-Link DSL-G225 router these settings are under DHCP RESERVATION LIST under the Local Network SETUP section.
Apart from the interfaces file, Raspbian also uses the dhcpcd.conf file in some way as well. To prevent the assigning of a second dynamic IP, the dhcpcd.conf file can be manually deactivated (not recommended):
sudo update-rc.d -f dhcpcd remove
By manually deactivating the dhcpcd.conf file, Raspbian will boot without using this file (stop the DHCP server from running) – meaning that you have manual power over DHCP.
To check if Raspbian accepted the new network settings after the file has been deactivated, use:
sudo /etc/init.d/networking restart
The process can be reversed using:
sudo update-rc.d dhcpcd defaults
The most current dhcpcd.conf will be used again after reversing it.
The simplest way to test whether the internet connection is still active after the DHCP server has been disabled is by using the ping command:
ping -c 5 google.com
Conclusion
A static IP address is often used for Raspberry Pis. This post showed how to set a static IP on the Raspberry Pi using Ethernet and Raspbian. The process of setting a static IP address on the Raspberry Pi depends on the distribution of Raspbian, but can always be done using terminal commands.


