WordPress theme developers often require different sized images to suit their layouts. Additional image sizes can be set using WordPress PHP functions.
Table of contents
Introduction to image sizes in WordPress
Each time an image is uploaded using the Media Library, WordPress will automatically resize the image to one of its default image sizes:
- Thumbnail size (150 x 150 px)
- Medium size (300 x 300 px)
- Medium Large size (768 px)
- Large size (1024 x 1024 px)
- 2x Medium Large size (1536 x 1536 px)
- 2x Large size (2048 x 2047 px)
- Big image size (2560 x 2560 px)
WordPress uses basic rules to resize these images and instructions were declared as PHP functions somewhere in the WordPress Core files.
Image resizing will only take place when the image dimensions of the original image are larger than the default image sizes. If either the height or the width is larger, the image will be resized.
Similar to the default WordPress image sizes, instructions to resize to additional image sizes can also be set using PHP functions. Depending on their use, additional image sizes can be set to be used as part of the responsive image set, to be used by back-end users with the WordPress Editor or to be used in theme template files.
While explaining the process, functions and variables, this post will show how to set additional image sizes, unset default and built-in image sizes and how to regenerate image sizes.
- Get the ROCCAT Burst Pro PC Gaming Mouse from Amazon.com
- Get the LG 22MK430H-B 21.5″ Full HD Monitor from Amazon.com
- Get the Corsair K95 RGB Platinum XT Mechanical Gaming Keyboard from Amazon.com
Identifying additional image sizes
Before anything is added, a WordPress website might already have additional image sizes set. It is important to identify them before setting new additional image sizes.
Additional image sizes will be theme and plugin dependant and are usually set in the plugin-name.php or the theme’s functions.php file.
Another important aspect to consider about additional image sizes is that they might be targeted at specific post types. WooCommerce, for example, only targets Product post types.
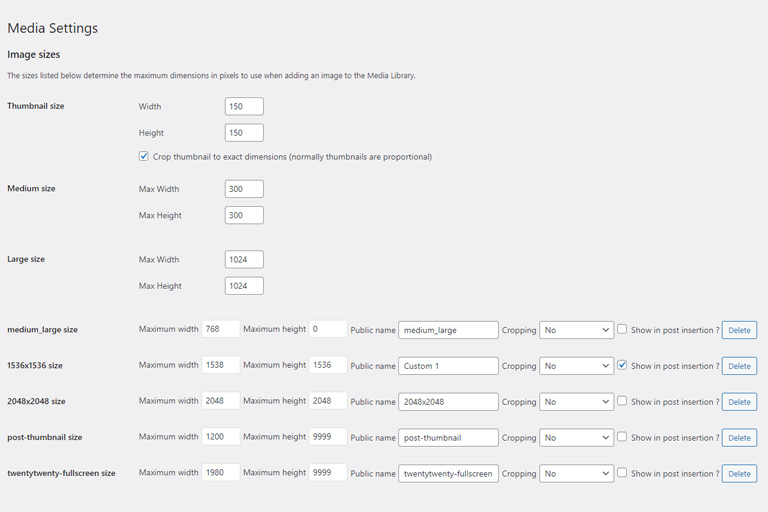
The easiest and most comprehensive way to identify additional image sizes is by using the Simple Image Sizes plugin. Later on, this plugin can also be used to regenerate newly set additional image sizes, so it’s worth activating it for now.

Showing image sizes using the Simple Image Sizes WordPress plugin. The additional image sizes will be shown below the default image sizes under the WordPress Settings -> Media tab.
In this case, the 'post-thumbnail' size and the 'twentytwenty-fullscreen' size was set by the TwentyTwenty theme.
Adding additional image sizes
As with the default WordPress image sizes, additional image sizes are added using PHP functions. These functions can be added to the (child) theme’s functions.php file.
The two main WordPress functions to add additional image sizes are:
- The
add_image_size()function (see Adding additional image sizes using the add_image_size function) - The
image_size_names_choosefilter hook (see Enabling additional image sizes in the WordPress Editor)
The content width variable
Although it might not make sense at the moment, WordPress has a sneaky variable called $content_width that is needed by some themes to function.
Its purpose is to set the maximum width of the main content area and oEmbed features, but it is also used by WordPress to override the maximum width set using the function and hooks discussed below.
The content width is set by themes in the following way:
if ( ! isset( $content_width ) )
    $content_width = 640;
Its value will be the maximum value of the image size values, even if the image size values are higher.
Adding additional image sizes using the add_image_size function()
The main step in adding additional image sizes to a WordPress site is by using WordPress’ add_image_size() function — which adds the image size to the global WordPress $_wp_additional_image_sizes array.
After an additional image size has been set using theadd_image_size() function, uploaded images will be resized automatically, but they will not be selectable from the WordPress Editor, yet.
Adding additional image sizes using the WordPress add_image_size() function:
// Add additional image sizes.
add_image_size( 'image-large', 1280, 640 );
add_image_size( 'image-small', 640, 320 );
or, more efficiently:
function bts_add_image_size() {
  // Add additional image sizes.
  add_image_size( 'image-large', 1280, 640 );
  add_image_size( 'image-small', 640, 320 );
}
// Fires after the theme is loaded.
add_action( 'after_setup_theme', 'bts_add_image_size' );
The add_image_size() function has four arguments:
name, string (required) – the readable/public name of the image sizewidth, integer (in pixels, optional)height, integer (in pixels, optional)crop, boolean (true/false, optional, default is false)
With the PHP function code above, two additional image sizes are set:
- A large image (1280 x 640 pixels),
'image-large' - A small image (640 x 320 pixels),
'image-small'
Note that the cropping options in both cases were left out, so by default they were set to false (proportionally resized to fit inside dimensions).
By adding these two additional image sizes, the Simple Image Sizes plugin will identify them as follows:
Regenerating new image sizes
WordPress will only start to generate additional image size images after their functions have been added.
Unfortunately, all images that were uploaded before a new image size has been set/updated will need to be regenerated.
Fortunately, there are a couple of easy-to-use WordPress plugins that are suited perfectly for this job. They include:
- The Simple Image Sizes plugin
- The Force Regeneration Thumbnails plugin
- The AJAX Thumbnail Rebuild plugin
Enabling additional image sizes in the WordPress Editor
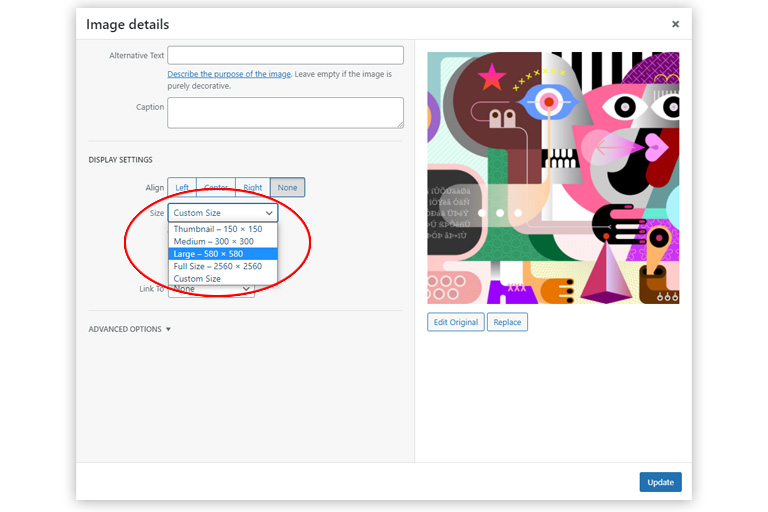
The default WordPress image sizes can be inserted into Post/Page content using the WordPress Editor. This is done using the Attachment Display Settings (Classic Editor) or Image Settings (Gutenberg).
This functionality can also be set for additional image sizes. Additional image sizes can be added to the WordPress Editor interface using the WordPress image_size_names_choose filter hook.
Unlike using theadd_image_size() function, the image_size_names_choose filter hook has no effect on the generation of image sizes, but purely on displaying them in the WordPress Editor. Only images that were uploaded and/or regenerated after the add_image_size() function was set will display in the Editor.
The WordPress image_size_names_choose filter hook uses the $sizes array to generate a list of image sizes that need to be displayed on the WordPress Editor interface:
// Adding additional image sizes names to Media drop-down.
function bts_add_image_settings( $sizes ) {
  return array_merge( $sizes, array(
    'image-large' => __('Large image'),
    'image-small' => __('Small image')
  ) );
}
add_filter( 'image_size_names_choose' , 'bts_add_image_settings' );
In this case, a custom function that handles the $sizes array was created. This function was called bts_add_image_settings(), but it can be given any name that is unique.
The (empty) $sizes array is passed into the function, which is merged with the new array of added items. The final $sizes array is then filtered through the image_size_names_choose filter hook.
The image sizes need to be added in a specific way. In this case, 'image-large' represents the readable name of the image size (which is used as the identifier), and 'Large image' represents the name that will be displayed on the dropdown menu.
More than one image size can be added to the $sizes array at a time. If this is the case, make sure each array item ends with a comma, except if it is the only or the last item on the list.
If they are not going to be removed (see later), the function can also be extended to include the 1536×1536 image size and the 2048×2048 image size:
// Adding additional image sizes names to Media drop-down.
function bts_add_image_settings( $sizes ) {
  return array_merge( $sizes, array(
    'image-large' => __('Large image'),
    'image-small' => __('Small image'),

    '1536x1536' => __('1536x1536'),
    '2048x2048' => __('2048x2048')
  ) );
}
add_filter( 'image_size_names_choose' , 'bts_add_image_settings' );
Removing additional image sizes
When an additional image size is not required it is best to remove it from the WordPress website.
Additional image sizes added by the child theme can be removed by simply deleting its code from the functions.php file and deleting the file variations from the /wp-content/uploads directory.
Additional image sizes added by WordPress, plugins or a parent theme need to be removed and its file variations need to be deleted from the /wp-content/uploads directory.
Be careful when removing additional image sizes. They might have a function somewhere, especially on older websites.
As with adding additional image sizes, removing them also needs to be done using WordPress PHP functions. These functions can be added to the plugin or (child) theme’s functions.php file.
The main WordPress functions used to remove an image size are:
- The
remove_image_size()function (see Removing additional image sizes using the remove_image_size function) image_size_names_choosefilter hook (see Disabling image sizes in the WordPress Editor)
Removing additional image sizes using the remove_image_size function()
As with adding additional image sizes, the main step in removing additional image sizes from WordPress is by using the remove_image_size() function. This function basically removes the image size from the global WordPress $_wp_additional_image_sizes array.
After an image size has been removed using theremove_image_size() function, images will no longer be resized when they are being uploaded. If the image size was added to the image_size_names_choose filter hook (see earlier), they will still be selectable from the WordPress Editor (see Disabling image sizes in the WordPress Editor below).
Removing additional image sizes using the WordPress remove_image_size() function:
// Removing additional image sizes.
function bts_remove_image_size() {
  remove_image_size( '1536x1536' );
  remove_image_size( '2048x2048' );
}
// Fires after most of WP functionality has been loaded.
add_action( 'after_setup_theme', 'bts_remove_image_size' );
In its simplest form, the remove_image_size() function only takes the readable/public name of the image size as an argument.
By looking at the WordPress Code Reference, the remove_image_size() function uses the unset() PHP function to remove the specified image size from the $_wp_additional_image_sizes array.
With the PHP code above, the '1536x1536' and '2048x2048' built-in image sizes are being unset.
The remove_image_size() functions were added to a custom function, in this case, called bts_remove_image_size(). This custom function can be given any name, as long as it’s unique. The function is then added to the WordPress 'after_setup_theme' filter hook.
Disabling image sizes in the WordPress Editor
To stop an image size from showing in the WordPress Post/Page Editor, it needs to be removed from the $sizes array and filtered through the image_size_names_choose filter hook.
Make sure it wasn’t added by your own code in the first place.
function bts_remove_image_settings( $sizes ) {
  unset( $sizes['thumbnail'] );
  unset( $sizes['2048x2048'] );
  return $sizes;
}
add_filter('image_size_names_choose', 'bts_remove_image_settings');
In this case, a custom function that handles the $sizes array was created. This function was called bts_remove_image_settings(), but the user can give it any name (as long as it is unique).
The current $sizes array is passed into the function, from which the required image sizes are removed/unset. The final $sizes array is then returned and is filtered through the image_size_names_choose hook.
Unlike using the remove_image_size() function, the image_size_names_choose filter hook does not have an effect on the generation of images, but purely on displaying them in the WordPress Editor.
Note that only images that were removed and/or regenerated after the remove_image_size() function was set will stop displaying in the WordPress Editor.
Conclusion
Additional image sizes can be created on a WordPress website using WordPress PHP functions. Unused additional image sizes can also be removed/unset.
Additional image sizes can be set to be available in the WordPress Editor Media settings or their sizes can be called inside template files.


